
Thrifted Nightgown with Armhole Tutorial: Thoroughly Thrifty Thursday

My Princess is not yet four, but she has quickly outgrown all her 4t clothing and has jumped right into 5t. All my friends have girls that are currently in those sizes or have other people to pass hand-me-downs to. Buying a whole new wardrobe for my daughter is not something I want to think about since we are trying to save money to go toward our garage project. I knew I would have to think creatively.
After a couple thrift store trips, I have a whole pile of clothing/fabric for her to wear. And I only spent $21. There are three shirts that fit her as is now, and a shirt and pair of pants that she will probably fit into in the fall/winter. I also have a whole stack of clothes to remake into something else.
She outgrew all her pj pants and shirts a long time ago but has been wearing them anyway. Since she likes her nightgown style pj’s so much, I decided to forego the 2-piece kind and make her some that she can wear now but also grow into. Most of the nightgowns I have seen in the store have princesses all over them and are made out of polyester. Since I want to be able to pass them down to Miss Tickles, I wanted cotton, and while we like princesses, I like to avoid having so many commercialized characters running around my house all the time if possible.
I found two long sleeve adult large cotton nightgowns for $1 each at the thrift store with plenty of fabric to be able to make her size. This is what I started with…

I searched pinterest for some inspiration and found this pillowcase dress style and this long sleeve style. I liked the dress part of the long sleeve, but I wanted the pillowcase style at the the top.
This is what I came up with…

She loves it.

Since I knew what I was doing then, I decided to make the same style with the second thrifted nightgown of the same style.

Just so you know the dark spots on her arm are marker and not some form of disease.
Two Nightgowns for $2 and about 4 hours of my time! I also have 4 sleeves and a row of buttons to use for other projects.
Armhole Tutorial:
I learned a new technique while making these nightgowns. I wasn’t sure how to do the armholes, and I didn’t want to use the polyester bias tape that we had since I want to keep it all cotton. Here is a step by step tutorial.
1. Cut a strip of fabric about 3/4 in. to 1 in. wide and an inch or 2 longer on each side of the armohole. Serge or zig zag stitch one side.
2. Pin unserged side to armhole, right sides together. Start in the middle and work your way out.
3. Pin so that they are easy to pull out when sewing.
4. Sew with a regular stitch setting with the presser foot at the edge of the fabric.
5-8. Fold strip to the underside of the armhole, starting with folding down the extra fabric at the top then folding the side over to pin.
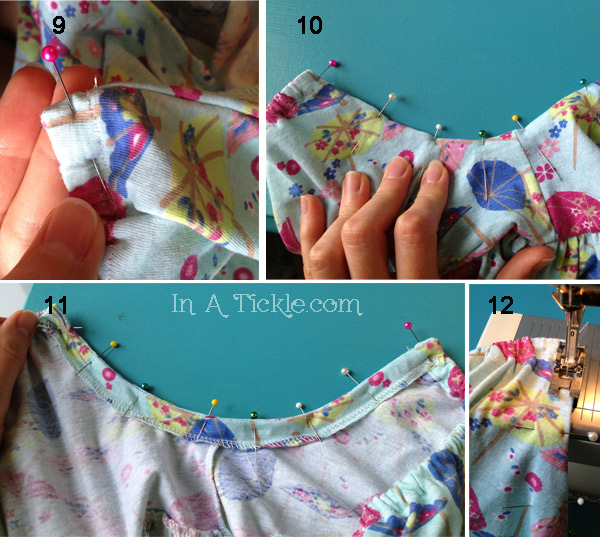
9-12. Pin and top stitch on the front side of the fabric.
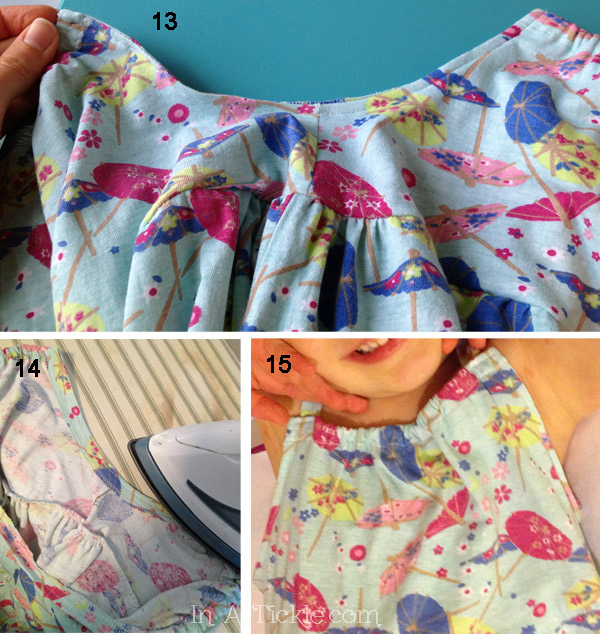
13. Trim extra thread.
14. Iron armhole.
15. Enjoy!
Brilliant!! Love this Idea!! I will be starting to save some of my girls reusable clothes now 🙂