Why Pa Built the Boat- Guest Post

Today, we are happy to have Jan’s husband, Tom Johnson, share a guest post. He is a wonderful husband, dad, accomplished entertainer, actor, singer, and musician, all around fix-it guy, remodeler, furniture builder, biker, and most of all–his grandkids adore him! You can find out more about the group he performs with here.

When our kids grow up and move to the ends of the earth, we have a wonderful invention now called video chat. I’m sure big businesses and other organizations utilize this tool, but I think it was really created for Grandma and me. Eighteen hundred miles is an expanse that even today doesn’t get breached often enough, so we make up for the time in-between visits with the computer and “Facetime.” (Yes, I’m a Mac guy.)

Last week we were chatting with family and having a great time. The Olympics had been a fun inspiration for Songbird (our Granddaughter in the Big Apple.) We had many chuckles watching her slide, “twizzle” and glide across the apartment floor on our monitor, especially when she stopped and fell on her “tushey” like some of the skaters did. She is so much fun!

The other day during our chat Songbird’s Mommy asked me:

“Pa, Songbird loves her ‘little people’ (Playmobil®), and she often asks me to hold out my hand so she can sit them in my palm. Is there something you can make that they can sit in, like a car or boat, for her to play with?”

I told her that I would love to, and Grandma could bring it out shortly when she comes out for the “birthing.” Oh, yeah, the family tree is expanding!

First, let me tell you what I made, and then I’ll tell you the why.

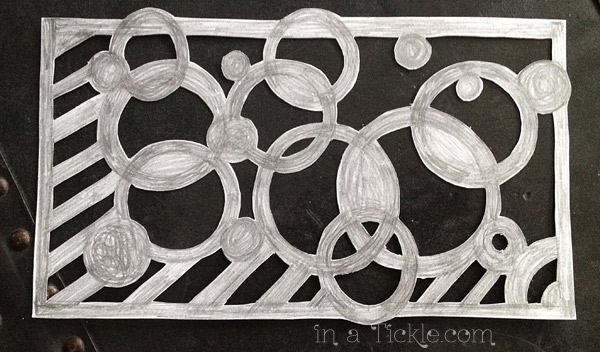
One scrap of wood, a scrap of paper, four tools, some time and a little paint and fabric and this is what Songbird’s little people get to play in!Little People Wood Sailboat

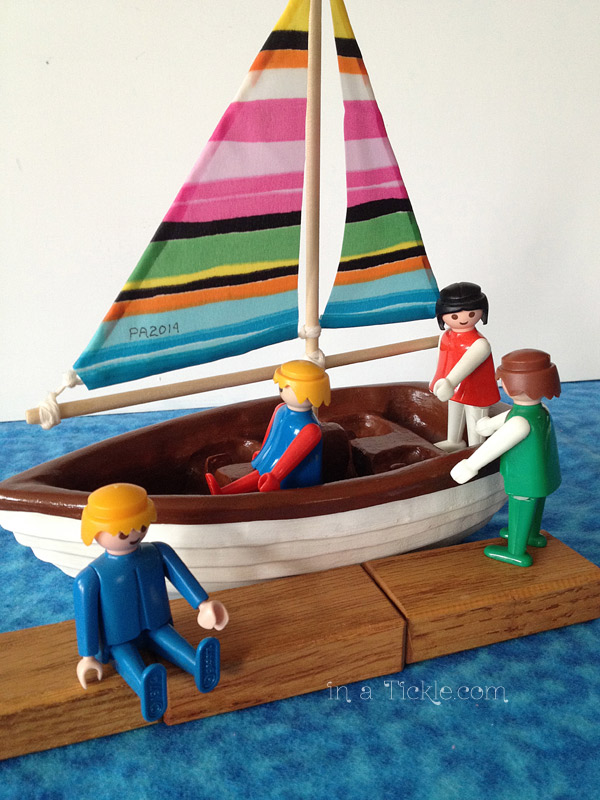
I simply drew out a boat shape on a piece of old basswood I had laying around. I could have used a 2X4 just as easily. Wood blank for carving boat
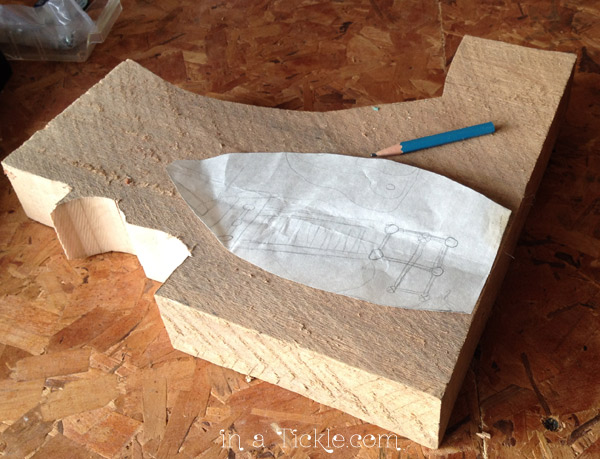
Using my band saw, I cut out the basic shape of the boat. Step two was to shape the prow of the boat with the belt sander. Step three was to drill holes in the top of the boat to take out some of the excess wood between the seats.Wood Working Tools 
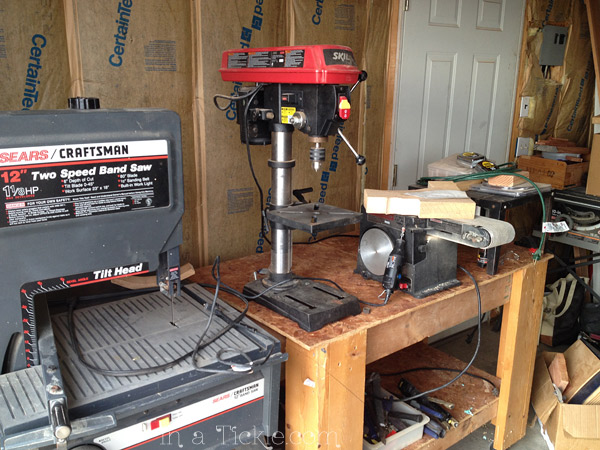
The final stage of construction incorporated my Dremel® tool. I bought some sanding drums for another project, and they were perfect for shaping the sides to look like planking and to fashion seating for the toys. (I didn’t want the “Little People” falling off their benches, so I indented where their their little “tusheys”  would fit.)Carved Boat 
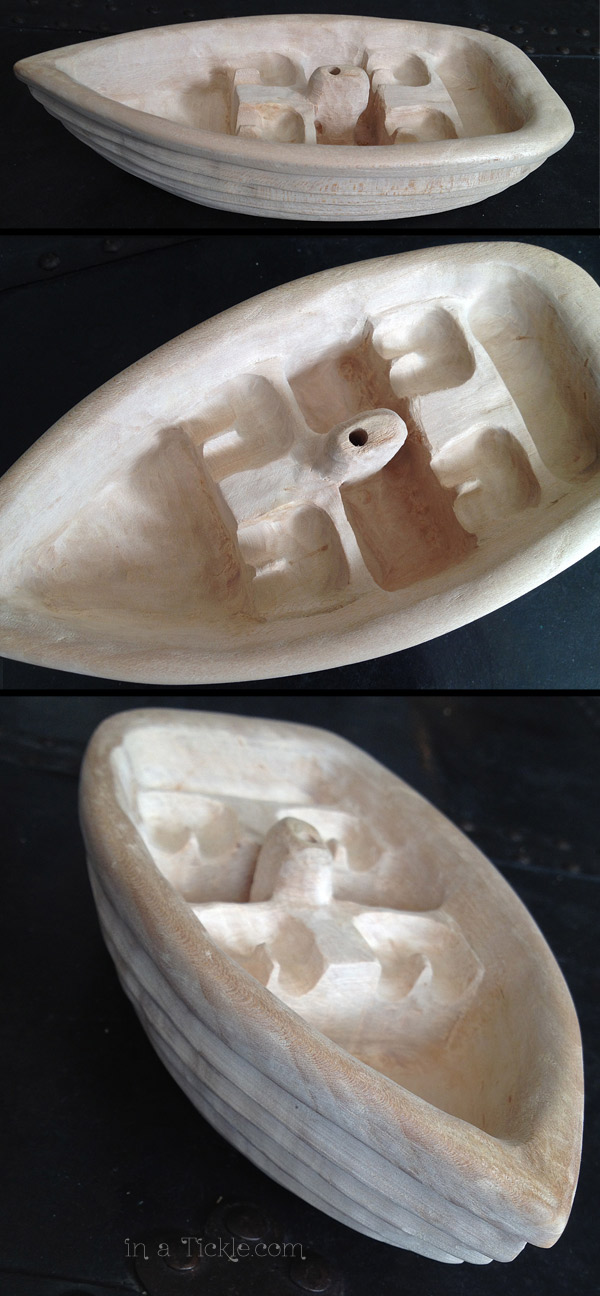
A little hand sanding smoothed out any rough edges and then on to the sails. A 3/16 dowel became the mast and the yardarm, and a little string glued to the ends gave Grandma something to attach the sails to.Making mast and sails

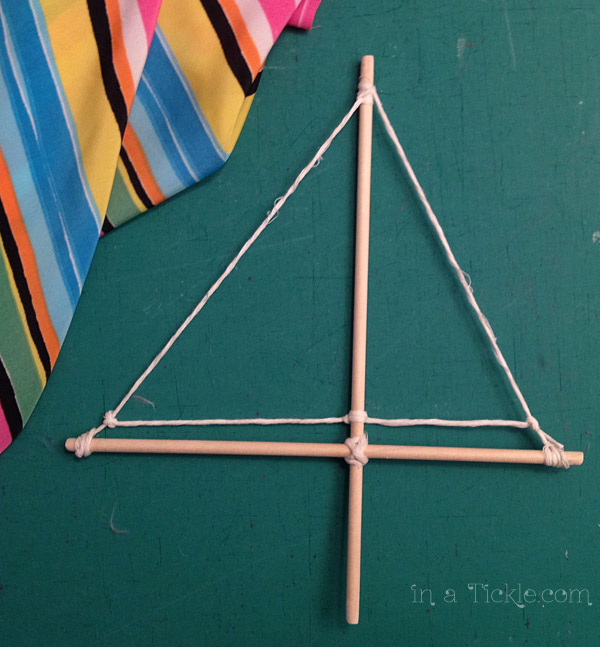
Speaking of Grandma, she added some great finishing touches to the boat by painting and rigging the sails.Paintng the boat

So here’s the finished project. One boat for Songbird’s little friends to have fun adventures on the oceans of her imagination!Sailboat-1

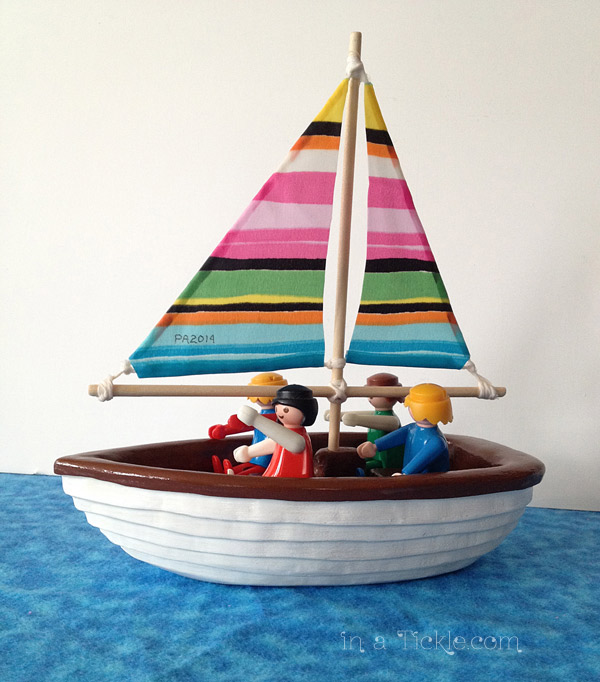
That’s the how, but more importantly is the why.

My daughter also said in that conversation:

“I could go online and buy something, but I don’t want just another toy for her.”

I went online and found a great Playmobil® boat with 55 pieces for $20 plus shipping. It had so much detail with all the little pieces, even a shooting cannon! But then I smiled and closed the search window.

Yes, I could buy her the boat and she would have it to play with amongst all her other toys. But then, it would be just one of her other toys.Sailboat-2

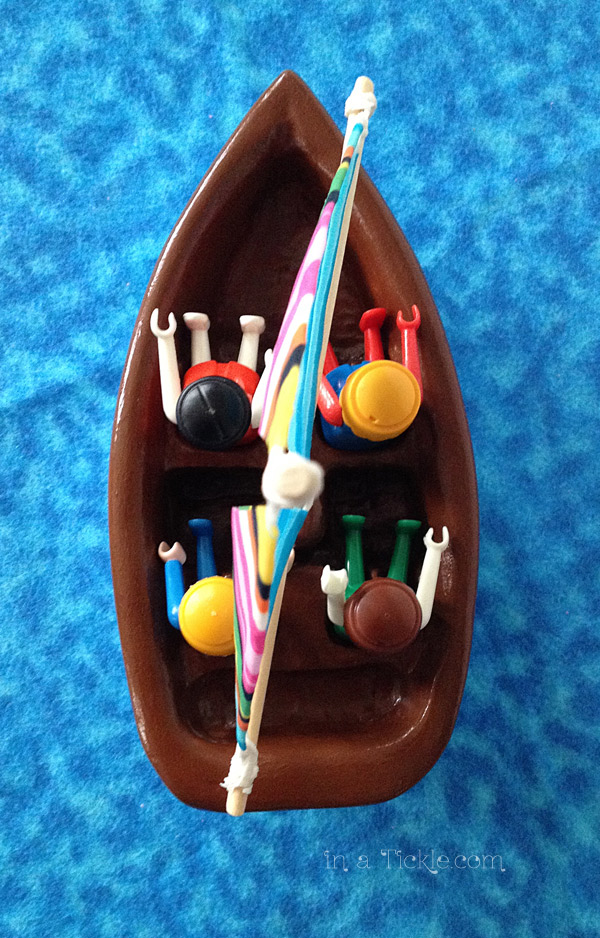
The magic that makes a toy more than just a toy, a sweater more than just a sweater, or a gift more than just a gift is the time and love you put into making it. In an era of microwave and online ordering, there is a growing number of people that are appreciating creativity over expedience. There is an old saying that our life is but a mere vapor and then it’s gone. What a wonderful thing to be able to give part of that “vapor” to a spouse, a child, a grandchild, a friend. Hone your talents and then create treasures that will transcend the generations. If you’re too busy “making money” to be able to make a memory for someone, then you are too busy.

But I’m probably preaching to the choir…Birch To Go Sailboat

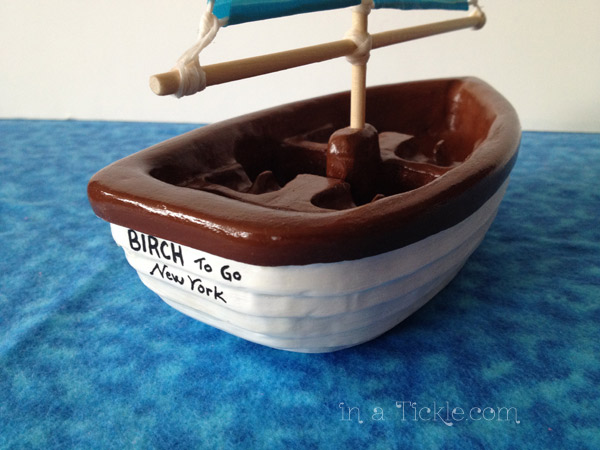
So, Songbird’s little boat, aptly named “Birch To Go” for the famly business, isn’t as accessorized as the store bought boat, but then when she gives it to one of her children, probably after I’m on the Other Side singing with the angels, she can proudly say, “Pa, made that for me when I was your age!” Sailboat-3Brings me a smile just thinking about it.Sailboat-4


Documented Life Project- Week 8

“Add a flap to your flap.” That was challenge for week 8 for the Documented Life Project. Those that are doing the challenges in their daily planners have added flaps to their planner pages so they have extra paper to work on the challenges. We are just doing the challenges as art project challenges on individual pieces of paper and don’t have a flap to which we can add a flap. Here’s what we came up with…

Jan:
I decided my paper was going to have multiple flaps. I chose a picture I had taken from my back porch a couple weeks ago and printed it from the computer. Finally this week the snow has melted away. I know it is still February and with the way this winter has been going, I am thinking we have not seen the end of snow. But I am eagerly waiting in expectation for spring.Week-8-DLP-JLast year I took pictures of various flowering trees and plants in my yard as they blossomed. So as you lift each flap, you can see a collage of spring blossoms that I expect to see again soon. Flaps reveal spring blossomsInside flapsI started to doodle a border around each flower picture but it was not showing up. So I stitched borders around each picture on my sewing machine.

Melinda:

We got a new mail out from Convoy of Hope today. As I looked through it, this picture caught my attention. I liked the color combinations and the words. I wanted to use that somehow.

Week-8-M1Use my handy exacto knife, I cut out flaps from another piece of cardstock to peek-a-boo the words I wanted to highlight. Then covered the flaps with paper and wrote my message. I finished off the edge with a strip of ribbon to match.

Week-8-M2

Week-8-M3


Creative Family Game Night

We recently were introduced to a fun new game by some good friends while visiting their home. The game is silly, fun, and a perfect game to encourage your family to think creatively and use imagination.

Quelf

The game is called Quelf. There are different categories that you do based on where your piece lands on the game board. You have to answer questions, act out something silly, or perform a random task. There is a lot of laughter and outside of the box thinking. If you have kids that are in upper elementary to teenage years, this version would be great family fun.

quelf jr

If you still have little ones at home, try the Quelf Jr. version. We bought this one after we got home from our trip thanks to a gift card from my Aunt and Uncle (Thanks!!). The game says it’s for 6 and up but the tasks are easily adaptable for younger ones if they are willing to play along. Miss Tickles is only 2 and she likes to play around and do or say the things the cards tell you to do (most of the time with a little help from her brother and sister, but it just makes for good togetherness).

Playing Quelf-1

Building a snowman while singing a holiday song

Playing Quelf-2

She had to talk using her sock puppet hand till her next turn

Playing Quelf-3

They love this game!

Playing Quelf-4

So silly! (Don’t mind the mess in the background. It always looks this way.)

I will admit, my Hubby and I don’t always like playing games with the kids. The games aren’t always that fun for adults. This game, however, has all of us laughing and having a great time! Grandma played with us one day and had a great time too!

(We are not getting any sponsorship or compensation for this post. We just like the game that much).

A Stitched Postcard

Last week I shared a post with you about the new Great Big Stitched Postcard Swap in which Melinda and I are participating. If you would like a creative project to work on and then be able to bless someone else somewhere in the world, be sure to sign up. It’s free and the latest you can register is Feb. 25, 2014. The next week you will receive info about where to send your card. There are even some prizes to win. Find all the information here.postcardswap550b

I got inspired this weekend to work on my postcard and want to share with you what I did. Because I am so ready for cold weather to end and spring to arrive, I was looking through some of my pictures I’ve taken of spring flowers in previous years. This photo became my inspiration for the postcard. It was taken in Central Park in New York a few years ago. TULIPS in Central Park

I started with a piece of watercolor paper cut to postcard size (I used 4 X 6 inch). To make the leaf and stem background, I painted with watercolors.

Watercolor backgroundMy plan was to make tulip flowers with tissue paper. I knew the tissue paper would not look as bright glued over this background, so I painted flowers with gesso where I wanted to put the tissue. I left texture in the gesso to give the tissue flowers dimension.Step 2 Gesso flowersAfter that dried, I tore pieces of tissue paper and glued them onto my gesso flowers. I also added a few pieces of bright green tissue for additional leaves and stems.Step 3 Tissue paper flowerI coated the whole thing with a layer of matte mod podge. When that was dry I hand stitched pieces of fabric on top of the tissue flowers to make fabric tulips and stems.Fabric tulipsThe theme of this postcard swap is CREATE. I found a piece of lace in my stash that would make a cute fence for my tulips and embroidered with yellow floss the letters to spell CREATE in each hump of the lace. Then I hand stitched the lace in place on the card with white floss.Lace on cardI wasn’t happy with the way the yellow embroidery floss looked and that the yellow threads were showing through from one letter to the next. So I used white fabric paint and painted over the letters as well as the lower part of the lace to brighten it up which I liked much better. Finished Postcard

For the back side of the postcard, I printed out my photo of tulips onto cardstock and glued it to the back of the finished card. I added a separate piece of cardstock for the address lines, wrote my message, and to complete the look, added a canceled stamp. I plan to put the postcard into an envelope to mail it. Back of PostcardNow I just have to wait until I receive the name and address of the person I am to send the card to next week. Melinda will be sharing her card in another post.

Won’t you join us in creating a postcard to swap?

Creativity on Ice

Do you enjoy the Olympics? I love watching the figure skating events– such grace, creativity, strength, flexibility, power, emotion, and beauty. As I am watching these skaters compete, I find my eye being drawn to the designs the blades of their skates leave on the ice as they twirl, glide and leap. Of course, only occasionally could I actually see the designs on the ice as they skated, but I was imagining what it would look like if you could have an arial view above the skaters and draw a line tracing their paths across the ice. What kind of design would you have? What would the ice look like if their skate program was being performed on clean, shiny ice where no one else had skated?

I googled the phrase “skate marks on ice” and found some images of ice with good skate lines. Here is one I especially liked (from This International Life).

IceSkatingMunich6

I also found this creative art work on Etsy by Alli Coate:Skating Print

Perhaps as you watch the Olympics you too are inspired by the artistry of the movement, dance, and music. What inspires you?

I thought it would be fun to pull out some pictures of one of the last times I’ve been on ice skates about a dozen years ago. We cleared a section of my in-laws’ lake for our skating rink in northern Wisconsin. Such fun!

Me-skating

Photographer must have missed my triple jump. Ha!kids-skating

Kids-skating-2Kids-skating-3


Documented Life Project- Week 7

The challenge for week 7 in the Documented Life Project was to draw a shape, repeat the shape and add color.

Jan:
When I read the challenge, I was tempted to just say my week 7 challenge was combined with what I did for week 6, since it was filled with circles. But since the whole idea of doing these challenges is to stretch my creativity and try new things, that would not work. I was playing with some doodling and came across a doodle design that was fun to draw. Helen Williams, the author of the blog, A Little Lime, where I found it, called this design a feather. (By the way, Helen makes beautiful art and shares many of the patterns she uses. Check out her blog!)

This is what I drew in my sketch book and decided that this repeating curly shape would be my shape for the challenge.Sketch

To me this design looked more like something growing in the ocean than a feather, so I drew several stalks with the repeating shape on cardstock, colored them, and cut them out. I glued this to a portion of this gelli print I recently made with shells.

Shell Gelli Print 2Sea Picture 1To plant my design in the ocean, I cut out a strip of the gelli print and glued it on the bottom of the picture over the base of my “shape” stalks. I also cut out a couple of the gelli printed shells and glued them at the floor of my ocean to add depth.

For the hair-like strands coming out of my plants, I tied knots in string and glued the strings in place with mod podge. Sea Picture CloseupSea Picture 2The repeating shape that became my plants still seemed too stark. I wanted them to look like they were in water. I wondered what it would look like to paint watercolor on plastic wrap and glue that over the whole picture. I painted a piece of plastic wrap and let the watercolor dry. Then I covered my picture with mod podge and laid the plastic wrap over the picture with the watercolor side down. Watercolor overlayIt was quickly apparent that idea would not work. I did not think the mod podge would dry underneath the plastic and I didn’t like the way the plastic looked. So I pulled it off and loved the effect left by the watercolor overlay on the mod podge.Sea picture Closeup 2Finished Sea Picture


Melinda:

I got behind on my pages so here is my Week 6. I wanted to do something with ballet because after getting home from our trip, I was finally able to go back to dance class. All of my classmates have been working on pointe lately which is both inspiring and frustrating because that has always been a dream of mine. My hope is to keep strong enough throughout my pregnancy so I can start doing pointe after I get back into dance after having baby. I had this picture by Mary Foley pinned to my daughter’s board. I liked all the different elements that were used to make this picture.

Pinterest-InspirationWhen making my page inspired by this picture, I decided to stick with using paper this time (I’m reorganizing all my craft stuff and didn’t want to get everything out at that time). I spotted the cover of a magazine that had beautiful icy branches that made me think of the snowflake dance in the Nutcracker. I wanted to keep with that theme as I did my ballet shoes and the rest of the page.
DLP-Week-6-MFor week 7, I chose circles as my continued shape.

I have been wanting to do some paper weaving on a page lately, so I pulled out some polka dot paper to use for my background. I then drew several circles with different doodle techniques and added my colors. I thought about what circles represented in my life at this point and thought of how they are never ending, so I wrote “Continue” to remind myself to just keep going no matter what comes my way.

DPL-Week-7-M

Sweatshirt to Slippers Transformation

Not sure how many years I’ve had these slippers but they are old. They are worn very thin and not doing a good job this winter of keeping my feet warm.Old SlippersBuying new slippers right now is not on my priority list, so I decided to take one of these apart and use it for a pattern to make a new pair of slippers. Slipper pieces for patternI wasn’t wearing this bright pink sweatshirt any more, so it became fabric from which to cut my slipper pattern pieces.SweatshirtI also had on hand some Insul-Bright fabric which can be used for clothing, home decor, hot pads– basically anything with fabric that needs a layer of insulation. I cut a piece of this for insulation in the middle of each slipper bottom to protect my feet from the cold tile floors.liningFor the soles, I cut a layer of sweatshirt fabric, Insul-Bright and imitation fleece fabric left from a project. The rest of the slipper was fleece fabric and sweatshirt fabric. I don’t think my sewing machine could have handled any more layers. I finally got them sewn together and my feet are toasty warm.New SlippersSlippers

Have you transformed an article of clothing lately? Before you get rid of a garment, be creative and ask yourself what else it might become and recycle by transforming it into something new and useful to you.

Creativity Brings Healing {Guest Post}

Today’s post is written by a good friend, Kathy Osenga. When she shared with me the experience of healing that was taking place in her life through the creation of a special gift, I asked if she would be willing to share her story with you.Bed-2

I know how to begin this post, ”Christmas 2013 was on the way and my hubby (Papa Rick) and I had committed to MAKE gifts for our 6 grandchildren,” but I’m uncertain how it will end for I have now discovered not only a love for being creative but also the love that flows through being creative to touch others.

Our 10 year old granddaughter, Princess, wanted a bed for her American Girl doll. Specifically, a bed she had picked out in the American Girl Store in St. Louis. Armed with a few pictures and some measurements, Papa Rick crafted a fantastic replica of her heart’s desire. Next it was up to me to create the beaded “curtains,” canopy, and bedding. The goal was to match Princess’ own bedding which her Nana and I had made. With fabric scraps in hand, I unsuccessfully attempted to purchase pre-strung “70’s” style beads. It became obvious that I was going to get to string the beads myself. So with the days already full I found myself stringing beads, creating patterns in pink, black, and crystal, late into the night.

As I added beads, I thought of the beautiful little girl I love so very much and imagined the joy I hoped to see on her face. However, I found my thoughts turning to my own childhood where there were no warm “grandma memories.” I couldn’t even remember receiving a single gift from either grandmother–just vague, unemotional, indifferent women. Definitely not what I had anticipated when I took on this project!

Over the next few weeks as I worked intensely to create Princess’ “perfect” gift, joy surged with each “darling” finished piece. But the negative memories kept coming. Tears flowed, and I saw the source of my own silent struggle with being a “good Grammy” to the six special blessings in my life.Bed-1

I began to pray with each finished piece that Princess would feel a Grandmother’s love each time she looked at her gift. With each finished piece, something began to happen in me too–a healing and soothing of the past took the place of pain, and a confident hope for my sweet grandchildren and the generations to the follow rose up in me. The old dysfunctional relationships had been cut off and a new legacy begun. The gift was an outpouring of my love through creating that would now be passed on.

Who knew that unleashing the creativity God placed within us could be such a powerful agent of love and healing.

~Kathy OsengaChristmas Doll Bed

Documented Life Project- Week 6

The challenge for week 6 of the Documented Life Project was to “Open your Pinterest board and be inspired.” As you can imagine, that opens the door to unlimited inspiration and interpretation for the challenge. I decided to only look at the pins on my art board and craft board and not look any further or I would spend all my time looking through Pinterest. This is my inspiration:Pinterest ImageThis picture was a project the artist did with her children and you can check out how she did it here.

I cut out small pieces of colors and designs I liked from some magazine pictures and glued them randomly on my paper to cover the whole page.Collage of magazine paperI knew I did not want to make a bird on a tree branch like the picture that inspired me because I like to take ideas I see and add my creativity to make it my own. I played around with drawing some butterflies but they were not cooperating with me. Since I was watching the opening of the Olympics, the circles became my inspiration. I drew my design and used an x-acto knife to cut out my stencil.Stencil CirclesI held the stencil in place with my fingers on top of the collage while I sponge painted black paint over the open areas of the stencil. Once I finished sponging, I hand painted a few more places on my picture where I felt I left too much of the collage showing. It needed a little more definition on some of the solid circles. Here is my finished page:Week-6-DLP-J

One of the fun things about doing these challenges is that I am encouraged to try something different- to “stretch” myself. Since I am only doing a small page for each challenge I can try things without it being overwhelming. That way if I find a new technique or idea that I want to try on a bigger scale, I can.

There are still people joining in on the Documented Life Project every week, so you can start any time. If you don’t want to do a planner or journal like many of the participants are doing, you can use the challenges like Melinda and I are. So far we have done each challenge on a half sheet of card stock just for the fun of creating. To see our project pages so far click on the Documented Life Project 2014 category at the right under Daily Posts.

Since Melinda just got back from her trip she is still catching up on things at home. We will share her week 6 challenge later.

New Great Big Stitched Postcard Swap

postcardswap550b

Melinda and I are excited to participate in the new Great Big Stitched Postcard Swap for this spring (2014) and invite you to join with us. You can read all about it here. The deadline for registration is February 25th. It’s free to register, so sign up today and start working on your postcard.

What is the Great Big Stitched Postcard Swap? Creative people from all over the world make a postcard based on their interpretation of the assigned theme and incorporate stitching in the design on the card. They send the card to the person assigned to them and wait to receive a card in the mail from some where in the world. The theme for this swap is CREATE. You can view some of the postcards from previous swaps to get ideas by scrolling to the bottom of the information page.

Last fall I made a postcard for the swap and you can read about what I did. The theme then was CELEBRATE and I chose my design to represent my celebrating the wonderful news of two new babies joining our family this year. Melinda was not able to participate in the swap last fall because she was in the middle of the first months of pregnancy of just trying to make it through each day. I had a lot of fun creating my postcard and sending it to England. I will admit I was a little disappointed that a postcard never reached my mailbox. It was to be coming from another country so who knows where it might have gone? But that isn’t stopping me from doing it again– the joy was in creating something special to send to someone else.

So will you join us in the Great Big Stitched Postcard Swap? Sign up by midnight, February 25th. Let us know in the comments that you signed up.

A peak at the postcard I made last fall…Postcard Closeup