Finding Inspiration in the Produce Aisle

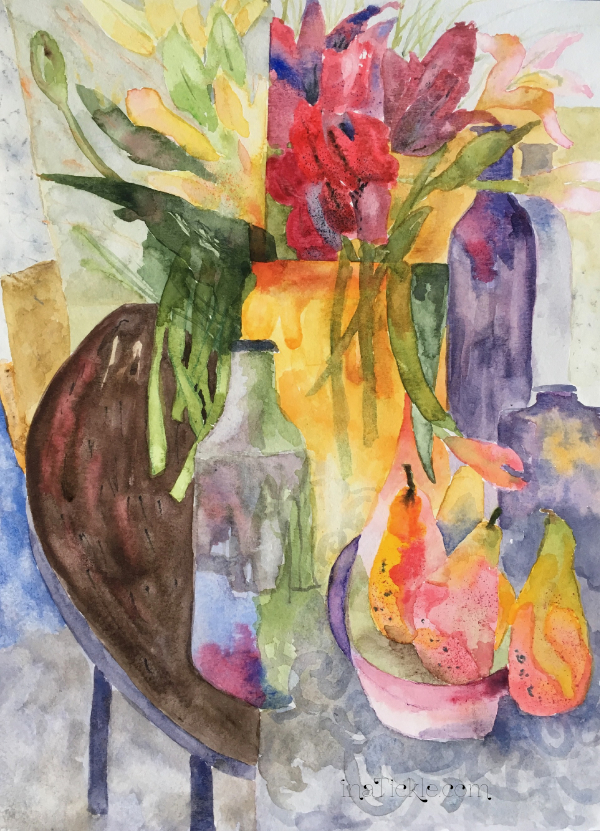
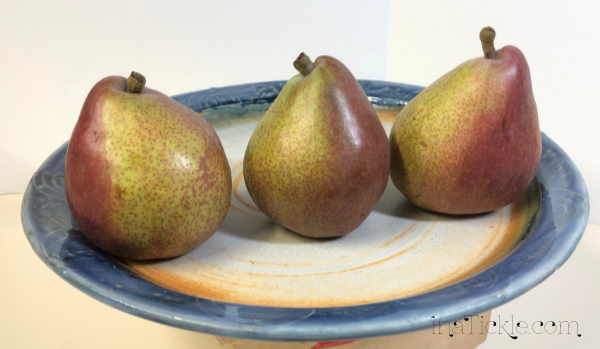
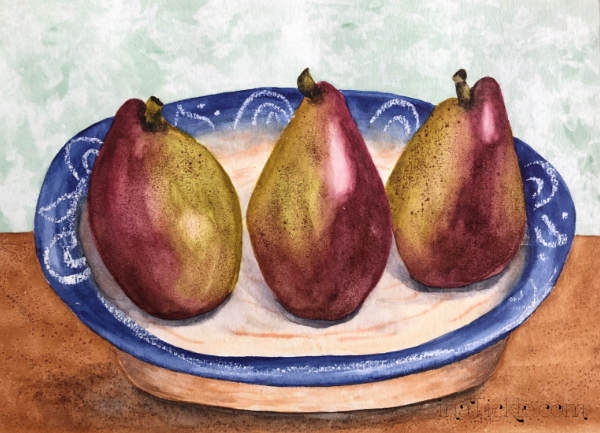
I wasn’t looking for art supplies or even for art ideas. I was just shopping for groceries, in a store that doesn’t even sell art materials. And there they were in the produce isle— the most beautiful red pears. I didn’t even think about what they might taste like, I usually buy green pears. All I could think of was how much fun they would be to paint!

My eight year old granddaughter and I are trying to get back into our routine of weekly watercolor painting sessions together. We have never done a still life together, so this was a first.

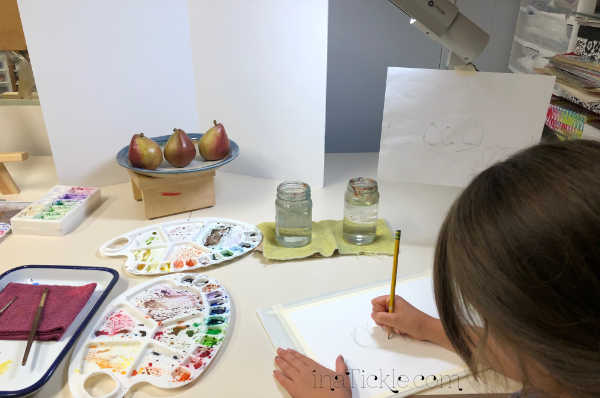
We each sketched the pears onto scrap paper for practice first and then onto our watercolor paper and started painting.

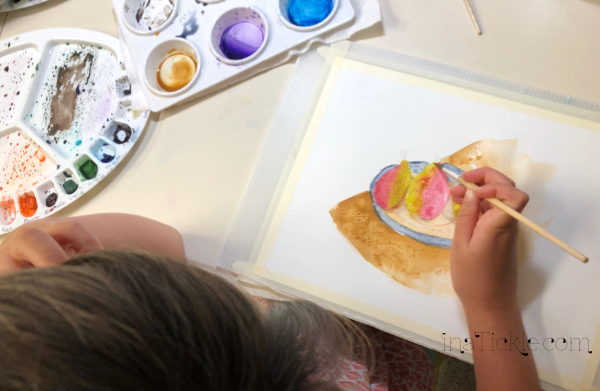
I’ll let you in on a couple little techniques we used in our paintings. We rubbed a wax candle onto the paper to make resist markings on our blue plates before painting. For the speckles in the pears, we rubbed a watercolor pencil on sandpaper over the wet paint.

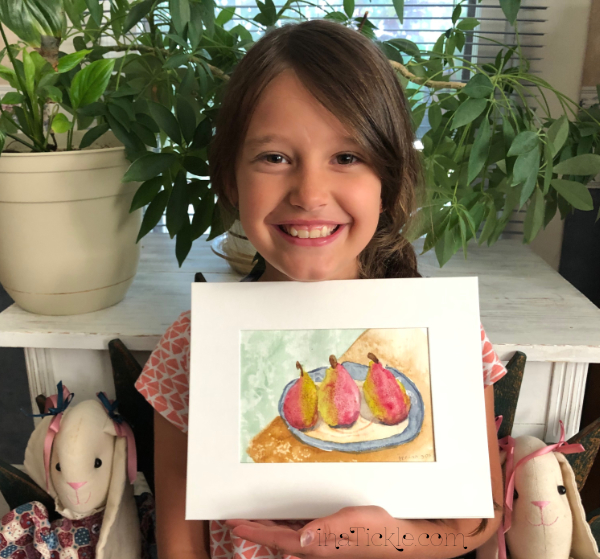
I think she did a wonderful job with her first still life painting! You can check out other paintings she’s done at Black Panda Art Studio. I feel so honored to be able to encourage this young lady in growing in her artistic abilities. She inspires me to grow!

Here is my painting of Red Pears on Plate:

We might be finding more inspiration in the produce isle!

Learning Negative Painting

During the pandemic quarantine I came across an artist whose work in negative painting fascinated me. Her watercolors were vibrant and the negative painting created beautiful depth to the paintings. I wanted to learn her secrets. I also wanted to support an artist whose work I admired so I purchased her DVD and learned (at least some of) her secrets. Her name is Susan Crouch. The tutorial I painted is called Carolina Morning.

Susan Crouch DVD and my finished painting.

Susan includes a printout of the wrens on a branch with a couple of leaves to help get you started. After drawing in the wrens, I masked off that part and layed down a wash of color for the lightest background. Then I followed her instructions for painting the wrens.

First background layer and wrens

The shapes and layout of the rest of the leaves are left to the individual painter to create. Following her guidelines I painted in my first layer of leaves. Or maybe I should say, I painted around my first layer of leaves! This is negative painting— to paint the shapes and space around your subject.

As those shapes dried, I began painting some texture and leaf veins inside some of the top leaves. I also negative painted more leaves behind the top leaves.

Negative painting requires a lot of thought process and you don’t want to go too dark too fast if you want multiple layers and depth. It took me days to complete the painting because each layer needs to be completely dry before adding more paint. It was also hard trying to keep from making my colors muddy in the layers.

My finished painting!

This style of painting appeals to me because I love trying to achieve various textures and depth in watercolor. I learned so much in following Susan Crouch’s tutorial and can’t wait to try the technique in more paintings. I looked back at a much earlier post of trying to learn simple negative painting and am glad to see I’m making progress!

Have you tried negative painting? It’s a good workout for your brain!

Brush Up on Your Skills

I love the opportunity to learn from other artists. Each one has something different to offer in the way they approach their art. You can brush up on your skills by doing things exactly the way they do in their demonstrations or you can learn new techniques to apply in your own way. The web-based learning platform Skillshare offers many thousands of classes in all kinds of subjects. I recently published my first class on Skillshare and would love for you to take my class as well as thousands of others. You can get two free months to try it out by using this link. (Disclaimer: I do get bonus compensation when you use my link, as well get paid for time students view my class.) My class is called Watercolor: Stained Glass Inspired Painting.

This past week, I’ve taken two classes on Skillshare by my friend, Mary Evelyn. She offers several watercolor classes and I recommend you take her classes, too! (website)

The first class was painting a purple finch. I took the background in a different direction than she did and added other color and salt. Salt provides amazing texture in watercolor, but there are no guarantees in how it will turn out. This time I must have caught the right moment because the salt ended up making leaf looking shapes for my tree background!

The second class was painting a dog-faced butterfly with an added bonus of learning about shadows. Take the class so you can see the trick she taught!

Do you see the little dog faces in the wings?

Even if you aren’t into watercolor, I bet you would be able to find many classes on Skillshare to interest you. I’ve taken classes in drawing, computer drawing perspective, motion graphics, mixed media, watercolor, pattern making, calligraphy, quilling, lighting, video editing and more. Now is a great time to add new skills and to brush up your old skills!

Beauty From Trash

I joined an art challenge called Quarantined Creatives Art Challenge hosted by Matt Tommey. It’s still open to join and it’s free. You are welcome to participate with several thousand other creatives (online)!

The first challenge was to reflect on the following verse and then create art from something that would normally be thrown away.

…and provide for those who grieve— to bestow on them a crown of beauty instead of ashes, the oil of joy instead of mourning, and a garment of praise instead of a spirit of despair. They will be called oaks of righteousness, a planting of the Lord for the display of his splendor.

Isaiah 61:3

As I looked around my craft room, I saw the boxes still sitting in the corner from the grandkids making acrylic pours (pre-quarantine) with the dried paint that dripped off the canvases. I’d also just gone through a bunch of receipts and tore off the long tails from purchases made at a craft store and tossed them in the trash can. I decided to use those “trash” items as well as a watercolor paper that I’d been experimenting on to make my art challenge.

I haven’t done any mixed media projects for a while so it was fun to work on this. I glued receipts randomly on the paper of my art journal and then brushed gesso on the top. The receipts gave a texture to the paper.

Then I pulled out my gelato paint sticks and quickly colored the paper.

Gelatos are water-soluble, so I used a brush and painted over the page with water. I took a paper towel and rubbed over the page to remove some of the water and also to blend in the colors better. You can see the texture that the glued receipts give to the page after coloring over them.

I tore the watercolor paper to make some vase shapes. My intention was to cut out shapes from the dried acrylic paint left overs, but once I pulled them from the plastic, I decided to use them as is. The shapes looked much like flower petals, so I went with it! After gluing those in place, I let the pages dry completely.

After letting it dry overnight, I used acrylic paint to add in some stems, leaves, white flowers, and other finishing touches.

So what do you have that you think is trash that you could turn into a beautiful work of art?

And whatever you may be going through in this time of uncertainty in our world, let the Lord turn your “trash” into something of value in your life.

Focus on Spring and New Life

Where are your heart and mind focused? It’s easy to get wrapped up in the constantly changing daily news. Many are out of work, separated from families, confined to their homes, and wondering what the future holds. Are you focusing on what you can’t do? Or are you focusing on what you can do?

In the past month, my part of the world (my yard), has made a giant transformation from gray, brown, lifeless vegetation to bright green leaves, flower blossoms, green grass, birds singing and building nests to lay eggs, garden seeds sprouting, bees buzzing, frogs chirping. You know what? It happens every year! Winter seems to last forever and then spring peeks out and new life appears. I am choosing to take a closer look at the new happening around me and focus on spring and new life.

A walk around my yard a couple weeks ago revealed forsythia, daffodils, and flowering quince.

They inspired me to try some negative watercolor painting.

Then while sorting through some old drawings I came across this sketch I made of a bird house.

This birdhouse sketch, done for an art challenge in 2014, was inspired by a photo taken on a trip in upstate NY. Since I’d just started seeing bluebirds out in the yard, I decided to combine this sketch, a bluebird, and forsythia bushes into a painting.

Then the redbuds started to bloom, so I painted a small branch of blossoms.

During this time of uncertainty, many artists around the world have been offering classes online for free to help encourage people to try something new or to expand their creativity. I came across a class by Birgit O’Connor to learn how to paint a large rhododendron flower.

Painting this has inspired me to try doing some closeups of other things.

Just like spring comes after winter with newness of life, this season we are going through in our world will change. Try to focus on the good things you see around you. Choose to be a good person, to love more, to care more, to find ways to create beauty in your world and share it with others.

What are you focusing on?

Paint Pouring

Acrylic paint pouring is fairly new in the creative craft world. It’s been on my “must try” list since I first started seeing posts and videos giving demonstrations. I love the beauty and unpredictability of the outcome. So much depends on the paint used, the pouring medium, and how it’s put onto the painting surface that you would never be able to make a duplicate. It’s also something beginners can do with amazing results.

I picked up a pouring kit on clearance at our local craft store after Christmas. Last weekend two of my grandkids were here for the day and wanted to try something new. So out came the kit and we had some fun. Many videos are online now to show you the various methods of doing paint pours, so I am not going to show you how— I’ll just tell you what we did. (I was too busy helping them to take pictures of each step!)

After watching a couple of videos, the kids decided to do a dirty pour. That method is to put several colors of paint into a cup, lay the canvas upside down on top of the cup and then turn everything over at once. Then the cup is sitting upside down, full of paint, on top of the canvas. When you pick up the cup, the paint pools on the canvas.

B not only tilted her painting in each direction to let the paint spread over the canvas, she also used a light plastic spatula to do some design work. J wanted to only use tilting for his design.

Many demos talk about using a blow torch lightly over the paint to help activate the cells (created by the silicone additive). We don’t have a blow torch, so I used my craft heat gun. It seemed to work fine. Once they were satisfied with the way their paint pour looked, the paintings sat untouched for several days to dry completely. It’s a messy project, so I suggest using gloves, small flat cardboard box and plastic to catch the paint falling off the edge, and cups or something to hold the canvas up off the surface while it dries.

Since there was an over abundance of orange paints mixed, I scooped up puddles of paint from the plastic lining the cardboard and poured it onto a small pre-painted canvas just to see what it would do.

It must have been coated with something, because the paint separated as it dried, leaving interesting cracks. Either the silicone or the pouring medium must have caused the underpainting to blur but still keep its color. It made for an interesting experiment!

All dry!

I definitely want to try more paint pouring and I’m sure the rest of the grandkids want their turn as well! Have you done paint pouring?

New Class Available!

I am so excited to tell you that I have published a class of my own on Skillshare! Skillshare is an online learning community in which you can take thousands of classes in a large variety of subjects. If you’ve followed my blog the past year, I’ve shared about several of the classes I’ve taken. I finally decided to jump in and create a class.

Skillshare is subscription based, but if you sign up through my link below you can get a 14-day free trial to check out everything they have to offer, take as many classes as you want, and you can take my class! Of course, you have the option of canceling anytime before the free trial is up if you decide it’s not for you. You can watch the intro to my class…

Use this link to sign up for a 14-day free trial AND take my class!

https://skl.sh/38T6c4Z

If you like my class, please leave a review and share it with someone else! Thank you so much!

Staying One Step Ahead

Everyone needs a challenge in their lives to keep growing and expanding their gifts. My challenge now is staying one step ahead of my granddaughter, (or maybe more correctly, keeping up with her!) I love her enthusiasm and desire to learn. She’s the, now 8 year old, girl who paints with me every week.

In the past month, she entered an art contest for the WonderWorks Branson attractions being built locally. She just got notification her piece was chosen to be on display in the art gallery this next year when they open. She is so excited! (I’d show you her painting but we are not sure if we should share it online yet.)

She also set up a FaceBook page (with parent’s help) to feature her art called Black Panda Art Studio. She loves all things panda. Remember her first paintings I shared with you? You can follow her on FB to keep up with her art.

My granddaughter also sold her first commissioned painting. She wants to sell paintings to help pay for piano lessons and summer camp. She just got another commission request this week to start working on. Here is her first:

A couple weeks ago she informed me that she’s been doing a lot of thinking and made a decision to buy a building and make a studio/art gallery for her to work in. I asked if I would be able to display my art there too. She said, “Of course! You can work for me!”

This week we painted a bird from a photo online.

And here is my painting:

I better get my running shoes on so I can keep up with her!

Focus to Perfect Your Skills

Over six years ago I wrote a post about my dreams of watercolor painting. You can read the whole post here. I longed to learn to paint well with watercolors, but my paints tended to stay on the shelf… from fear that I wouldn’t be able to do it well. Here’s a portion of what I wrote:

For so long now I have been drawn to watercolor. It fascinates me. At the same time I think I have been fearful to really do it. What if I am no good? I want to be able to do it well. It’s easy to default to creative activities that I already know I can do well. I even feel no fear in trying new creative things and posting the results on the blog (even if they are not that great) in trying to encourage you (our readers) to find the creativity in yourselves.

Perhaps watercolor will be my “thing,” and that is why I am having a hard time starting. I have been fearful of failure. As long as the potential is sitting there in the box, I can continue to dream about doing it. I can paint great creations in my head without anyone being able to see whether or not I can really do it on paper. But now I have taken a class from a master watercolor artist who encouraged me to keep going. A few bricks have been knocked out of that wall of fear. I need to pull the watercolor supplies out of the box and paint and paint and paint until the bricks have all been knocked out. When we interviewed Skip and Racheal Mathews, we found out Skip determined to make 15,000 flame painted butterflies in order to perfect the process when he was first learning to flame paint. If I really want to be a master watercolor artist, do I have that kind of determination? I have to start… and then keep going…

In the past year, I focused more on watercolor than any other creative activity. I’ve taken online classes, read books, and started mentoring my granddaughter who loves watercolor. By focusing more on developing this skill, I am seeing growth and increasing in confidence. Just doing it more and more is knocking the fear out and I am starting to feel like I can be a watercolor artist. I’ve only shared a few paintings this year (some of what I’ve done with my granddaughter). So I have decided to be brave and post several more pictures I’ve painted…and I do plan to keep going now that I finally started.

Trying to create texture with watercolor fascinates me. I was inspired by a photo I found online to paint this bird.

I also painted this cardinal with inspiration from a photo I found online.

Painting from tutorial from the book, Taking Risks With Watercolor by Shirley Trevena.

First flowers of spring from my yard.

Capturing the sea

Abstract flowers in the wind

My sister’s flower garden

Grandkids watching the ducks at the lake

Grandkids off on an adventure

Birch tree tutorial from Jean Lurssen class on SkillShare

Flowers at Lily Lake in the Rocky Mountains

Niagara Falls

Under the Falls

Shadowbox Inspiration

Last week I took a granddaughter to visit crafters at Silver Dollar City’s annual craft festival. This year we met a sweet crafter named Amy Koch of Paper Loft Creations. She creates adorable shadowboxes using wood, paper, fabric, string, rocks, paint, lights, and more. Her creations each look like a storybook come to life and I imagine she has storylines of her own running through her head as she makes each shadowbox. It’s obvious she loves books because almost every shadowbox has little books included in the design. Amy was very sweet to my granddaughter in showing her how to roll paper to make a flower and gave her a couple to take with her. She also encouraged her to be creative. You can check out what Amy does at her Facebook page. When we left the park for the day, I asked my granddaughter which was her favorite booth we visited, and she didn’t hesitate in answering that she liked Amy’s booth the best.

My granddaughter was so inspired by Amy’s treehouse shadowboxes that when they came to my house the next day, she and her big sister and younger brother decided to make their own shadowboxes from cardboard boxes. They gathered sticks and other items from around our yard and I cut out boxes for them. First order of business was to paint the inside of their boxes.

They found wood scraps in Pa’s leftovers to use for suns.

While the paint dried, they figured out how they wanted to arrange their sticks and wood scraps.

After the paint dried, the girls used glue guns to put everything in place. Besides the sticks, they made some pillows and little books for accessories.

Little brother used LOTS of white glue to put his creation together!

They were all so proud of their creations and loved every minute of the construction.

If you’ve been following my blog, you may recall last spring all of my grandkids were visiting and had a wonderful time creating a fairy garden as well as making fairy dolls. The girls have since made several more fairy dolls and were excited to see if their dolls would fit into their treehouses.

I’ve been told that the fairies love their new houses!

The girls also made a boy fairy doll for their younger brother and he likes his house too!

Thank you Amy Koch for being willing to share your love of art with us and taking the time to show my granddaughter how to make a paper flower. You made an impression and gave her inspiration!