Interview with Owner of Cakes By Kimberly

Weekend Wonderings

Have you ever wondered how the people running creative businesses got their start? We thought it would be fun to feature someone every once in a while who is pursuing their dreams using their creativity. Our first creative dreamer is a close family friend who grew up with my kids. Kimberly Wheeler is the owner of Cakes By Kimberly, and she graciously agreed to answer a list of questions about herself and her creative business.Cakes by Kimberly

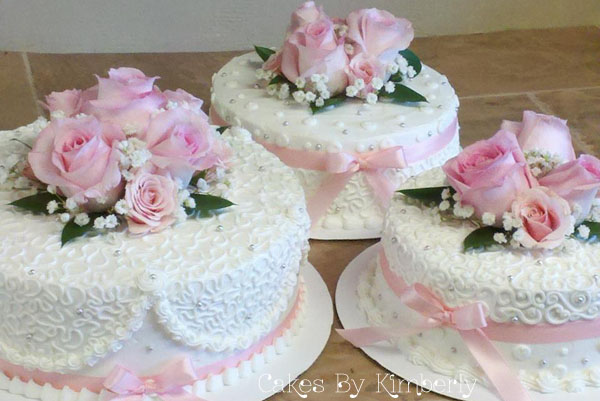
Tell us about how you got started decorating cakes.

It all started with my need for a summer job. My mom was working in the floral department of a local grocery store and knew the bakery was hiring cake decorators. I had never really done any cake decorating other than cookies at Christmas time or spreading icing on a cake that was still in the pan, let alone hold or do anything with a pastry bag…needless to say, my skills were very limited…but I needed a job. I applied…I was hired…and, surprise! I liked it! Who knew the job I kind of turned my nose up at would lead to my own cake business 12 years later.

Cakes By Kimberly

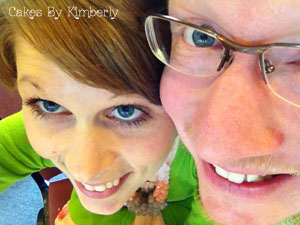
Kimberly with her very supportive husband, Richard

When someone commissions you to make a cake for them, do they tell you exactly what they want? Or do they give you the freedom to be as creative as you want? What process do you go through to figure out how you are going to decorate a cake?

Sometimes yes and sometimes no. I have a lot of repeat customers, whom I am so thankful for, and they usually give me the gist of what they are wanting and then allow room for me to be creative. Some people say, “Oh, whatever, you’re the expert…just make it pretty.” When I hear that I always try and nail down a few more specifics as the category of, “Whatever”, is pretty broad…and whether they know it or not, most people do have a vision for their cake, and I really try with each cake to make that come to life.

Process:
First of all would be price range as this determines the extent of decoration and size of cake.
Next- Theme/Design/Their vision for the cake
Third-colors
Fourth-wording 

And then I just start thinking, drawing out some ideas, looking online for pictures to get my creative juices going, and…voila’ ! A custom cake is born!Cakes By Kimberly

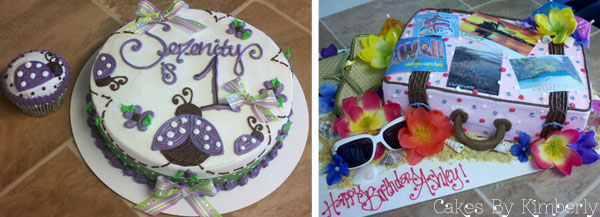
You’ve started branching out doing other yummy edibles. What are you doing and what motivated you to start that aspect of your business?

I’ve started making some gluten free refined sugar free items such as biscotti, granola, bread, muffins, pancakes, cakes…and hopefully soon some cookies and brownies.

This is a whole different ballgame and definitely a learning process as I figure out how different flours and ingredients work, or don’t work, together.

It can be fun and frustrating at times..but very exciting and rewarding when I am able to create a recipe that works and is enjoyed by all who try it.

My motivation for branching out to this area involves several reasons…one being, for many years I struggled with Anorexia and Bulimia. Although I have made much progress, the road to getting my health back has been rocky, and one big side effect of the eating disorders was that I completely screwed up my digestive system. My tummy is very sensitive, so I have had to do a lot of adjusting and found by cutting gluten, refined sugars, and dairy…I felt better. But I still needed the whole grain fiber whole grain flours offer, and I also wanted some treats that I could enjoy and feel good about eating.

Also, I am finding a lot of kiddos have food allergies and can’t do normal birthday cakes or other baked goods…hense the bread, muffins, and pancakes. I’ve actually been making these for a little boy who has had a lot of problems with food allergies, and I’m keeping his freezer stocked with all sorts of great stuff! I’m thrilled that he is loving all the goodies! (I think his mommy is too). I would love to do more bulk baking like this for other people that face the same challenge.

And thirdly, there are also just a lot of people becoming more aware of their sugar intake, and I wanted to have an available option for them as well.

The cost of these items is a little different as you are paying for quality ingredients…but it’s worth it!gluten free goodies

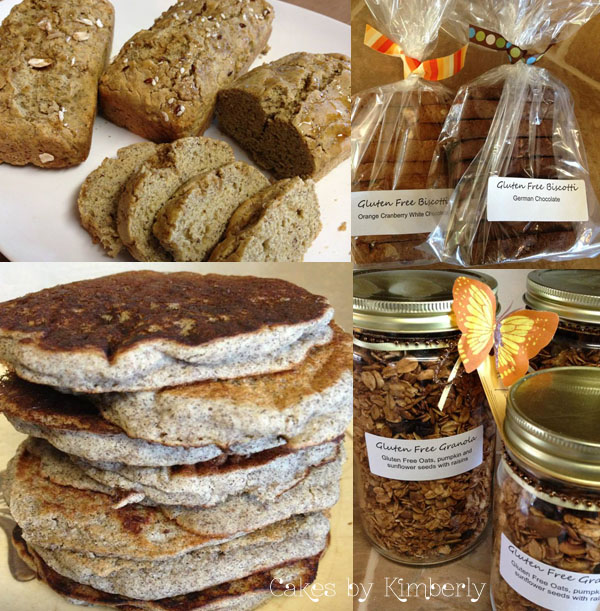
What kinds of creative things did you do as a child?

As a child I can remember doing TONS of creative things as my mom and dad and grandmas and grandpas are all very crafty…it’s just in the blood! 

I loved to draw and doodle! I went through a phase where all I would draw was Garfield and Friend’s cartoons, then I moved to setting up still lifes and doing charcoal/black and white drawings. My church bulletins were forever (and still are) covered with my flowery doodles…let’s just say I always left my mark.

I also liked to sew as well and made lots of Barbie doll pillows and blankets…I also went through a phase where I did the plastic canvas with the yarn. I made an entire Barbie doll living and dining and bedroom set…chairs, couches, pillows, tables, lamps, dressers, entertainment center, t.v. vcr, speakers…you name it…I made it! My nieces are even playing with it now…makes me smile every time I see them enjoying it!Cakes By Kimberly

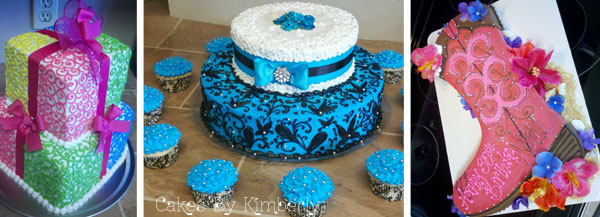
What other creative things do you like to do now as an adult?

I like to crochet (love to make baby blankets for all my friends and sister’s having babies-but they started popping those suckers out so fast I couldn’t keep up- so I switched to making hats and scarves for Christmas presents.) *Side Note from Melinda–We got one of those beautiful crochet blankets from Kimberly when Ninja Boy was born. We still have it and use it!

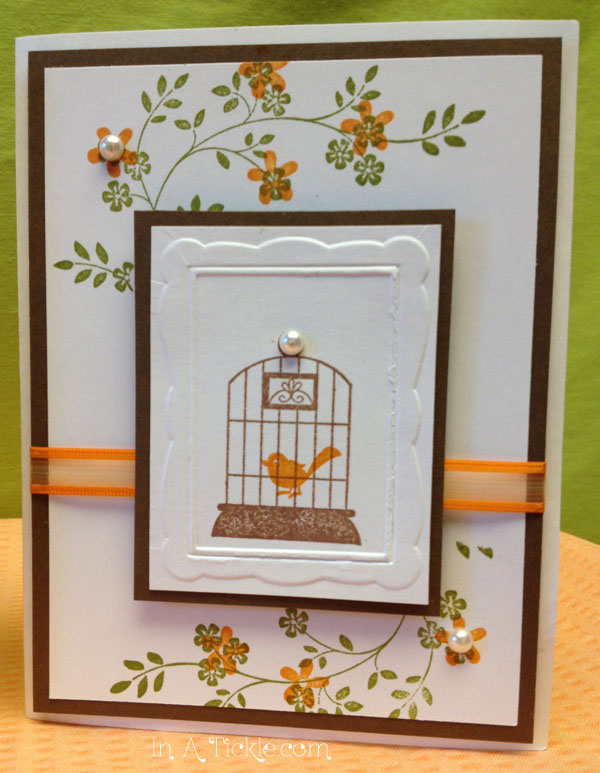
I also like to make my own greeting cards. I even wrote and illustrated a children’s book for my niece, which was published! It’s called, “God’s Fruit Basket” and is about the Fruits of the Spirit.Cakes By Kimberly

What kinds of things inspire you to be creative?

I love color! I love patterns! When I walk into a craft store and see the scrapbook paper…I see cake! I think..wow..this would be neat on a cake! Fabric is the same way. Or ribbon. I am learning to think outside the box a little more and stretch my creativity to places it hasn’t gone yet…it’s a process, gaining confidence in my abilities, and being willing to try something new..even if it doesn’t work the first time…learn from it. And then try again!Cakes By Kimberly

What encouragement can you give to someone just discovering their creativity?

Embrace the ideas! Try it, why not? You’ve got nothing to lose. Who knows, you might be on the brink of an amazing discovery! Also, don’t be afraid to fail or make mistakes. We aren’t perfect; we are human. You’ll always learn something, even if it doesn’t turn out the way you thought. Learn to say, “Oh well, won’t do that again,” then move on.

Don’t spend too much time looking at what others are doing. Limit your time on Pinterest, or Google or Facebook. It’s easy to see all the amazing ideas, and before you know it, your search for a yummy brownie recipe, decorating or party idea, or whatever you might be looking to be inspired by…has suddenly made you feel worthless…like you never have any good ideas..and before you know it…your excitement to be creative has greatly dwindled.

I’ve learned I can only take a peek at a few ideas…just to get my juices flowing and figure out a direction to go…then I turn it all off and allow the creativity God has put inside me to do it’s thing. We are all different- that’s what makes us unique! The last thing you want is to be a cookie cutter designer, doing it just like everyone else…just. be. you! Just do your thing!Cakes By Kimberly

Is there anything else you would like to share about your business?

My business is fun. My business is challenging. My business can be stressful. There is a lot to learn about running your own business. No matter how big or how small…there are a lot of facets, and also a lot of different directions it could go. I’m just taking it a day at a time, being thankful for the provision God has brought into my life and praying that He will give me the creativity I need with each cake or specialty baking order. I don’t know what’s around the next corner with it; I do know I just want to do the best me that I can be.

Shepherd of the Hills 50th Anniversary Cake

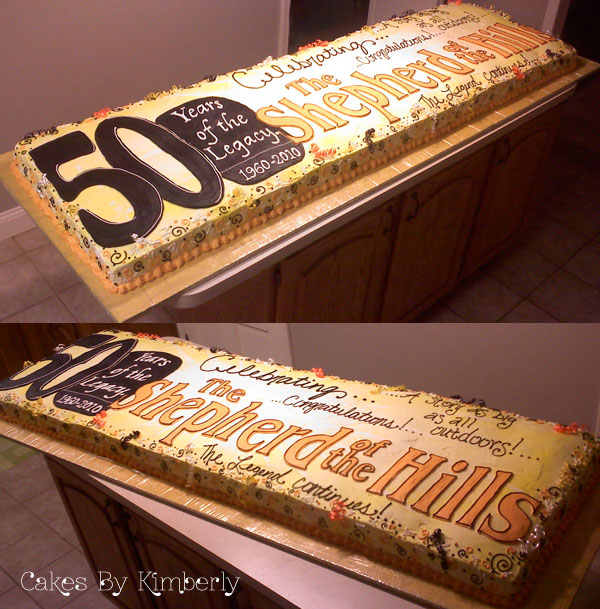
Kimberly’s biggest project- Shepherd of the Hills 50th Anniversary cake. The board for the cake was over 6 feet long. It took 44 individual cakes, 5 gallons of icing, 5 gallons of oreo cookie cream filling and 8 hours to decorate start to finish!

First tiered cake

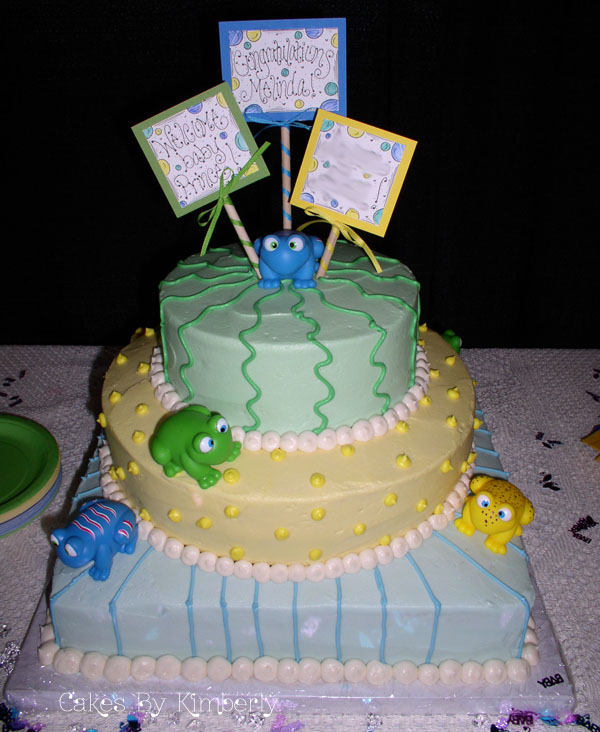
Melinda’s baby shower cake when she was expecting Ninja Boy. Kimberly said, “This was the first time I had ever done a tiered cake, and it’s like something clicked with this one. I really wanted to do something other than a sheet cake and tiered cakes were something I had yet to tackle. I just decided to wing it and it worked! And it opened the door to a whole new world for me!”

Are your taste buds longing for a bite of these delicious looking goodies? Head over to Cakes By Kimberly to take a look at a couple hundred images of her awesome cakes and other yummy goodness. Give Kimberly a call when you have a special occasion needing her creative touch. Your guests will thank you!


Blueberry Picking: Foody Friday

Foody Friday

blueberries

A couple weeks ago we shared with you about going strawberry picking with the kids and getting rained out. This week the blueberries were finally ripe, and with the aunts in town, we decided to make a trip to the fields. We were motivated by the juicy berries as well as the huge Thunder Muffins they sell in the restaurant at the farm.

We started picking towards the back of the field thinking that people wouldn’t have gotten that far yet, but it was slim pickin’s. The kids got hot pretty quickly so we left the aunts and grandmas to hunt while we sat at a picnic table under the shade.

picking blueberries

Ninja Boy was the only one who saved some blueberries to take home. The little girls ate all the ones from their buckets.

Little blueberry picker

Blueberries!

making friends at the blueberry patch

Making friends with some fellow pickers under the shade

After a short rest and a rejuvenating muffin, the kids went back out to the second field with the aunts where it was full of ripe blueberries! We should have started there.

picking blueberries

We hope to go out again as more berries ripen, and we plan to get there earlier in the day before it gets so hot.

Why go berry picking? It’s a fun experience for the whole family. Having the kids go out and pick their own food can do wonders for picky eaters. Eating berries at the freshest they will ever be tastes so good, and they are a great source of nutrients. Blueberries are better than candy any day.

Will you be going berry picking this summer?


Free Pool (or at least cheap): Thoroughly Thrifty Thursday

Thoroughly Thrifty ThursdayIt’s the first day of summer tomorrow! It has already been feeling pretty summery lately though. With the temperatures rising and sun shining, I usually want to stay in and enjoy the AC. I know, I am horrible. I don’t like being hot, but my kids LOVE being outside. I have to make myself get over it and just go out and play. One of the best ways to survive the heat is with some nice cool water.

In the past we have had kiddie pools that easily get holes in them and can get slimy gross quickly. We haven’t been motivated to buy any pools for the kids this year because we still have to finish the garage/playroom, and we didn’t know what kind to get anyway that we hadn’t already tried in our price range.

In all the cleaning, minimizing that we have been doing in the garage lately, we happened to have a few large storage tubs sitting around empty. That’s when I got the idea! Fill up the tubs with water and use them as kiddie pools!

Storage container swimming pools

I am sure I can’t be the first person to think of this…

So they can’t swim laps, but it didn’t seem to bother them at all. They got to get in the cool water and splash around.

Storage container swimming pool

Plus, they learned about which toys will and won’t float and which toys bubble when you submerge them under the water. Yay for learning through play.

Which toys will float?

If you don’t have any empty tubs lying around, go through one and see if there are things you can get rid of, or at least dump it long enough for the kids to play in it for awhile then fill it back up. Or you could buy a big one for $8-12 depending on what you get. Parent friendly–No blowing up required!


Writing Memories on Your Heart: Write With Me Wednesday

Write with me Wednesday

I have two sisters. One lives out west. One lives in the east. It is not very often that we have been able to all be together. Busy lives, families, jobs and schedules that seldom coincide didn’t help. When our dad passed away, we decided to plan a big vacation trip with our mom to celebrate her milestone birthday that would be coming up in a few years. But we asked ourselves “why wait until then?” Life can be too unpredictable.

Mom Sisters

So four years ago we all got together; mom, east sister, and I at west sister’s house for a long weekend. While reminiscing about various places mom had traveled with dad over the years, we asked her where she wished she could have visited. She mentioned having passed through Savannah, GA and thinking it was a place she would have liked to have spent some time exploring. Since none of us girls had been there and not knowing much about it, a plot began hatching to schedule a trip there during the next year. Mom never suspected a thing.

So, we surprised her with a week of vacation in Savannah. We rented a carriage house in the heart of the historic district and had a wonderful time exploring the city and learning much of its fascinating history (that we probably had studied in school but forgot.) That week proved to be so much fun, we decided a mom/sister vacation would be a yearly event.

Last year, our original plans were to spend a week in the mountains of Colorado, but had to change plans at the last minute because most of the places we planned to visit were burning or being threatened by wild fires. So we changed directions and rented a house on the Finger Lakes in upstate New York in the town of Skaneateles. This time, however, my other daughter and her baby got to join us for the week. It was another delightful week of exploring, reminiscing, laughing, and relaxing.

While making plans for 2013, each of the job situations for my sisters and I was up in the air, so we decided they would come to Branson, Missouri for a shorter time together. Since mom and I live in the same area, we would not have to pay for lodging for the group. Melinda was able to participate in some of our activities this time (along with her kids, who think their great aunts are awesome.) The best part of meeting here was that we did things that we had never done together in this area. Usually when their families have come to visit, it is during Christmas or Thanksgiving and we end up doing the same things we’ve always done. It was again pronounced a successful vacation together, just not long enough though!

On each of our vacations together we try to find places to eat that are unique, popular with the locals and off the beaten path. And definitely not chain restaurants! One of the places we heard about in Savannah sounded like it was “the” place to get barbecue. We circled the block several times on foot trying to find the address that was listed and could not find it. Finally we asked and were directed down an alley. And they were right; it was some of the best BBQ we’d ever eaten!Restaurant in the ally

The first get-together, my west sister pulled out all of her card making supplies. We had a blast trying out techniques she learned in some classes. Mom had not made cards before and got hooked. Now she doesn’t buy cards, she custom makes them! In Savannah and Skaneateles, my east sister found Stampin’ Up®! workshops for us to attend and we had a great time making cards in the homes of the demonstrators. This year my sisters brought some of their supplies and each demonstrated their card techniques for the rest of us to try. Every flat surface in my home was covered with card making!

Card Making

kids card making

Even Ninja Boy and My Princess got into the act and wanted to try everything!

I haven’t written down everything we’ve done on each of our mom/sister vacations, though I have intended to put together photo highlight books of each of our trips. Someday I will get caught up (sigh)! But the memories of each of those times together are written on our hearts. We don’t know how long we will all be able to be together, but we will continue planning yearly events with each other and include my daughters as well!

What memories are you writing on your heart?

Transform an Idea {Card Ideas}: Transform it Tuesday

Transform it Tuesday

Have you ever sat and browsed Pinterest for hours? I have! I see all these amazing ideas, pin and like, and wish I had the time/money/materials/etc. to do all those things.

I often have to stop and remind myself that I can’t do everything that’s on Pinterest, and it’s not there to tell me what I have to do. It’s a place of inspiration. Don’t let Pinterest think for you.

That being said, definitely use Pinterest as a starting block if you’re stuck and need an idea.

My aunts are in town this week, and we had a great day of card-making yesterday. They were awesome and pre-cut some beautiful papers and such to put together certain card looks.

We got our feet wet and followed their examples to make our cards, but after a bit, mom and I started getting antsy. Since we like to think outside the box as much as possible, we used the basic idea of one of my aunt’s cards, and started creating our own versions.

Here is her beautiful example card:

Bird Cage CardHere is our variety of interpretations:

Bird Cards

created by mom, grandma, my aunts, and me

Another striking card example:

Red Bird CardHere are our playful versions:

Red Birds Cards

created by mom, grandma, and my aunts

Here’s a great earthy idea:

Tree cardOur even more varied:

Tree Cards

created by my aunts and me

If you see an idea on Pinterest or wherever, you can copy it exactly if that helps you get your creative juices flowing. As you keep going, even the same shapes and stamps can create very different variations on a similar theme.

Even if you don’t have the same tools and colors to create something exactly as you see it, you can use the resources you have available to you and use the picture you saw as a launching point. You are creative. You can take someone else’s idea for a card or other creative outlet and transform it into your own.


Coconut Oil for Burns: Real Me Monday

Real Me Monday


Coconuts

I discovered another use for coconut oil last week. Burns! I was not smart and using common kitchen safety practices and burned my hand on the stove while cooking dinner.

It hurt bad. I spent a good hour with cool water running over it and the rest of the night with a cold compress on it. Mom suggested coconut oil to put on it. I knew I had heard something like that before, looked it up, and tried it.

I put some on like you would any ointment and covered it with a large bandaid. While it was not soothing at first, it did seem to feel like it was working. The less burned part on my pinky and ring finger looked completely better by the time I went to bed. I applied the coconut oil again before going to sleep. It was still hurting when I went to bed but not bad enough to keep me awake.

By the next morning it looked so much better and felt a lot better too. The way it felt the evening before, it seemed like it would take a lot longer to get better.

Here’s what it looked like before and after using the coconut oil.

hand

It has now been over a week and it has healed significantly. I probably should have continued putting coconut oil on it, but it helped so much right away I didn’t think about it after the second day of using it.

I am going to try it the next time I get a sunburn this summer and see how it helps with that.

I knew I loved coconut oil, but now I have a new use to add to my list. I am going to have to buy it by the tub pretty soon!

Disclaimer: This was a minor burn. I am not a doctor. Do not take this as medical advice. Do your own research and use your own discretion on the need for medical attention when treating a burn.


Happy Father’s Day: Weekend Wonderings

Weekend WonderingsHappy Father’s Day!

Hope you dad’s feel special this weekend.

My aunt, sister in law, and I wanted to make our husbands feel special, so we  surprised them with a guys night. They work so hard, and when they aren’t working, they are giving their time to their families. We wanted to give them a break and make them feel appreciated. Here is what we did…

They showed up at my sister-in-laws house at 2pm to find this…

Father's Day 2

Father's Day 3After a couple rounds of poker, they were able to open this…

Father's Day 4Where they found this…

Father's Day 5They had been talking for months about going to see Man of Steel together. We kept fussing about it because we had been wanting to plan this. They were excited to go together on opening day!

Big thanks to my sister in law for hosting at her house and taking care of most of the details!

Have a happy Father’s Day weekend and make those dads feel loved!


Swiss Chard in June {In Season}: Foody Friday

Foody Friday

One of the best ways to save money and get the most nutrients out of your food is to eat in season. Many times we get stuck eating the same fruits and veggies that we always eat. Unfortunately, those fruits and veggies aren’t always in season, and they can get expensive. You can look up info online, or check out these interesting apps for finding out what is in season.

Today, I want to branch out a little and introduce you to what might be a completely new kind of vegetable in your world. Swiss Chard.

Swiss Chard is in season and, therefore, at it’s cheapest in June. It’s in the same family as spinach, quinoa, and beets, and it’s good for you! You can read more about swiss chard and ways to cook it here.

I’m going to share a throw together lasagna with swiss chard that I adapted from this recipe.

Swiss Chard Lasagna Recipe


Swiss Chard Prep

1. Start off by rinsing and patting dry the swiss chard leaves.

2. Cut off the end of the stems (or cut off the whole stem if you want. The stem can be tougher to chew, especially for the kids).

3. Cut the leaves in to approximately 1 in. squares. If using stem, chop up smaller than what I did for easier chewing.

4. Heat up skillet and 3 tbsp oil on medium heat. Sauté minced garlic for 30 seconds.

5. Add cut up swiss chard. Stir then cover for 3-4 minutes. Add a splash of apple cider vinegar and/or lemon juice. Add salt to taste.

This would taste great on its own as a side dish for another meal.


Swiss Chard Lasagna Prep

For the cheese filling:

I didn’t have ricotta cheese so I used feta and some greek yogurt. I didn’t have mozzarella so I used monterey jack and parmesan. I can’t tell you the exact amount of each. I just shredded a good pile added 2 eggs and stirred in pepper, oregano, and basil. (Check out the recipe I linked to at the beginning if you need some more precise cheese ratios).

Swiss Chard Lasagna Prep

Cook lasagna noodles as directed on the box.

1. Start with a layer of sauce and add a layer of noodles.

2. Layer of sauce (someday I’ll post my sauce recipe).

3. Layer of cheese mixture.

4. Layer of cooked swiss chard. Keep doing that until you have made 3 layers of noodles, sauce, cheese, and swiss chard.

5. Top with a final layer of noodles and add shredded cheese. I was out of other cheese so this time I used colby jack (That’s the beauty of cooking, if you don’t take it too seriously, you can get away with whatever. Use what you’ve got when you can).

6. Cover with foil (make sure to tent the foil to keep cheese from sticking). Bake at 350 degrees for 30 minutes. Remove foil and cook for another 5 minutes.

Cut and enjoy!Swiss Chard LasagnaEven the kids liked it!Kids eating lasagna


Free Haircuts: Thoroughly Thrifty Thursday

Thoroughly Thrifty Thursday

I have friends who are hairstylists, so I write this post with deep respect for their profession. You deserve every penny you get for cutting people’s hair. It’s quite a skill!


That being said…if you don’t have a hairstylist you know and love or you just don’t have the funds to cover haircuts for your kids, I recommend at least trying once to cut it yourself. If you totally mess it up, take them to a hairstylist, and they can fix it up easy (that’s what I did the first time I cut Ninja Boy’s hair at fourteen months old).

Now before you whip out the clippers and scissors, I highly recommend you do some research first (like I said, there is a reason why hairstylists get training for this). I emphasize the BEFORE you start cutting (which I didn’t do the first time I tried cutting Ninja Boy’s hair earlier this year). Here is a good tutorial for boys. Here is a good one for girls if you want it short.

I have been cutting Ninja Boy’s hair for the last three or so haircuts. Never have they been perfect, but for a five year old boy, he looks pretty darn cute.

Here is before I cut it…(probably a month since his last cut)

Ninja Boy start of haircut

Before the haircut

Ninja Boy Haircut

during and after

Isn’t he so handsome with his angry face? (what a goober).

I cut My Princess’ hair for the first time ever last year because she requested short hair. I had been avoiding cutting it for her first two years because it took so long for it to grow. I don’t know why, but I get it in my head that I want to be the first one to cut my kids’ hair regardless of whether I know what I’m doing or not.

She wasn’t too excited halfway through, and I had to wait till daddy got home for her to sit on his lap to be able to finish. However, it turned out super cute! We let it grow over the winter and spring to let her decide which length she preferred. She requested several times in the last couple months for it to be short again.

I wanted her to wait till after her dance recital so that it would be easier to pull back into a bun. Since she doesn’t have another recital until Christmas, she was excited to be able to chop it off short!

My PRincess Haircut

before, during, and after

After it dried, I realized it needed a trim here and there, but I’ll have to wait for another good opportunity to sit her down.

I am not perfect. I am just determined. I figure the more I do it the better I will get. That’s what hairstylists do. They go to school and learn techniques and PRACTICE, PRACTICE, PRACTICE.

I won’t be offering haircuts to anyone else’s kids anytime soon, but I figure I can save a little money and at least take care of my own so they don’t look like ragamuffins.

Drawing 3D Cubes: Draw With Me Wednesday

Draw with me Wednesday

Let’s have some fun today drawing three dimensional cubes or boxes or blocks. To make it easier, you can start with a grid sheet to help you visualize the lines. After practicing a while, try drawing cubes on plain paper.

Print a copy of this grid sheet and follow along with my drawing images:3D Cube Drawing1. Place dots at the corners of 4 squares on the grid as shown in image #1.

2. Connect the dots with straight lines. (You can use a straight edge or draw them freehand.) That wasn’t so hard! Now you have a square. Now let’s make it 3D.

3. Now draw a dot in the middle of the square and then 3 other dots as shown in image #3.

4. Draw straight lines connecting the new dots, forming a new square up and to the right of the original square.

5. Now finish your 3D cube by drawing straight diagonal lines between the corners of each box, connecting the squares. There! You have a see-through 3D cube!  

Let’s try it again, only this time draw dotted lines in the same places I did on the following image. The dotted lines will represent the part of the block you can’t see in a solid cube. Then draw the cube again leaving out the dotted lines and you will see a solid cube. (Notice, I am drawing these freehand without a ruler on the rest of these cubes.)3D cube drawing


3D Cube drawing

Play around with drawing 3D cubes until you feel comfortable with it. Make your cube face the other direction by drawing the second box up and to the left of the original box. Try leaving out certain lines to make your cube into an open box laying on its side or sitting upright. Shade in the inside of the box to help you visualize it better as an open box. Then try your hand at drawing stacking blocks. Remember when the blocks are touching one another, you will only see part of each block. Draw the facing square of the blocks that touch first and then the rest of each visible parts of the blocks.  If you draw a line that doesn’t belong, just erase it and keep going!

3D cubes

If your kids have some blocks at home, try stacking them in various configurations and see if you can draw it on the grid or on plain paper and make it look three dimensional. Have fun drawing today!blocks


UPDATE: 6.14.13

Yesterday I showed the grandkids how to draw 3D cubes and they caught on fast.Kids drawing 3D boxes

Ninja Boy spent the rest of the afternoon drawing 3D blocks and had fun creating more elaborate block configurations to draw. I challenged him to try to put together a replica in blocks of drawings I made and he loved it! He would then put together block formations and make me draw them on paper. We had a great time!Ninja Boy 3D DrawingNinja Boy 3D DrawingNinja Boy 3D Drawing

So, now I challenge you again to give it a try!