Butterfly Transformation: Transform It Tuesday

Transform it Tuesday

In 1988, after China was beginning to open up to more westerners visiting their country, my sister decided she wanted to visit the country before it made too many changes. One of the gifts she brought back to my kids was a beautiful Chinese butterfly kite. It adorned the walls of the girls’ room for many years. However, after all these years, it began to get pretty ratty looking. The fabric was dirty with a strange looking mold and tearing from the frame, and it was looking rather sad. I debated tossing it, but being the sentimental person I am, I just could not do it. So I decided to give it new life to adorn the wall of our sewing room.

Original Chinese Butterfly Kite

I gently took the fabric pieces off the delicate bamboo framework, which was surprisingly still in decent shape.

Butterfly kite skeleton

Then using the old pieces I took off as my pattern, I cut new fabric to put on the frame.Butterfly kite parts

I glued the new fabric pieces onto the bamboo framework and painted the fabric edges to keep them from raveling as well as give a decorative edge. The butterfly has a new life! Even though it has changed, when I look at it, I still think about China and my sister’s trip. Finished butterfly

Maybe you would like a large butterfly kite on your wall. Since you may not have one to transform like I did, here is a website with instructions for making a Chinese kite.

Why I Dance: Real Me Monday

Real Me Monday

Today just happens to be the day of dance recital. We get to rehearse in the morning, then come back this evening to perform.

My Princess danced in her first recital at Christmas. After it was over she cried and said, “why didn’t we start over again?” She would have done the whole performance a second time that night if she could have.

After crying when she had to leave rehearsal the other night and asking me every day if she gets to go on stage, I’m sure this recital will be much the same.

Since it’s recital day, I wanted to share some of our dance story. How My Princess got started and how I got back into dance and why.


Dance costume

My finale costume. So pretty!

When I was a little girl, my brother, sister, and I took dance and music classes with other homeschoolers at a local dance academy. We did ballet, tap, jazz, hip hop, choir, etc. I liked ballet for awhile, but as I got older, I became very self-conscious of my body (we weren’t allowed to wear skirts–tights and leotard only). Also, my teacher was very strict, yelled frequently, and made me feel even more self-conscious than I already was. What once was fun became overwhelming. I would go to class and leave after a few minutes feeling sick to my stomach. I often stayed out for the rest of class. I don’t remember how long that last, but I know I was about twelve when I quit taking classes.

I began taking a couple classes again for one more year when I was thirteen to fourteen. I don’t remember much about it. That was a hard year for me overall.

I pursued other things after that. I took piano for a few years and worked a lot. When I was in college, I did a dance that was student-directed/choreographed, but aside from that, I hadn’t done any dancing for years.

A few months after My Princess turned two, we watched the Nutcracker on netflix. She was hooked. She danced everywhere, all the time. Despite being quite clumsy in other areas of life, she was the most graceful fairy princess when she danced. I knew that as soon as she was old enough, I was going to put her in a dance class.

My Princess ballet lesson

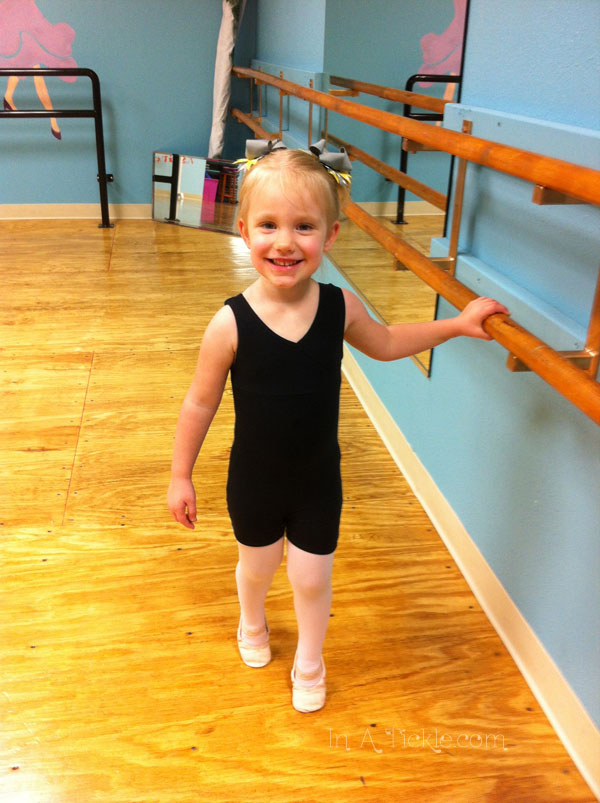
My Princess at her first ballet class

I researched local dance academies and found Sonshine. The teacher, Miss Kathie, was someone I had worked with doing a show as a kid. I knew she would be wonderful with My Princess. I also knew she would focus on classic ballet technique and performance rather than dance competitions. I wanted my daughter’s love of ballet to grow and not be distorted by some of the things I have seen come out of the competition circuit.

She started the summer she was two and a half doing dance camp for five days in a row. To say that she fell in love was an understatement.

Ballet teacher & student

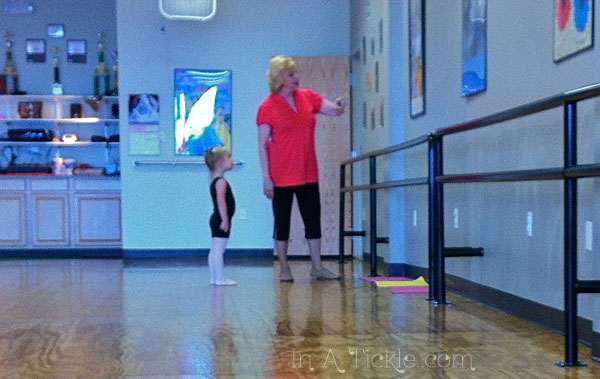
Miss Kathie showing her the beautiful ballerina pictures on the wall in the studio

During that time, her teacher kept encouraging me to try dancing again. I thought it would be fun, but I was nervous to try. It had been thirteen years since I had taken a dance class. I eventually just bought my ballet shoes and tights so that I wouldn’t chicken out.

Ballet shoe & tights

The first couple weeks were hard on my body. I was so sore, but I was inspired by how much I remembered. I improved every week. It has now been nine months since I started back and…

This is why I dance…

1. Body

I have had three children and gained and lost the weight with each. While, I didn’t feel overweight, I didn’t feel like my body was very strong. Each pregnancy took a lot out of me. Dance has helped me tone up and not just lose weight, but turn fat into muscle that is actually helpful to my body. I have noticed that I don’t get sore as easily when doing physical things, and I have a lot more endurance.

After years of chiropractic, my body is finally adjusting better than ever, and my last scan was the best I have ever had. I knew that stretching and exercise would help with that, but I had never been motivated before. My chiropractor said the difference has been noticeable since I started dancing and stretching regularly.

2. Mind

Before I started dancing, I had embraced the “old.” I claimed being “old” because I had already had three children. I was older than people I was around frequently because of working with the youth. I felt my mind deteriorating–I joked about the kids sucking the brain cells out of me in the womb.

Learning new dance moves and routines, moving my body and getting the endorphins flowing has helped my mind become more clear. I feel young again. I may have three kids, but I don’t have to be old. I want to be able to run around with them without getting too tired. I want to keep up with them mentally as they grow and learn new things.

It makes me say “I can” instead of “I can’t.” I can do this tap dance even thought I haven’t tapped in fifteen years and the recital is a week away. I can do the floor routine even though I have a weird tailbone that sticks out and hurts when I roll on the floor. I can do it because of adding padding to my rear, and I can decide not to be self-conscious at all about it because it’s worth it.

3. Spirit

God made my body. God gave me desires in my heart. I can fulfill His purpose in me by giving my time to dance. I am renewed every time I am able to go to class. I have opportunity every time I dance in class or on stage to glorify Him because He made me. I think He smiles when I move my body joyfully and gracefully.

I can give Him honor as I set an example to the other students to have a good attitude and encourage others. I give Him glory when I honor my teacher with consistency and loyalty.

This is a desire that He has obviously placed in my daughter as well. She beams with excitement when she sees me put on my tights and leotard and tells me I look beautiful. She watches with admiration as she sees me dancing with my class. This is something that we can share together for years to come and is a connection point that I believe is God-given. It’s something we can do together and talk about. I can set an example of how a dancer should act.

I am so thankful for my husband who encourages me to dance, and even though at times he wishes I were home, he stays with the kids so that I can be renewed in this way. He sees how much I love it and sees how much it has helped me. In fact, he supports his girls so much that he volunteered to help call the show for the recital tonight!

Miss Kathie says you are never too old to take a dance class. So if you used to dance or have never even taken a class once, give it a try! Try ballet or tap, ballroom or even zumba! Get your body moving–it will be good for your body, mind, and spirit.

Play is For More Than Kids: Weekend Wonderings

Weekend Wonderings

I recently saw the following picture online and showed it to Ninja Boy. He was amazed and said he didn’t think he could ever build something like that. I told him I believed he could and he just needed to use his imagination and start small. After looking through several more pictures of Lego® creations on Pinterest, he was excited. It wasn’t long before he and his sister were busy building and excitedly told me they were using their imaginations. They ended up with structures larger and a little more complex than I have seen them build in the past.

Lego

On the link to this picture, it says the boy has been working with his dad for several months to build this tower. What a wonderful activity for a father and son to do together. It not only builds relationship between the two, but the father is playing! Studies are showing that play is good not just for kids, but for adults as well.

Many corporations are now finding that “play” helps their employees be more creative and productive in the workplace. As a matter of fact, Lego® developed a program for businesses to use called “Serious Play”. Constructing with Lego® bricks, they work through various problem solving and team building activities, in order to foster creative thinking.

In this article from Business Insider showing pictures of the 15 Coolest Offices in Tech, you will see how these corporations are trying hard to make their workplaces fun, playful places to inspire creativity.

Dr. Stuart Brown, founder of the National Institute for Play, “came to research play through research on murderers, unlikely as that seems, after he found a stunning common thread in killers’ stories: lack of play in childhood. Since then, he’s interviewed thousands of people to catalog their relationships with play, noting a strong correlation between success and playful activity.”

Watch Dr. Stuart Brown’s TEDtalk entitled, “Play is More Than Fun” and you will be encouraged not only to make sure your kids play more, but to include play in your own life as well.

Kids playing Legos

So the next time I encourage the kids to play with the Legos, I’m going to sit down on the floor and join them!


Rainy Day at the Strawberry Patch: Foody Friday

Foody Friday

A couple years ago we went blueberry picking with the kids. Ninja Boy was just three, My Princess was one, and Miss Tickles was still cooking. My Princess ate her weight in blueberries, ripe or green! We joke that they have to weigh the kids before picking so they can charge us for the ones they ate. After that outing, we talked and planned for going again the next year. Sadly, we missed picking altogether last year because the season started so early and ended quickly because of the weather.

We are determined to make it happen this year. We keep watch on the Blueberry farm’s facebook page to see when the blueberries become ripe and picking season can begin.

Meanwhile, while we wait for blueberries, we discovered that a strawberry farm is only an hour and fifteen minutes away from where we live.

We loaded up the kids and took the trip up to Boz’s Berry Farm. The kids each got their own basket to put their picked berries in (though the berries didn’t stay in them very long before being taste-tested).

Grandma showing how to pick strawberries

Grandma showing how to pick strawberries

As we headed out to the field, it started to sprinkle. A little rain wasn’t going to deter us from our mission. We decided that it would surely pass over us quickly.

Girls picking berries

I found one!

picking strawberries

Look how big this one is Grandma!

Before leaving to pick strawberries, Ninja Boy was complaining that he didn’t want to go because he doesn’t like strawberries. I convinced him that it didn’t matter. He could at least help us pick them.

Girls taste testingAfter the girls had their share of taste-testing, Ninja Boy decided he would try one.Ninja Boy tasting strawberry

He LOVED it! There is something about picking fruit fresh off the plant that makes it taste that much better! He had never had strawberries this fresh. No pesticides, no ripening agents. Just fresh, juicy, fully ripe strawberries.

Ninja Boy picking berries

He got serious about picking after that!

We heard stories from the workers about tiny frogs eating the bugs and hungry turtles chomping on berries in the middle of the field. We kept our eyes open and spotted one of the tiny frogs. They help eat the bugs that hang out around the plants.Tiny frog in strawberry patch

Miss Tickles eating strawberries

Pretty sure Miss Tickles should have been weighed before picking!

Suddenly, the rain picked up and pelted us with huge drops! My Princess started getting cold, so we headed up to the shack to get our strawberries weighed. The kids stood waiting for Grandma, who wasn’t letting the rain bother her. With so many berries left to be picked she just started singing in the rain and kept on picking.

Kids in rain

Ninja Boy was concerned and made her come back.Grandma in Rain

We picked almost 20 lbs between all of us and bought 20 more lbs of pre-picked berries for a little extra fee.Strawberries

Since they were so fresh, they needed to be eaten or processed quickly, so mom prepped them to freeze.

First step is washing the berries. Don’t want to soak them in water. Just use a colander and spray them with water.Washing strawberries

Remove the leaf caps and any bruised spots. Separate out the berries that are too ripe and use them soon, because they won’t freeze well.

Strawberry leaf caps

It felt like the strawberries multiplied once I start processing them!

After rinsing and taking off the caps, let the berries dry a bit on paper towels.

Berries drying

Lay a sheet of waxed paper on a cookie sheet and place the berries pointed side up on the paper, not letting the berries touch each other. Place in freezer. Strawberries freezingAfter the berries are frozen solid, quickly place them in freezer bags. By freezing them solid before putting into bags, the berries stay separated and you can pull out a few at a time as needed.Frozen berries

Frozen strawberries are great in smoothies or cooked to make a strawberry syrup.

Thrifted Nightgown with Armhole Tutorial: Thoroughly Thrifty Thursday

Thoroughly Thrifty Thursday

My Princess is not yet four, but she has quickly outgrown all her 4t clothing and has jumped right into 5t. All my friends have girls that are currently in those sizes or have other people to pass hand-me-downs to. Buying a whole new wardrobe for my daughter is not something I want to think about since we are trying to save money to go toward our garage project. I knew I would have to think creatively.

After a couple thrift store trips, I have a whole pile of clothing/fabric for her to wear. And I only spent $21. There are three shirts that fit her as is now, and a shirt and pair of pants that she will probably fit into in the fall/winter. I also have a whole stack of clothes to remake into something else.

She outgrew all her pj pants and shirts a long time ago but has been wearing them anyway. Since she likes her nightgown style pj’s so much, I decided to forego the 2-piece kind and make her some that she can wear now but also grow into. Most of the nightgowns I have seen in the store have princesses all over them and are made out of polyester. Since I want to be able to pass them down to Miss Tickles, I wanted cotton, and while we like princesses, I like to avoid having so many commercialized characters running around my house all the time if possible.

I found two long sleeve adult large cotton nightgowns for $1 each at the thrift store with plenty of fabric to be able to make her size. This is what I started with…

Adult nightgown

I searched pinterest for some inspiration and found this pillowcase dress style and this long sleeve style. I liked the dress part of the long sleeve, but I wanted the pillowcase style at the the top.

This is what I came up with…

Girl's Nightgown

She loves it.

My Princess Nightgown

Since I knew what I was doing then, I decided to make the same style with the second thrifted nightgown of the same style.

My Princess Nightgown

Just so you know the dark spots on her arm are marker and not some form of disease.

Two Nightgowns for $2 and about 4 hours of my time! I also have 4 sleeves and a row of buttons to use for other projects.

Armhole Tutorial:

I learned a new technique while making these nightgowns. I wasn’t sure how to do the armholes, and I didn’t want to use the polyester bias tape that we had since I want to keep it all cotton. Here is a step by step tutorial.Nightgown tutorial 1

1. Cut a strip of fabric about 3/4 in. to 1 in. wide and an inch or 2 longer on each side of the armohole. Serge or zig zag stitch one side.

2. Pin unserged side to armhole, right sides together. Start in the middle and work your way out.

3. Pin so that they are easy to pull out when sewing.

4. Sew with a regular stitch setting with the presser foot at the edge of the fabric.Night gown tutorial 2

5-8. Fold strip to the underside of the armhole, starting with folding down the extra fabric at the top then folding the side over to pin.

Nightgown tutorial 3

9-12. Pin and top stitch on the front side of the fabric.

Nightgown tutorial 4

13. Trim extra thread.

14. Iron armhole.

15. Enjoy!

My Favorite Authors (Today Anyway): Read With Me Wednesday

Read With Me Wednesday

“Not all readers are leaders, but all leaders are readers.”

~Harry S Truman

I absolutely LOVE to read. My mom instilled that desire in me since I was a young girl. According to her, when I was three years old, I saw my brother and sister reading and demanded she teach me how or I would figure it out myself.

Reading Books

Raising my kids right.

Since then, I always make time for reading. Even if I haven’t had time to read a whole book, I am always reading articles or blogposts online to fulfill that need.

Because of our shared love of reading, Mom and I decided to add to our With Me Wednesday posts a Read With Me Wednesday and eventually a Watch With Me Wednesday for YouTube, Netflix, and Movies we like.

Reading and creativity go hand-in-hand. By reading fiction, you open up your mind to new possibilities and impossibilities. By reading non-fiction, you can learn about anything that’s been done or you could ever do in whatever field of study you can think of. A reader has the whole world at his or her fingertips.

I have been asked at times what my favorite book is, and I am confident that I will never be able to answer that question. I have read so many books over the years and have enjoyed so many. I have reread multiple books but to decide which was my favorite is not something I want to commit to.

However, I CAN give a list of some of my current favorite authors.

So here are three of them (in no particular order):3Authors

1. Ted Dekker

I have read almost every one of his 30+ books. If you like fantasy, psychological thrillers, and intense in depth series then he has the books for you. I would start with either THR3E or Blink. He is a christian author but isn’t overtly preachy. Almost every time I read one of his books, I end up staying up way too late for a couple nights because it is so hard to put down. Before I had kids, there were a couple nights I stayed up till 4am to finish his books. He pulls you into the story, and you can’t close the book and let it go on without you.

2. Steven James

I have read seven of his books. The Patrick Bowers Files and the Jevin Banks Experience are both thriller series that are quite intense. The first series follows an FBI detective that tracks and catches serial killers. He gets pretty graphic at times, and they can be pretty dark as he looks into the evil that motivates these crimes. They are fascinating stories. He is also a christian author who is not over the top in his message. He is known as a “master storyteller,” and it’s so true. He is consistent and informative, bringing in true to life facts to make the story believable.

3. Karen Kingsbury

And now for something completely different. My mom has seen Karen Kingsbury in person three times (once at a convention and twice for a book signing at the store she used to manage). According to mom, she is a sweet, down to earth lady.

Jan with Karen Kingsbury

Mom and Karen Kingsbury

She is a christian author who writes what I would describe as emotional family dramas that grip your heart and bring tears you never would expect from a book. While reading one of her books, my husband walked in to me bawling my eyes out. I told him I know it is just a book but to let me weep. They make you laugh and cry. Mom said she tells the story about Karen’s husband asking her why she was crying while she was writing. She said that so and so died, and he said “well you killed her!” After reading her books, you feel like you know these people and feel everything that they are going through. Every time I finish a series, I feel like I am saying goodbye to a close friend. We have one of her children’s books, Let’s Go on a Mommy Date, and I cry every time I read it to the kids.Let's Go On a Mommy Date

Little Pillowcase Dresses for Africa Update: Transform It Tuesday

Transform it Tuesday

In the beginning of April, the young girls at my church issued a challenge to the ladies to make Little Dresses for Africa from pillowcases. Melinda and I had fun making four more pillowcase dresses.

Pillowcase dresses

You may want to go back and read the post about that. We thought we’d give you an update about that challenge! The girls made ten dresses for a class project and challenged the ladies to match it. Many of the girls had never sewn before but had a wonderful time learning to use a sewing machine. Girls sewing dresses

The girls made a beautiful display of their dresses:

Little Dresses for Africa

Little Dresses for Africa

By Mother’s Day the wall looked like this:Pillowcase dresses for Africa

Twenty-eight little dresses were lovingly sewn and collected for Little Dresses For Africa as a result of the girls’ project and challenge.

The dresses were sorted by size, tagged and boxed by the girls.Sizing and tagging dresses

The box was sent to Dresses For Africa headquarters where they will be sent to countries in Africa and other countries as needed with missionaries.

Boxed dresses

This project by the girls inspired a lady who was recovering from surgery to make ten more dresses. A local 4th grade Bible study group caught the vision and made seven more dresses. It also inspired a ladies Bible study at another church to start their own project and make some dresses. Little Dresses For Africa is an ongoing project. I encourage our readers to get a group you are involved with to get creative and transform some pillowcases to make dresses. You can find out all the information at their website.

Melinda made another dress that did not go to Africa. My Princess, who is outgrowing all her clothes, got a pillowcase dress of her own!

Pillowcase dress


Dry Erase Ghost: Real Me Monday

Real Me Monday


I sit down at the computer to work on some blog stuff and marketing. It’s morning, and I haven’t eaten yet. Ninja Boy asks me for a marker “to draw on this.” Distractedly, I said, “I don’t know.” I am assuming that the “this” he is referring to is the white board he had been holding a little bit ago. He spots a dry erase marker on the desk and asks if he can use it. I say that he can because that is what you use on a white board, right?

A minute or two later, he walks in holding my cream colored throw blanket from my bed that now has three black dots on it. He said something about wanting to be a ghost. I don’t quite remember what all he said, but I let him know that I was not a happy person at that moment. I didn’t yell or freak out, but I’m sure whatever my face looked like as I was explaining to him why that was not good was enough to let him know that he didn’t like how I felt about his plan. I think he was most upset by the fact that I told him he could use that marker.

Blanket with marker

I took this picture after I had started cleaning the third black dot. Starting to come out!

As I was trying to clean out the dry erase marker with rubbing alcohol, I thought about what had happened. I did tell him that he could use that marker. It’s not his fault that I didn’t make him clarify what it was that he was using it for. In his mind, I had given him permission. Even though I hadn’t yelled at him, I was still feeling badly for how I had responded to him. Yes, he needs to understand that he can’t draw on himself and things whenever he wants to, but to his credit, he thought he had asked this time.

While I thought about all of this, I pondered a way that I could give him what he wanted without ruining any more blankets. I cut out three circles out of black construction paper and taped them onto a sheet. Now he could be a ghost without causing mommy to stress out.

Sheet Ghost

I kept asking him to put his arms out a little. He was not wanting to cooperate.

Sheet Ghost

After a few kind threats, he acquiesced.

(So far I have not completely removed the stain. Oh, well. It will be a constant reminder to PAY ATTENTION.)

How Anti-creativity Are You?: Weekend Wonderings

Anti-creativity: opposing creativity

Creativity: the use of the imagination or original ideas

While reading those definitions did you find yourself saying, “I am definitely NOT anti-creativity! I think people need to be able to be more creative. We sure could use more original ideas to solve some of the problems in our world.”

That’s great!

But take a look at this video below. It is an anti-creativity checklist for teachers that was inspired by this video for business put together by Youngme Moon. Even though it was made for teachers, it can apply to parents, grandparents, men, women, church leaders, coaches, just about everyone! I heard myself in some of the sentences, and I think I am pro-creativity!

You can download the original “Anti-creativity Checklist for people who want nothing to do with inovation, flights of imagination, or out of the box thinking” in list form.

What are some phrases that you need to eliminate from your thoughts or conversations that are keeping you or others around you from pursuing new imaginative creative pursuits?

Here’s another video you can watch of a news story showing how a principle decided to be creative and go against the norm to transform a very troubled school.

Creative Kids

No anti-creativity in these kids!

We’re Makin’ Waffles: Foody Friday

Foody Friday

When I was growing up, waffles were a staple at our house. We didn’t have them for breakfast often, but waffles for dinner happened regularly. This night was most likely a night where mom was tired and didn’t want to have to think about what to make. We were never upset about that. Bread-like substance smeared with Peanut Butter soaked with sugary syrup=kid win! To her credit, she at least put bananas in the batter and on splurge nights–BACON!

My son has inherited this love of waffles and will eat more waffles than any other food except maybe chicken strips. No, probably even more than chicken strips. Though there is debate out there between pancakes and waffles and which one is better, he is no respecter of breakfast breads covered in syrup. He will devour it all!waffle with strawberries

There are a few differences between my childhood waffle experience and my kids’ experience.

1. We have circle waffles.

My parents had a square waffle maker that made four thin waffles at a time. I don’t know what happened to square waffle makers (I am sure they are out there somewhere), but the last three waffle makers I have owned have all been round and belgian. For some reason, I miss those thin square waffles. Maybe it was because I felt like I could eat more of them than the one thick one that fills me up pretty quickly. I had more topping combination options with more waffles.

2. We now use REAL maple syrup.

My mom used to make her own syrup using water, vanilla, maple, and lots of sugar in the microwave. We loved it, but I now know that maple syrup tastes better and is a much healthier option. Maple syrup is natural and sweeter than table syrup with lower calories, contains antioxidants and NO high fructose corn syrup or refined sugars. It may be more expensive, but it’s worth it.

3. We use whole wheat flour.

Slowly I am weaning mom off the Bisquick®. That’s what our waffles/pancakes/biscuits were made from as kids. It is easy and works well, but it is definitely not the healthy option. It contains hydrogenated oils and dextrose (high fructose corn syrup). Making your own waffles is not much harder than measuring out bisquick, and you get to control what ingredients go in your waffles. Try this Recipe below.


Whole Wheat Waffles Recipe:

Adapted from Better Homes and Gardens New Cook Book

Ingredients:

  • 1 3/4 c. whole wheat bread flour (or 3/4 c. all purpose flour and 1 c. whole wheat flour)
  • 1 tbsp. baking powder
  • 1/4 tsp. salt
  • 2 egg yolks (put the egg whites in a separate bowl to add later)
  • 1 3/4 c. milk of choice (I use coconut milk)
  • 1/2 cup oil or unsweetened applesauce
  • 2 egg whites

1. In a bowl, stir together flour, baking powder, and salt. Make a well in the center of dry mixture; set aside.

2. In another bowl beat egg yolks slightly. Stir in milk and oil (or applesauce). Add egg yolk mixture all at once to the dry mixture. Stir just until moistened (batter should be lumpy).

3. In another bowl, beat egg whites until stiff peaks form (tips stand straight). Gently fold beaten egg whites into flour and egg yolk mixture leaving a few fluffs of egg white. Do not overmix.

4. Pour 1 to 1 1/2 cups batter onto grids of preheated, lightly greased waffle baker. Close lid quickly; do not open till done. Bake according to your waffle makers directions. When done, use a fork to lift waffle off grid. Repeat step 4 until all the batter is gone.

Alternate instructions: If you have no idea how to do the whole egg whites thing, just use two unseparated eggs and beat slightly. Add milk and oil, beat slightly. Then add the egg mixture to the flour mixture all at once. Stirring just until moistened without overmixing. Then follow step 4 as normal.

Toppings:

Choose from sweet and savory options to make delicious combos.

My favorites…peanut or soy butter with syrup, or cream cheese, cherry jam with honey, or Nutella, bacon, and banana with syrup.Waffle Toppings


“Not Your Grandma’s” Chocolate Gravy Recipe:

Healthy Chocolate Gravy

Ingredients:

  • 1/4 c. cocoa powder
  • 3 tbsp. flour
  • 3/4 c. coconut palm sugar
  • 2 c. milk (coconut milk)
  • 2 tsp. vanilla
  • 1 tbsp/ butter or coconut oil

1. Mix cocoa powder, flour, sugar, and milk in pan on stove, stirring with whisk over medium heat until mixture looks like gravy.

2. When mixture thickens remove from heat and stir in vanilla and butter or coconut oil. Serve warm.

Waffle with chocolate gravy

Extra Fun: If you LOVE waffles and would like to eat more waffle-like food like waffled mac and cheese, waffled pretzels, or s’moreffles (I just love the name of that one) check out this fun site called Waffleizer for some fun waffle inspiration and recipes.