
Two special little girls in my life just celebrated their first birthday. I wanted to get them started on their creative journey by giving them their first art supplies and decided they needed art smocks. I cut off the lower part of each leg on a pair of jeans and cut open the seam on one side. Folding the denim in half lengthwise, I cut out a section for the arms. See the photo for dimensions I used. Depending on the height of the child, you could make the length longer or shorter. I wanted to make sure they could use them for a few years.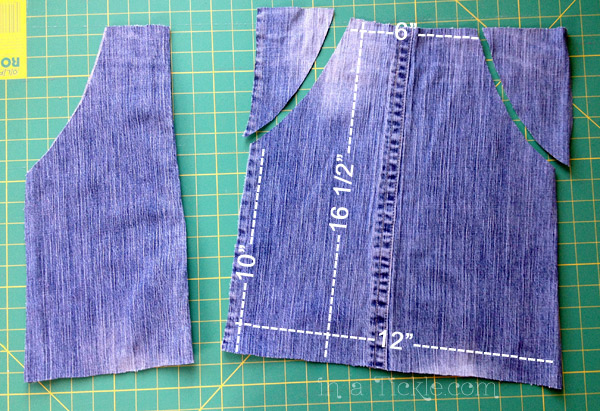
I turned under 1/4″ of denim twice on each side of the smock (the 10″ section on picture above) and top stitched to finish the sides.
I cut strips of print fabric to use for the ruffles, ties, and neck edge of the smocks in the following dimensions.
For each smock:
Cut one 3″ X 30″ piece for ruffle.
Cut two 3″ X 40″ pieces for ties.
Cut one 3″ X 6″ piece for neck edge.
I folded the ties and neck edge fabric pieces like double fold bias tape (my strips were not cut on the bias though) by folding in half lengthwise right side out and pressing. Then I opened that strip up and pressed both raw edges to the center and folded the strip again in the center (original pressed fold) and pressed. I tucked the raw edge of the smock neck into the middle of the neck edge double fold tape and pinned in place. Then I top stitched near the inside edge to hold the strip in place front and back.
For the ties, I turned the ends of the strips to the inside a quarter of an inch and refolded the double fold tape and pressed to give a nice finished end. I positioned the tie strip tapes into the raw armhole portion of each side of the denim just like I did on the neck tape leaving about 12″ for the neck ties and the rest for the waist ties. I pinned in place and top stitched close to the inside edge of the tape from one end to the other.
The lower edge of my jeans were quite raveled so I did not leave the original hem of the jeans as the bottom edge. I serged the bottom edge of the smock before sewing on the ruffle. For the ruffle on both the top and bottom edges, I turned under 1/4″ twice for a finished hem and top stitched. I had intended to gather the ruffle and sew it on, but the fabric I used for the ruffle was stiff so I made pleats instead, tucking the ends around to the backside of the smock and top stitching in place.
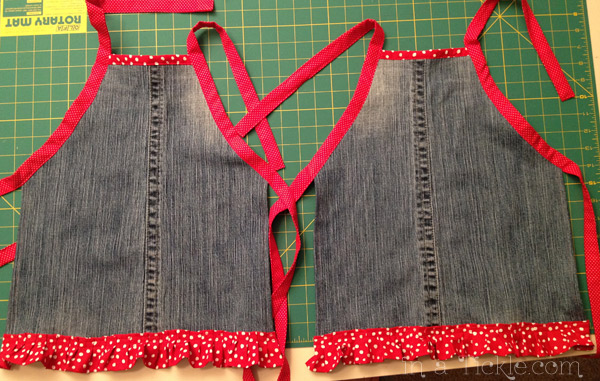
The smocks were cute and would have worked fine for art smocks at this point, but I decided to take it a step further and add applique and embroidery. As I was working on this, my eyes noticed a spray can I have had for a long time called Quilt Basting Spray. It temporarily bonds fabric and can be repositioned, and I wondered why I had not thought of using it for appliques before now! It worked great and was much faster to use than cutting and ironing fusible webbing to the back of appliques. And here are the finished smocks ready for fun messy creativeness!
Oh My Goodness, these smocks are the most adorable things I’ve seen! I’m finding you from the guest post on Julie Balzer’s blog. Love your clay pieces and can’t wait to see what you make with them. I haven’t ventured into the world of clay…yet!
Shirley