Let’s Talk Fabric Part 2: Thoroughly Thrifty Thursday

OLYMPUS DIGITAL CAMERA

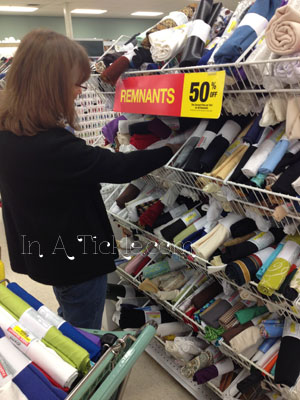
Last week we talked about finding fabric for your projects for less money by looking in the remnant bin at fabric stores. That’s pretty standard. You need fabric, you go to a fabric store. But today, it’s all about taking on a new perspective. I want you to start looking at fabric in a whole new way.

What if the next time you are needing fabric, you go to a clothing store instead. But I don’t want something that is already made! I want to make it myself. I thought we were supposed to be creative and make our own stuff. That’s true! But don’t turn away yet.

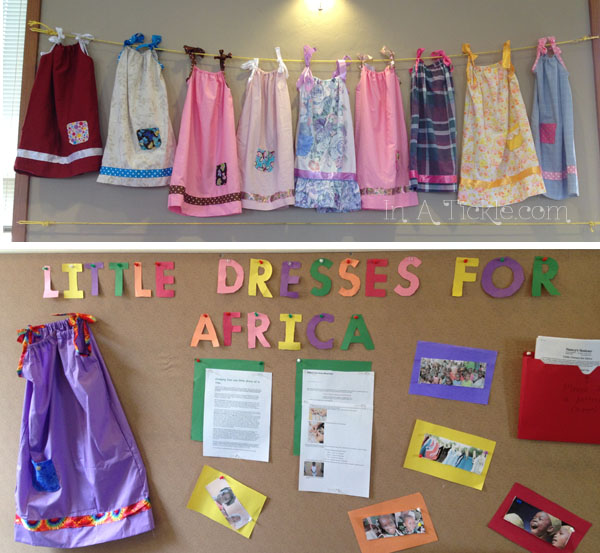
Say you need a yard of fabric for a dress that you are making for your daughter. You could go to the fabric store and get something from there. Maybe it’s on sale. Maybe not.

Or, you could go to a department store and look at the adult clothing and see what you can find there. I guess you could call this repurposing, but I want you to think about it even more than that. I want you to look at not a shirt or a skirt or a dress, but I want you to look at it like it’s a bolt of fabric. Look at each piece of clothing closely. Do you like the color? the pattern? Is there some kind of embellishment on the piece of clothing that you could incorporate into the dress you are making?

saleHead to the clearance section. You can get items for even 90% off sometimes. Look in the larger sizes and think about how much fabric you are getting out of it. If you have a pattern, bring in your pieces and see if you could lay them out and fit them on the fabric.

Mom and I took a trip to Kohl’s the other day and did our own fabric search. This is what we found:

OLYMPUS DIGITAL CAMERA

White shirt…or maybe a sleep sack. Orange dress…or maybe a curtain for the playroom. Long sleeve patterned shirts…or maybe some cute sundresses.


We spent $26.65 and got approximately 7 yards of cotton interlock fabric. That kind of fabric at a fabric store would have cost $12.99 (not on sale). We saved $64.28! What a deal! We are excited to use these items, and we will post them on some upcoming Transform it Tuesdays.

We found even more items that were either not quite the price we wanted to pay or didn’t have an idea yet for how to use it, so we left them at the store. However, we wanted to share some of the perspective we had when looking at these pieces.

Fabric Options2

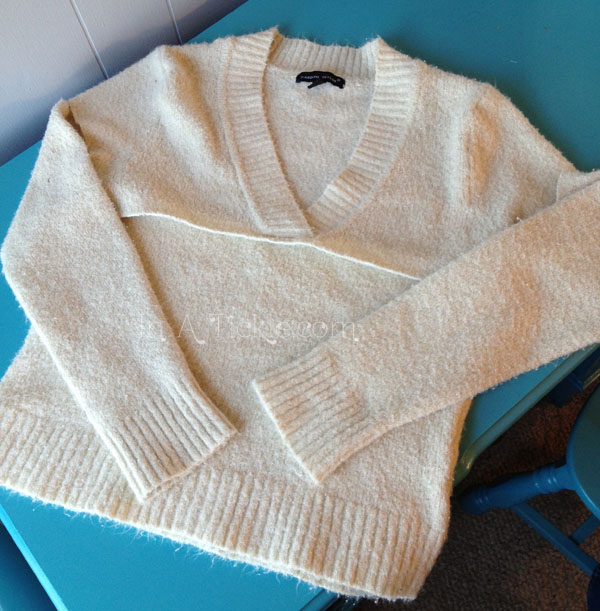
The long maxi style dresses have a lot of fabric. This skirt has a lot of fabric but look at those buttons! A card of buttons alone can easily be a few dollars. Lots of potential in oversized sweaters.

Fabric Options1

Lace fabric can be pretty pricey. This first pic has lace on top and sweater material on the lining…two in one! This lace dress has a lot fo beautiful lace AND comes with an accessory–the belt!

Next time you are at a clothing store, don’t look at the shirt or dress, look at the fabric! It’s brand new, but could cost less than a yard of fabric at a fabric store or just be a style or pattern that you wouldn’t find there.

Check out all the Let’s Talk Fabric posts:

Name It: Write With Me Wednesday

The other day, I was reading about creation in the Bible trying to get some creative inspiration from THE Creator. I focused on Genesis 2 and came across a fun point.

Genesis 2:19-20

So the Lord God formed from the ground all the wild animals and all the birds of the sky. He brought them to the man to see what he would call them, and the man chose a name for each one. He gave names to all the livestock and all the birds of the sky, and all the wild animals. But still there was no helper just right for him.

God wanted Adam to be a part of the creative process! He could have brought the animals to Adam and said, “here are the animals, this is what each of them is called. Take care of them.” But He didn’t, he let Adam name them! What a fun job.

Name It!

Today in our writing prompt, I want you to do some naming. Below are three creatures that need names! Choose one (or more) of the creatures and give it a name, a species, and a brief description of it’s characteristics/qualities/personality.

(I thought about names after I drew them, but If you want, I would love to know your ideas! Email them to melinda at inatickle dot com. I might have to write some stories about them.)

Creature3 Creature1 Creature 2

Take it to the next level! Draw your own creature and write out the name, species, qualities. Maybe even write a short story about your character.

Changing Lives One Little Dress at a Time: Transform it Tuesday

Transform it TuesdayOn Sunday, my church was decorated with dresses, made by the young girls in church, for a special project in their Wednesday night classes. They had taken pillowcases and transformed them into dresses for little girls in Africa. The dresses will be distributed through Little Dresses For Africa, a non-profit, Christian organization dedicated to changing lives one little dress at a time! The desire of the founder, Rachel O’Neill, is to send hope to these little girls to help them realize that they are worthy.

Little Dresses for Africa

Little Dresses for Africa

Making dresses from pillowcases has become popular (just do a quick search on Pinterest and you will find many posted), but actually the pattern dates back to pioneer days.

The girls at church have challenged the ladies to make as many as they did, or more dresses to send to Africa. So we decided to pass this project on to our In A Tickle readers and challenge you to join us in making a dress (or dresses!) You can use a pillowcase or make one from fabric you have on hand.

You can print off a pattern from Nancy’s Notions for making the dress. I will show you some pictures of the dress I made, which you can look at as you follow the pattern instructions.

Dress Tutorial1

Start with a pillowcase. Cut the seamed end off the top, leaving the hem at the bottom for the dress hem.

Dress Tutorial2

Fold the pillowcase in half lengthwise and cut the armhole according to the size dress you are making. Fold the top edge (neck) down 1/4 inch and then 1/2 inch- It is helpful to press these folds with an iron. Stitch to make a casing for the elastic. Thread the elastic through the casing- be sure to stitch down the end before it disappears into the casing! Then stich the other end in place once your safety pin comes through the end of the casing.

Dress Tutorial3

The elastic in the casing gathers the dress neckline in the front and back. Fold the bias tape over the raw edges of the armhole and stich in place, leaving the extra length at each end for ties on the shoulders.

Now you can add extra decoration to the dress, if you want. I added a pocket with some lace and a border near the hem with fabric and lace to match the pocket. Then using left over bias tape, I added a bow to the pocket. Finished dress

Are you inspired to make some Little Dresses for Africa? Let us know you want to participate in the comments below, or you can email jan@inatickle.com. We need to have the dresses all collected and ready to ship by Mother’s Day.

4.16.13 Update: Melinda made a pillowcase dress and added a cute bow!Pillowcase Dress for Africa

Spider-Man Mask Semi-Fail: Real Me Monday

Real Me Monday

This week is our first Real Me Monday, and I get to share an oops turned into somewhat success. I at least finished the project and Ninja Boy likes it, so I guess that’s success enough! The process though was not as smooth as I was expecting.

My son has been playing a Spider-Man game on his daddy’s ipad lately. So now he is very into Spider-Man everything, and wants to pretend to be him often. He mentioned a few times wanting a mask, and I wasn’t too sure about getting one from the store because most kids costumes are polyester, and I didn’t want it rubbing on his face due to his allergy. He informed me that they have plastic ones at the store, but I told him that maybe mommy could make him one. He seemed ok with that idea, at least he would give me a chance.

Since Easter was coming up the very next day, I figured I should get started on his homemade gift for the Easter basket (Last year I started my own tradition that at least one thing in the kids’ baskets would be homemade from me).

I looked through our fabric stash, and the only red I had was this:

Spider1

Ninja Boy informed me when he saw it that the fabric wasn’t right for Spider-Man. I told him it’s fine, and mommy will make it look really cool, trust me!

I got started on my project being a good little blogger and taking pictures along the way in case I wanted to make a tutorial because of course it was going to turn out AMAZING!

I started off with a piece of fabric, a hoodie, and a what I thought was a good plan…

Spider mask1

See, you do this…then this…then this…

 Then you try to figure out the eye holes and you completely mess it up! and throw in the towel AKA Spider-Man mask you spent the last 30 minutes working on. I was very close to giving up completely, but mom encouraged me that I could figure it out.

So I found an old red t-shirt, and used the old mask as a template for the new one. The t-shirt material fit a lot better over his face and zig-zag stitching around the eye holes worked a lot better than trying to put bias-tape around them (thanks mom for finishing the second eye hole for me!). I used a black fabric marker to draw the webs, sewed on a couple ties in the back to keep it on his face and there it was!

Spider mask2

So my super easy, going to be amazing, Spider-Man mask tutorial has turned into a lesson that sometimes it doesn’t work out the way you hoped, but if you persevere you can make something that functions as it should and still makes your kid happy. I would make the new version of the mask into a tutorial, but trust me, as good as I did it, you could probably figure out an easier way on your own! Or if your kid likes the masks that just go round the eyes, check out this tutorial from Cutesy Crafts.

After he got the mask in his Easter basket, he then informed me he needed the rest of the costume. One thing at a time, Ninja Boy, one thing at a time.

Spiderman

Ninja Boy as Spider-Man

Have you ever made something for your kids that didn’t turn out like you had hoped?


Look Closer for Inspiration: Weekend Wonderings

Weekend Wonderings

Dandelion“She turned to the sunlight

And shook her yellow head,

And whispered to her neighbor:

“Winter is dead.” ~A.A. Milne

It’s spring in the Ozarks! So what do you see…


The Park

Not much until you stop and look more closely at God’s beautiful creation!

Clover Flower

Clover looks very different close up!

Take some time this weekend to look more closely and you may be surprised by what you find. At the park we found, hidden away in the grass, tiny little flowers with very intricate designs. Yellow flowers Small purple flowerSmall yellow flowerMy yard is full of beauty from a distance, but when you look carefully, you can see why the Bible says to consider the lilies of the field and how God clothes them. 
Small Blue flowers
Purple Bulb FlowerBradford Pear BlossomBee with flower

When needing inspiration for designs you want to create, just look closer at the designs all around you made by the Creator!

Melinda’s Nutritious and Delicious Bread Machine Wheat Bread: Foody Friday


Foody FridayBread4

About two years ago, I stopped buying bread regularly from the grocery store and decided to start making my own. When we discovered that Ninja Boy was allergic to nuts, we realized how many things you buy at the store either contains or may contain nuts. Making our own foods became a lot easier than finding convenience foods that were completely nut free. Also, after looking at the ingredients in the store-bought breads, it frustrated me how many ingredients there were in just a loaf of bread and how many of them I couldn’t even pronounce. This began our journey toward eating mostly unprocessed whole foods. My mom helped get us started and gave me her old bread machine that she didn’t use often (I bought another one almost new from the online garage sale after a few months so now I can make two at a time).

I started off with a basic white bread recipe online, but I tend to start tweaking after awhile and got a bit more creative in order to have a more nutritious bread (especially since our family REALLY likes bread). I subbed the canola oil for olive oil and the the white sugar for local raw honey. Also, instead of just white flour, I did a combo of organic white flour, organic whole wheat pastry flour (or just whole wheat flour), and flaxseed. Not only is the bread healthier, but it tastes so much better than the original recipe. My family devours it freshly made (which could be a problem depending on how often I make it). However, my kids stay full longer when they eat this bread rather than basic white or even the wheat breads (which can sometimes just be brown colored white bread as far as nutrition goes).

Bread 2

Freshly baked with butter and cherry fruit spread.

I have been asked to share my recipe, but I will only do it if you promise to give it a few tries. When you have a bread machine, it’s like a baby. You have to get to know it’s personality. It took me a good five or six tries before I got the original recipe down and then another year or more before I developed this recipe to my liking. The first loaf might not turn out just like you hoped, but I promise if you keep at it, it will turn out beautifully. So do you promise??

Good.

Here’s the recipe for Melinda’s Nutritious and Delicious Bread Machine Wheat Bread (I know, such a long title, one word for every ingredient):

(This is the order that I put my ingredients in, and my machines are two different brands. Check your bread machine manual though just to make sure your machine likes it this way too)


  • 3 tbsp Olive Oil (trust me, it’s way better than canola or vegetable, and it’s healthier. Or try coconut oil and tell me what you think because I haven’t tried it yet, melt it first)
  • 3 tbsp Raw Honey (I get Terry’s Wild Honey from my area, let me know in the comments below if you want info about it)
  • 1 1/2 tsp Sea Salt
  • 1 cup hot water (I guesstimate, but it should be about 110 degrees)
  • 1 1/2 cups Organic Whole Wheat Flour
  • 1 1/2 cups (replace 2 tbsp with Milled Flaxseed) Organic Unbleached White Flour
  • 2 1/4 tsp Bread Machine Yeast or 1 package Bread Machine Yeast (Make sure its 2 1/4 tsp)

Tip #1: Measure out your Olive Oil first and pour it in. Then measure out your honey in the same measuring cup or spoon, the honey slides right out. Less scraping and no wasting precious raw honey!

Tip #2: Use 3/4 Cup to measure out flour. Fill up twice for your 1 1/2 cups. When measuring the white flour, put the 2 tbsp flaxseed in the 3/4 cup first then fill up the rest of the way with your white flour.

Tip #3: Don’t let your yeast touch the water when measuring and pouring in. Let the paddle do the mixing.

Check your manual, but I put in all the ingredients then set my machine to the medium color whole wheat setting. Then wait! It takes just under 4 hours to go through the process. You’ll know that it’s getting close to being done when your house starts smelling like a bakery!

bread3

It can take some getting used to cutting the right size of slices. It’s been two years and my Hubby still has trouble with it sometimes. So don’t worry if you can’t make them even right away.

To get a softer crust, remove the bread as soon as it is cool enough to come out of the pan. Then wrap tightly with plastic wrap or put it in a plastic container. It will get a little steamy, but trust me it keeps it nice and moist.

Bread1

I use the Sterilite 12.6 cups Square Storage Container. It’s the perfect size for a 2 lb loaf.

The bread (if it even lasts that long) stays fresh for 4-5 days. By day 6, it’s perfect for French Toast!

What’s your favorite kind of bread?

Let’s Talk Fabric Part 1: Thoroughly Thrifty Thursday

Thoroughly Thrifty Thursday

One of the common excuses I hear from people about sewing their own clothes for themselves or their kids is that they can buy an outfit from the store for cheaper than they can buy the fabric. Often that can be true, but there might be a way to get fabric for less too. For the next few weeks, we want to talk to you about ways to get fabric for a lot cheaper than you might think.

Last week, Mom and I went on a quick two hour fabric run. We have to drive 45 minutes to the closest Joann (gasp!). So, when we go, we have to make it count. After the typical stop to the bathroom in the back of the store (c’mon, it’s a long drive), we headed to the cotton fabric. We started picking out some basic solid colors and were happy to see that they were on sale.

After picking out several bolts of cotton, we switched to the notions side of the store to pick up some needed supplies. On our way back to the fabrics, I spotted a bin with yellow and bright red. Now if you are an avid shopper at all, you know that red and/or yellow means SALE! This particular bin held dozens plus of rolled up remnants of all colors and blends ranging mostly from 1/2 yard to 1 yard of fabric. We found a whole stack of 100% cotton flannels and cotton solids and prints. We even found three or four of the colors that we had originally picked out of the bolts in the cotton section.

Jan checking out the fabric.

Jan checking out the fabric.

I checked the sign again, and it took a store clerk to convince me that it actually was 50% off the price of the fabric per yard and not the price that it said on the tag. Not only that though, we found out while getting our other fabric cut that the 50% off was AFTER the sale price if that style of fabric was on sale! On top of that, at the register, we were able to use a $10 off $50 or more coupon. Most of the remnants ended up being around $1 each!

WARNING: Double check the original price on the remnant. We picked up a really nice piece of pink that when we were looking at our receipt later had been $19.99 a yard (and not on sale). Yikes! Thankfully, we only paid $9.99 since it was 50% off, but that’s not really the deal we had been going for in our fabric purchases that day.

So after you have found these great deals on fabrics, you want to keep as much of it in tact as you can when washing it. Make sure you finish off the cut edge somehow to keep them from unraveling. There are a few techniques to try depending on the equipment you have available to you.

Pinking Sheers cut a zig zag edge on your fabric. You lose a little bit of the fabric with the extra cut.

The Pinking Shears can do a pretty good job if its a tough fabric as you can see with the red, but doesn't work as well with a more delicate fabric like the flannel.

The Pinking Shears can do a pretty good job if its a tough fabric as you can see with the red, but doesn’t work as well with a more delicate fabric like the flannel.

Zig Zag stitch is great if you don’t have Pinking Shears or a serger. Set your sewing machine to the widest stitch width and regular length. But the sturdiest option, if you have one, is to use your serger to finish off the cut edge.

remnant1

When fabric shopping, depending on how much fabric you are needing for a project, always check the remnant bin first. It’s not just the obscure fabrics left in there. You can find some cute pieces if you check often enough.

And you might get the added savings if that style of fabric is already on sale!

What great deals have you snagged at the fabric store lately?

Check out all the Let’s Talk Fabric posts:


The Doodle Box: Draw With Me Wednesday

Draw with me WednesdayRemember these?pencil

In this day of all manner of technological devices at our fingertips, many of us probably seldom pick up a pen or pencil. We type on the computer keyboard and chase an arrow around the screen with our hand on a mouse. Then we swipe, text, and tap on our touch screen, tablet, or phone. Even at the store, we are signing our names with a stylus on an electronic signature pad (which, by the way, never ends up looking like my signature!)

Today, I want you to dig through your desk or kitchen junk drawer to find a pen or pencil and a piece of regular size paper. You might want to take an extra scrap piece of paper- like an old envelope or piece of junk mail and just draw some lines to get used to the feel of the pen or pencil in your hand again!

Now take off your “I’m an adult and don’t do these kinds of things anymore” hat and let’s get started!

Take your piece of paper and fold according to the photos…

Folding paper

Fold a regular sheet of paper 4 times to create 16 boxes on your paper when you flatten it out.

Start with the first box and ignore the rest. I know a big piece of paper can be intimidating to draw on at first, so we are going to doodle in little boxes one at a time! In the first box draw some straight lines. Let your creativity out and draw some lines. Relax, there is no right or wrong. Just have fun!

When you are finished with the first box, move onto the next box and draw circles.

Jan drawing doodles

Below is a suggested list of themes for each box. You can always go back to earlier boxes to add more to them as your creative juices start flowing!

1. Lines
2. Circles
3. Diamonds
4. Zig-zags
5. Squiggles
6. Swirls
7. Paisleys
8. Triangles
9. Stars
10. Scales
11. Waves
12. Spikes
13. Squares
14. Drops
15. Flowers
16. Hearts

Moms, Dads, and Grandparents, this is a great activity to do with your kids. It might help you to relax and let the creativity flow as you watch them draw with abandon.

NinjaBoy Drawing1

Ninja Boy is very meticulous with his drawing because he has so much detail that he wants to include.


Ninja Boy finished drawing

Ninja Boy followed his own creative drawing prompts!

My Princess so happy with her drawing

Ta Da! My Princess radiates joy as she looks over her page of drawings.


My Princess Doodle Drawings

Melinda Drawing1

You can even draw with a toddler on your lap!


Even though we were both looking at the same list of items to draw in each box, as you can see from our finished pages, we each created differently!

Melinda's finished drawing

Melinda’s finished page

Jan's finished drawing page

Jan’s finished page

Did you have fun with this drawing activity? Do you have any suggestions for more Doodle Box prompts? Try doing it again tomorrow and see what new ideas your creative mind comes up with for each theme.

Thrift Store Sweater Becomes Dance Outfit: Transform it Tuesday

Transform it Tuesday

My Princess, who is three, started taking dance class last summer (and LOVES it). Because I had taken ballet when I was younger, her dance teacher convinced me I should take ballet again. I knew I needed something to get my body moving again (my exercise must be wrapped up in fun or it’s not going to happen) so I thought I would try it out. It had been thirteen years, and I’ve had three kids since the last time I had taken a ballet class, but I was committed after buying tights and ballet shoes for $50! I skipped the leotard thing and stuck with the tank top and yoga pants for awhile.

After dancing for the last seven months, losing some weight doing it, and realizing I wasn’t too shabby, I decided it was time to start looking like a dancer. However, those dance outfits can be pretty expensive. I bought the leotard, and I really wanted some cute warm up stuff but when you are buying new ballet shoes and tap shoes for a three year old every six months, mommy’s outfits kind of take the back burner. That’s where I decided I would get creative. I found a sweater at the thrift store for $1. When you only spend a dollar, you feel a little more free to whip out your scissors without consequence. This is what I started with…

I'm still trying to get used to taking pictures before I start projects. So this sweater actually started as one piece, but you can see where I cut it so I'm going to pretend I did it on purpose.

I’m still trying to get used to taking pictures before I start projects. So this sweater actually started as one piece, but you can see where I cut it so I’m going to pretend I did it on purpose.

With a snip snip here and a sew sew there. Out came this…for only $1!

You can't tell in the picture, but the sweater is sparkly. So pretty and warm!

You can’t tell in the picture, but the sweater is sparkly. So pretty and warm!

If any of you are ballet dancers, please don't critique my form. If you do, I'll deny that it's a picture of me. Thanks!

If any of you are ballet dancers, please don’t critique my form. If you do, I’ll deny that it’s a picture of me. Thanks!

I have done something like this to two other sweaters (I might show you some time), one I already owned and never wore, and the other was my husband’s that he was getting rid of. So I now have three dance outfits and only paid $1.

Take a look in your closet (or your husband’s or kid’s), see what isn’t getting used and look at it with a new eye. Maybe there is another use for it, and you could give it new life! Don’t be afraid of the scissors. Sometimes you can’t see the potential until you make the first cut.

What have you made from an old or unused sweater? Share in the comments.

Welcome to In a Tickle

Today is an exciting day! Yes, it is April 1st. The day people get to say whatever they want and follow it up with “April Fool’s!” The day where people everywhere try to trick their friends and families with news that is untrue or with funny pranks. Today is the day where there’s a good chance if you announce something big, then no one will believe you. However, we are taking that risk and announcing our new adventure in the world of blogging and business!

We are excited to announce that we are making a dream become reality today. In a Tickle is our new blog/business/creative outlet where we share our creative lives with you and hopefully encourage you to embrace your own creativity. Check out the full explanation of our dream and our personal bios, Melinda and Jan, in the About Us pages.

We wanted to use this first post to tell you about our daily blog plan and what you can look forward to seeing at In a Tickle.

Real Me Monday

On Mondays, you can expect a Real Me Monday post where we will share a real moment from us. Reading blogs or magazines can often make us feel like we don’t have our lives all together like the people we follow, but every one of them has a life filled with ups and downs, mistakes and successes. It’s just that most often the successes are all we see. We want to share our best moments with you, but we all also want to share some of our failures. Sometimes you can learn the most when things don’t go as you hoped. We want to be real with you so you know that you are normal. Embrace mistakes and learn from them with us.

Transform it Tuesday

Transform it Tuesday will take an old or unused object or piece of clothing and turn it into something new and useful. Repurposing things we have into things we have been needing. Let’s take something ugly or blah and make something beautiful and creative. Helping our environment and our bank accounts!

Draw with me WednesdayWrite with me Wednesday

Draw with Me Wednesday and Write with Me Wednesday are the posts to get you involved. We will post a writing or drawing prompt that will get your creative juices flowing. They should only take minutes to complete and will often get your whole family involved.

Thoroughly Thrifty Thursday

On Thursdays you can expect to see Thoroughly Thrifty Thursday. We will be getting creative on how to get crafty without spending a lot of money. We can talk about deals that we have found and ways to use your supplies to their fullest potential. We can also talk about being thrifty with our time so that we don’t have any excuse about not having time to be creative.

Foody Friday

Foody Friday is the day we get to talk about food! Do you ever get tired of making the same things over and over? Maybe its time to get a little bit more creative with how you feed your family. We will share recipes or food facts that are nutritious and great for families. We’ll talk about creative ways to feed picky eaters or people with allergies (our family has a lot of experience with both of those).

Weekend Wonderings

Sometime during the weekend we will be posting something to inspire you, something to get you thinking, something to help you stop a moment and maybe spark a thought or idea for something creative in your life. We will be calling it Weekend Wonderings. Set aside a moment every weekend with us to fill your brain with some creative wondering.

We hope that you will continue on this journey with us to create, inspire, dream, and play. We are made in the image of a creative God, and that means you are creative too!

Melinda & Jan