Whimsical Flowers From Paper and Fabric

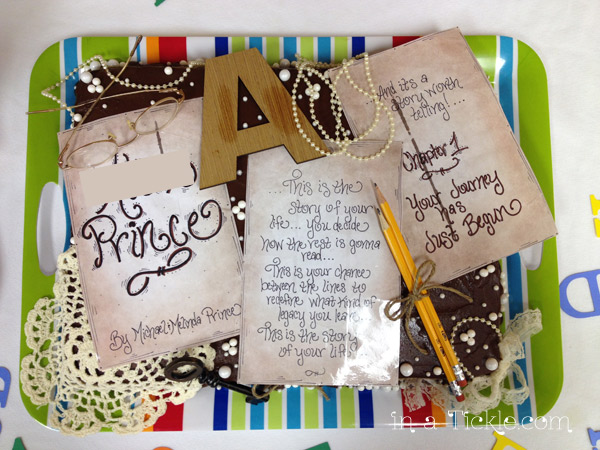
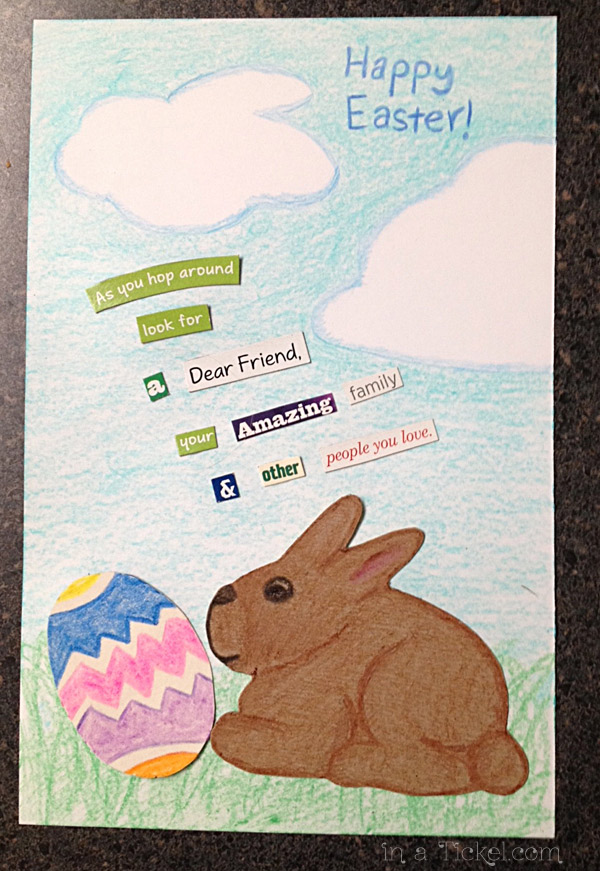
Melinda signed up to host and decorate a table for the Spring Tea at her church. Right away I knew what we could use for part of the decoration. Almost five years ago my sisters and I made decorations for Melinda’s baby shower when she was expecting My Princess, using tea pot planters purchased from a craft store.Tea Pot Decorations

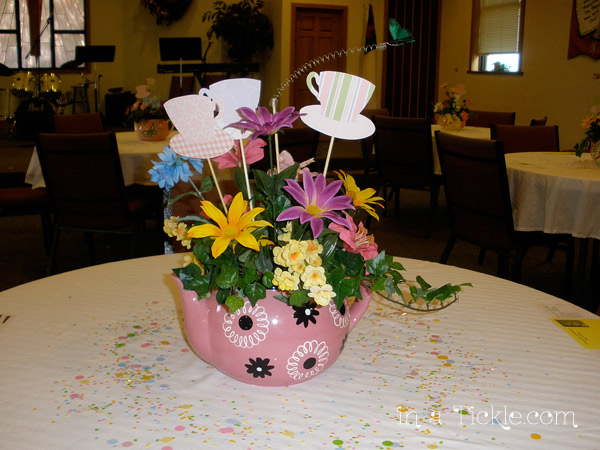
Only this time I wanted to make some whimsical flowers to put into the pots instead of “real” looking silk flowers. Last summer, my sister showed me how to make accordion folded paper flowers when we were busy making cards at our mom/sister get together. I started folding some paper while Melinda was working on a sewing project. Seeing a pile of small pieces of fabric scraps on the table gave me the idea of making flowers using both paper and fabric (or other sewing materials). After putting the first flower together, I had to go into the garage to get something and saw cut pieces of chain link fence we were going to throw away. We had just increased the fence around the garden to keep those pesky deer and critters from eating my plants! The minute I saw the fence wire pieces they no longer looked like trash but looked like the perfect stems for my whimsical flowers. Pieces of chain link fencing
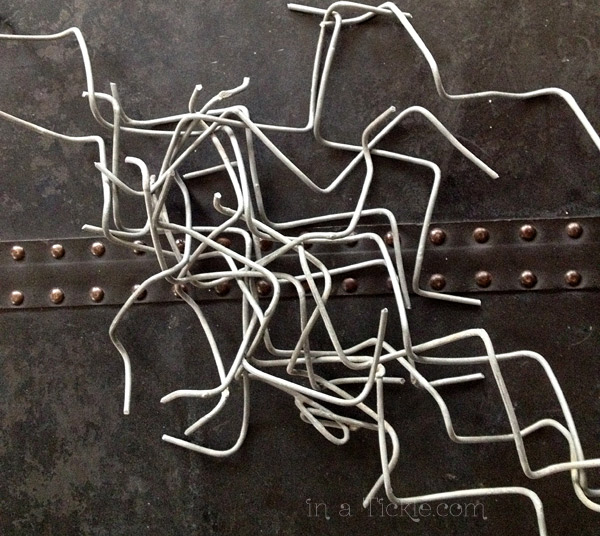
Using buttons, ribbons, fabric, yarn, and even some wooden beads, I made flowers you won’t see in any garden.

Paper Fabric FlowersHere’s a simple tutorial for making accordion folded paper flowers. I cut some of the paper strips with decorative edge scissors to vary the look of the flowers. However, because I wanted to use the hole in the middle of the folded flower (for pulling fabric, ribbon, etc. through as well as to stick my stem into) I did not hot glue a paper circle on the back as shown in the tutorial.

I first tried sewing the paper by hand to gather the strips as my sister had shown me, but my thread kept breaking– so I went with hot gluing the paper folds. I was just holding the flower down with my hand while trying to squeeze hot glue around the center fold and then holding the flower still until the glue set. After I had finished all the flowers, I was showing my mom how I made them. She came up with the great idea to use a lid the size of the flower to hold it in place for gluing and setting up. That worked so much easier– next time!Making Accordian Pleat Flowers
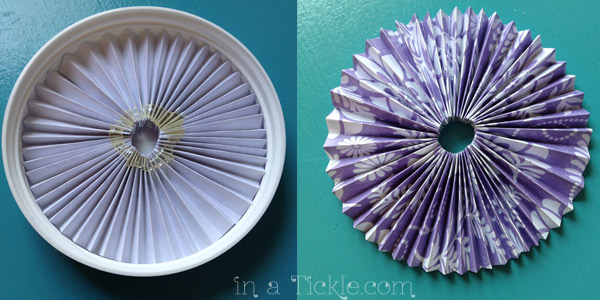
I used various methods of covering up the hole in the backs of some of the flowers and covered the wire fencing with florists tape.Flower BacksTea Pots with flowers
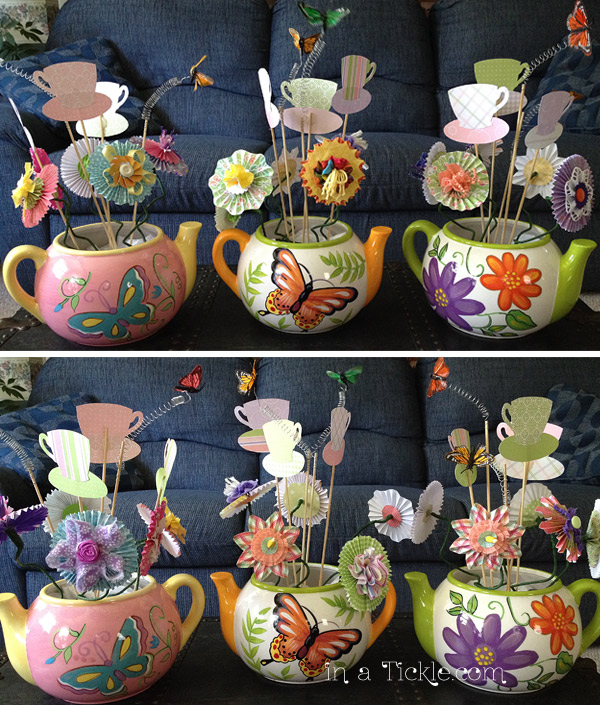
Tomorrow we will show you pictures from the Spring Tea.

Easy Transformation Toddler Dress

Each of my granddaughters prefer wearing dresses. Or skirts. Since they all need summer clothes, we are trying to figure out easy and quick ways to make dresses and skirts. The one I am showing you today was very simple.

I started with a toddler tank top.T-Shirt for top of dressAnd a ladies blouse purchased at a yard sale (the sleeves had already been used on another project.)Womans shirtThe tank top was cut in half width-wise, and the ladies blouse cut straight across under the arms for the skirt. Leaving the the blouse hem, darts, and button front as is, I stitched a gathering stitch across the top of the skirt. With right sides together, I adjusted the gathering to fit the lower part of the t-shirt top and stitched. I cut off the blouse collar, stitched to make it a bit more narrow for a bow and hand stitched the bow to the dress. Finished Dress!toddler dress

Documented Life Project- Week 17

The art challenge for Week 17 in The Documented Life Project was: “Photograph or draw your favorite shoes.”

Jan:
When I first read this challenge, I wanted to skip it. Shoes are not a favorite thing for me. I have very few shoes and wear the ones I get until they die. I dread shopping for shoes when they need to be replaced. In order to make the sale, shoes have to feel wonderful on my feet at first try on. They need to make me feel as though I could wear them all day long and never make my feet (or legs) hurt. It’s hard to find shoes that look nice and fit my criteria.

The weather has finally agreed that we can pull the sandals out of the hidden corner of the closet, so I decided I would draw a sandal from a pair I have owned for several years (I’m hoping they don’t die this summer). I’ve been wanting to do more sketching and this was a good challenge to sketch a black sandal and try to get the detail to show up.DLP-Week-17-J


Melinda:
Mom’s first paragraph is pretty much the way I feel. I hate shoes, and if I can help it, I don’t wear them. When I was a little girl, I would take me shoes off as soon as we got somewhere. My parents finally got me to start at least leaving them by the door instead of wherever throughout the house. I still do that to this day.

So when I saw this challenge, I wasn’t sure what I was going to do. The words I wrote on my page kept going through my head, and I decided to just draw my feet. I had seen mom’s page and was inspired to sketch as well. Still learning, but I do enjoy sketching and want to do more soon.

DLP-Week-17-M

Book Themed Baby Shower

We are counting down to the final weeks when Melinda’s newest addition to the family makes his arrival. To celebrate, Melinda’s closest friends planned a wonderfully creative “book themed” baby shower for her. You may recall hearing about these friends in this post last year. Each of these moms have a set of twins and we were wondering what the odds were of three best friends each giving birth to twins. But it was not to be (much to Melinda’s relief!)

Because of Melinda’s love of books (and consequently her children’s love of books) they decided it was the perfect theme for the shower. A few weeks ago they sent out clever invitations that looked like a book cover on the front with an old fashioned library card pocket on the inside. The pocket card contained all the information about the shower.Book Themed Baby Shower InvitationMelinda’s friends dressed up as librarians and decorated the whole room as a children’s library.Melinda and friendsCan you guess…how many kisses are in the jar? Guesing Game

Please address an envelope for thank you cards.Thank You Address EnvelopesEvery baby needs a first alphabet book. Pick a letter, draw a picture of something starting with that letter and write the word.

Alphabet Book Baby Shower Acitiviity

My Princess was excited to draw a picture of a queen for her brother’s book!

Every food item was related to a book.Blueberry PunchMuffinsRabbit FoodHungry CaterpillarGreen Eggs and HamDish Ran Away With SpoonBaby Shower CakeThe yummy chocolate cake with strawberries and cream cheese filling was make by Cakes By KimberlyMelinda and My Princess

Each guest received a beautiful handmade bookmark to take home with the quote:
Children are made readers on the laps of their parents. ~Emilie Buchwald

Baby Shower Bookmark

Even the gift table had book themed displays.Gift Table DisplaysMelinda's Baby Shower


Melinda-

I am so thankful for great friends that love me so much! I LOVED the shower. It was exactly what I hoped it would be and truly represented what I love so much–BOOKS! I appreciate all the friends and family that came and gave to me and my little boy.

Documented Life Project- Week 16

The Documented Life Project challenge for Week 16 was to: “Add a cardboard food box in a creative way.”

Jan:
For this challenge, I dug through the bin of items we have to take to recycling. We don’t have much in the way of cardboard food boxes but I did find some cracker boxes. I was not feeling inspired by anything printed on the boxes, but as I was looking at the weaving project I had recently done with textile fibers, I decided to try weaving my cardboard boxes. I used the fronts off two different graham cracker boxes, cut the cardboard into half inch strips and started weaving. Cardboard strips don’t want to hold together very well in a weave, so I had to tape the edges as I got the pieces into place. Once I got the cardboard woven together, the printed side still wasn’t giving me any inspiration, but I liked the plain backside of the weave.Woven Graham Cracker BoxI decided to cut the back of a Wheat Thins box into strips and wove narrower strips of plain paper between the cardboard to see how that looked. I mixed up the strips so the words would not be showing. I ended up with this and was still stumped about what I was going to do with any of it.Woven Wheat Thins BoxSince I was not sure what to do, I looked up quotes on the internet having to do with weaving. Once I came across this quote, I knew what to do with my cardboard weavings. In order to cut the woven cardboard into coat shapes, I covered the front and back of the weaving with packing tape before cutting.

You may not be able to leave your children a great inheritance, but day by day, you may be weaving coats for them which they will wear for all eternity. ~Theodore L. Cuyler

DLP-Week-16-JCardboard Weave close up


Melinda:

My kids always get Annie’s bunny crackers in their Easter baskets, so as I was filling their baggies, I decided those would be the boxes I used for this page (as well as a couple cereal boxes).

Since it was Easter, I wanted to use the bunny from the front of the package. Using some words from the boxes, I created my Happy Easter page.

Cereal BoxesI was sitting at the table with my kids’ crayons in front of me, so I decided to use those to color my background, the bunny, and the egg. Hope you had a happy Easter!DLP-Week-16-M

Spring is for the Birds

While visiting my little Songbird, I’m sure I read The Best Nest, by P.D. Eastman, at least three dozen times to her. Mrs. Bird is quite unhappy with her nest and wants a new one. After several unsuccessful attempts at making a home in new locations, she ends up back at her original nest, singing that it’s the best nest for her new egg to hatch in. If you haven’t read it, you should. The real story is more fun than my description, and the illustrations are great. Even though it’s a children’s story, you might learn something to apply to your own life as well.Best Nest

Yesterday I was busy cleaning out the front flower bed at our house and trimming wildly overgrown vines. I uncovered a nest built in previous years. Shortly after I finished, I noticed a cardinal checking out the nest. I jokingly said she was trying to find The Best Nest. She came back to the nest several times.

To my surprise, this is what I found this morning!Cardinal Eggs in NestShe did not waste any time! Since the nest is located on the front porch, Mrs. Bird flies off when we open the door. So trying to take a picture of her on the nest from the office window is a little hard with a simple camera. I can watch her while sitting at my computer. The eggs should hatch in about 13 days. The grandkids can’t wait to see the new babies!Cardinal in Nest

Super Quick Homemade Thank You Cards

I have been needing A LOT of Thank You cards lately, and the other day I needed some made up quickly. I wanted nice looking cards without spending a lot of time making them. I decided on a design and tried a trick to make it go a little bit faster.

I started off with my small letter stamps. Instead of trying to hold them all together each time to stamp the “thank” and the “you,” I decided to make it faster. Using regular scotch tape, I taped the letters together to make a whole stamp. This made stamping several in a row a whole lot easier. I can easily take it apart if I need the letters for something else.

Thank Stamp 1

Thank Stamp 2

Thank Stamp 3

I made up ten of these small pieces of cardstock to say “thank you” and could have made several more to keep on hand for another time if I had wanted to.

Thank You Stamped Cards

I made sure I had enough colored cardstock ready for the basic card. If you have 8.5″x11″ paper, all you have to do is cut it in half (5.5″ on the 11″ side). If you have 12″x12″ paper, cut it down to 8.5″x11″ and then cut it in half. You’ll have extra paper that can be used for other projects. Fold the paper in half and you have a basic card size.

Card Front

I cut down some of the gelli printed paper that the kids and I had made to use as the background of my card (You could use whatever patterned scrapbook paper you have on hand to match your card). To fit on your basic card size with a small border, cut your paper 5.25″x4″.

I added my piece of cardstock with the “thank you” stamped on and drew a little border with colored pencil.

Thank You Card

Very soon I had ten Thank You cards ready to write in and send.

Thank You Cards

Thank You Cards 2


Documented Life Project- Week 15

The challenge for this week’s Documented Life Project was to do something “Monochromatic: use shades, tints and hues of one color.”

While I was in New York, on one of my walks, I became fascinated with the designs on the ironworks on the fences and balconies and windows of so many of the old buildings. So I began taking pictures of ones I liked to use for future creative inspiration. Every time I was out my eyes were drawn to the abundance of iron design because it’s just not something you see much of where I live. I showed my pictures to Melinda and we decided to each use them as inspiration for this challenge.

Jan:
When I first saw this set of windows, I knew I wanted to use them in a challenge. Window InspirationFor my monochromatic challenge, I chose to draw the ironwork from one window and include the brickwork. The grandkids insisted the color I worked with should be shades of red. My medium of choice was my red and pink gelatos used as watercolor paint.DLP-Week-15-JMelinda:
I chose two pictures for my page. I really liked this fence, and I liked the variations of color on the windows.Fence inspirationRiver WindowsRiver SignI started off drawing the fence and also drew the window panes for my background. Using mom’s gelatos I colored the “window panes” in different shades of blue. I drew the lines in blue with water color pencil then soften them with a wet brush. At first I wanted my fence to pop out in a bright white color, so I painted it with gesso and outlined it with black sharpie pen. After starting at it a long time trying to figure out what to do next, I decided I didn’t like it white. I colored over it with a light blue water color pencil.

I had a very difficult time finishing this page. I couldn’t figure out what to add to it after the window and the fence. Everything I thought of just made it look cluttered or covered up too much of what I had already done.

Even after looking at a bunch of quotes, I was still not figuring out what to do.

I began thinking about the water that inspired the guy to do the different colors of window panes, and the word that kept coming to mind was “perspective.” Perspective means “a particular attitude toward or way of regarding something; a point of view” and “true understanding of the relative importance of things; a sense of proportion.” When you have an understanding of what is important in life, it changes you. That is something I have definitely learned over the years. So I decided to keep my page simple in order to highlight the shades on the window panes and not cover them up so much.

DLP-Week-15-M

Ninja Boy:
Six year old Ninja Boy thought what we were doing looked like fun and wanted to participate. I let him look through my photos and choose one he wanted to draw. He liked this one:Fence inspirationHe decided to make a monochromatic drawing using pencil. I love his attention to details.6 yr old drawing of fence


Easy to Make Dress for Girls Who Twirl

My Princess loves wearing dresses and if they have a skirt that twirls, all the better. We bought a simple plain t-shirt and with fabric already on hand made this adorable dress in less than a couple of hours.Front of DressWe followed the basic instructions in this tutorial from The Crafty Cupboard to make the dress. You could make this dress with the skirt attached at the waist, long waisted, or empire waist style. Since the skirt is a full circle, the length and width of the fabric needed would depend on where the skirt is to be attached to the t-shirt and length of skirt. T-shirt and skirt fabricAfter cutting the t-shirt the length desired (plus seam width), fold the shirt in half with sleeves together. Then fold in half again the same direction and measure the width of the folded cut line. This will be the measurement you use to cut the center circle of the shirt.

Fold the skirt fabric in half with the selvages together and then in half with the cut edges together to form a square. (Think cutting out paper snowflakes.) At the folded point (which will be the center of your skirt) measure the length you determined from the previous paragraph. Pivot from the center point marking the length at several points. Then using those markings, draw a quarter circle. Before you cut that circle, do the same thing from the center point to mark the length of the skirt and then cut both quarter circles.

We surged the waist and bottom edge of the skirt before pinning and sewing the skirt to the t-shirt. The surged hemline was easy to press under 1/2 inch and topstitch for a small hem. You can add a sash and ties to the dress if desired, but it works without as well. Check out the tutorial.

Back of Dress

Back of dress with ties

We plan to make several summer dresses for the girls using variations of this method. A little friend’s birthday is coming up soon and she loves frilly, glittery dress up clothes to play in.Glitter Fabric So we used a variation of this same tutorial to make a fun play skirt. Only this time we made the waist slightly bigger and made one straight cut from the waist to the hem, turning under and top stitching these edges to make a wrap skirt. We added a waistband and stitched velcro on the waistband to make the skirt adjustable. This way she can wear it as she grows (or share it with her sisters!)

Play Dress Up Skirt