Space: The Available Frontier

Today, we are happy to have Jan’s husband, Tom Johnson, share a guest post. He is a wonderful husband, dad, accomplished entertainer, actor, singer, and musician, all around fix-it guy, remodeler, furniture builder, biker, and most of all–his grandkids adore him! You can find out more about the group he performs with here.

There’s an old saying, “Necessity is the mother (or father) of invention.”
The movie “Robots” chimes the saying, “See a need, fill a need.”
Well, my newest platitude is, “if you don’t have space, create it!”

My son and I have enjoyed canoeing together over the years. But the time we have now to “wash the bottom of the canoe” is limited, mostly because of his schedule. He is now 33 years old and lives on one coast or the other, depending on his work as a photographer/motion graphics designer. He only gets to visit periodically now and usually not in long stretches of days, so we have to make the most of the time we have while he’s here. Up until now, our canoe has been sitting in a dusty old barn, packed behind an accumulation of other seldom used items. Three weeks ago he sent me a text and said he had some time for a visit. I was determined to hit the water with him while he was here. But that meant having to dig the canoe out of the barn, rinse off at least some of the accumulated dust and cobwebs and get it on top of the car. It was then that inspiration hit me!

Now, my wife’s car owns the garage domain, and my car is relegated to the carport. (My motorcycle wrested a resting spot beside her car only because of its’ compact size.) I looked around to see if there was some way to store the canoe so that it would be more easily accessible. I also wanted the ease of loading the canoe onto the car, being an old 17 foot aluminum model–both weighty and unwieldy.Canoe Storage

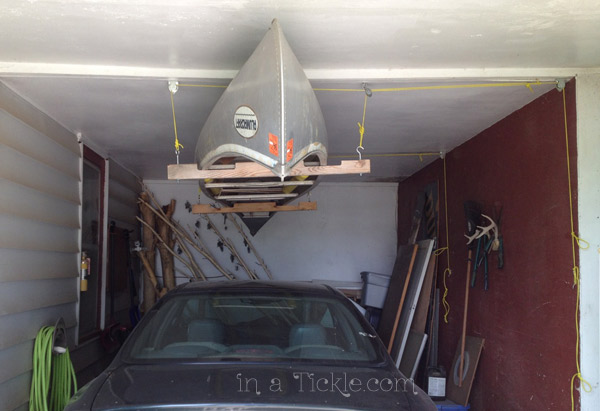
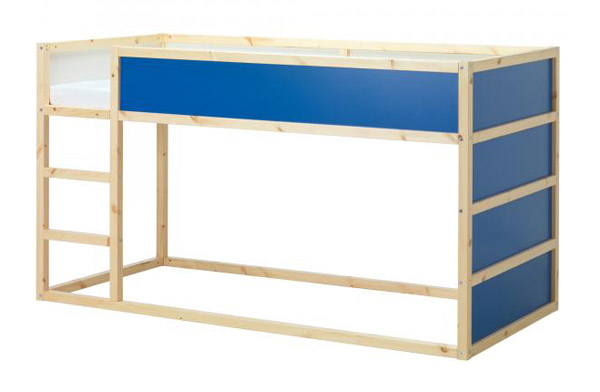
(Notice the maple trees drying in the back of the carport? Preparing for the next inspiration. Remember this bunk bed?)

I remembered that I had a couple of double pulleys stored away in a box in the garage (the garage that is slowly becoming organized by sheer necessity.) I also had a pallet from the wood stove pellets that I had burned in the winter. The pellet pallets have the two cutouts across the bottom of the 2X4s, which was my motivation to use that wood. Those cut outs would be perfect for centering the canoe and keeping it from slipping across the beam. After dismantling the pallet I took two 8 inch eye bolts and inserted them into holes drilled on one end of each beam. Then I inserted two 8 inch hooks to the other ends. The hooks allow for the beam to be released on one side of the canoe so that the it can be more easily removed from under the canoe once the canoe has been lowered onto the car.Pulley for Canoe

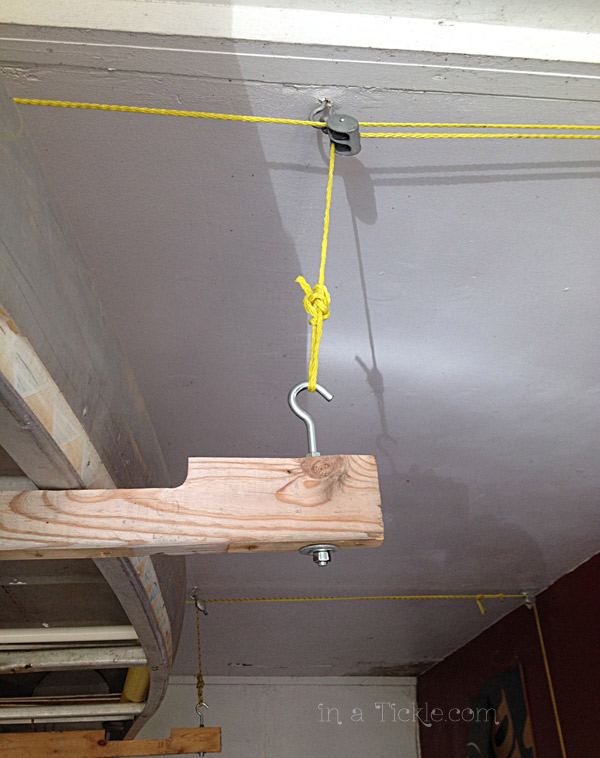
I positioned 450 pound test weight pulleys on the ceiling opposite the double pulleys, making sure to anchor them into the rafter beams and using 2 inch lag bolts.Pulley 
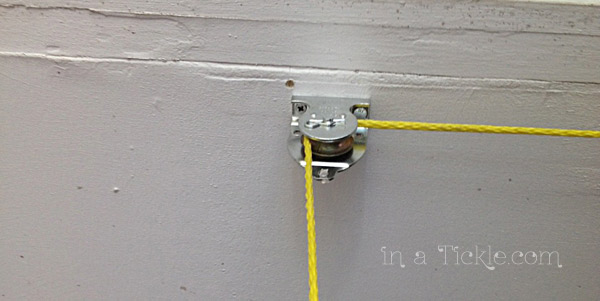
Then I bolted two more pulleys at the wall of the carport to ease the tension of pulling the ropes to lift and lower the canoe.Canoe storage pulley I bolted a mooring cleat at shoulder level and tied knotted loops in the lifting rope to easily secure the level of the canoe both at its lifted and lowered heights.Mooring Cleat

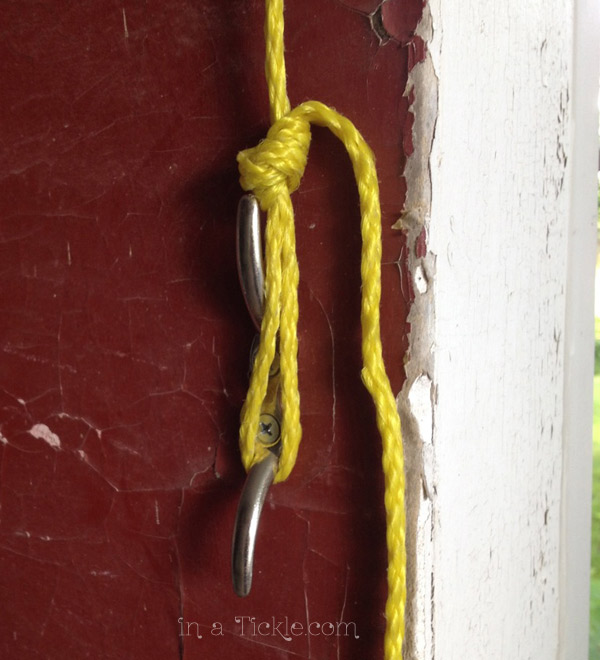
The foam pads that I had used in the past with other vehicles didn’t seem to quite fit my most recent canoe hauler so I made my own. Canoe Cartop Carrier
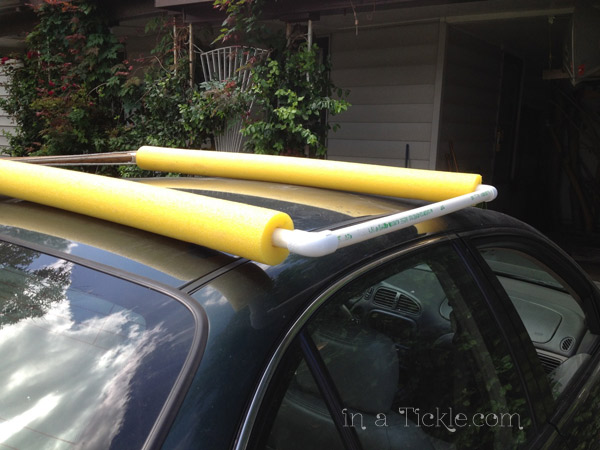
Using two foam float tubes, available at both the hardware store and the “mega-mart”, I cut them in lengths 10 inches wider than the canoe and just long enough to support the canoe to keep it from scraping the top of the car. I used 3/4 inch pvc pipe to reinforce the tubes and make the support rigid. It is just the right size to support the canoe and also to store inside the hoisted canoe. The paddles also can be stored inside the canoe across the thwarts.Paddle Storage

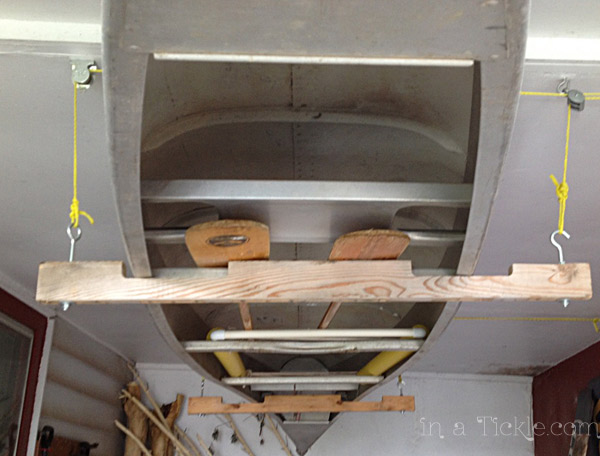
Viola! Easy, immediate canoe access using previously unused but available space and a trip to the hardware store. Time to hit the water!Canoe Storage

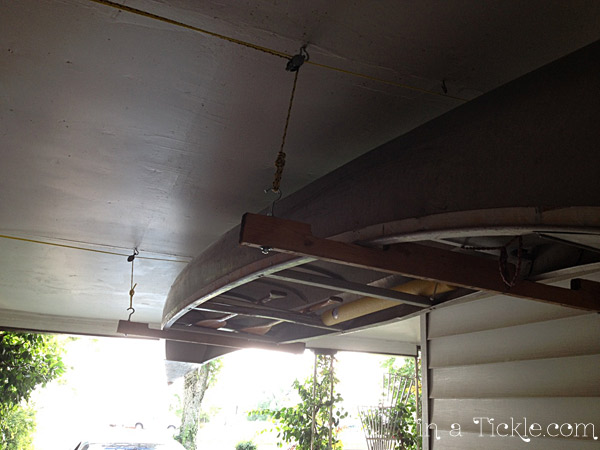
Now if I can just come up with a creative way to make it easier to load and unload the canoe at the water’s edge. Working on it!


New Addition to the Family

In case you’ve been wondering why things have been a bit quiet at inaTickle.com the past couple of weeks, here’s the reason why…

Say hello to the newest member of the inaTickle family:Baby PrinceMelinda and baby are doing great. Big brother and sisters think he’s pretty special and have decided he’s a keeper. We are not sure what blog name to give him yet, so for now you can call him, “baby”.Miss Tickles with baby brotherMy Princess with baby brotherNinja Boy with baby brother

Transforming a Loft bed Into a Playhouse

When you live in a small apartment you have to get creative. My daughter has learned to make the most of every available space in her apartment. Because of this, the furniture has to use space wisely and efficiently. The bed where I slept on my visit is an Ikea loft bed.Ikea Loft bed It will eventually be where my little Songbird will sleep when her baby brother needs the toddler bed turned back into a crib. The space underneath the loft bed is a nice little play space for her. My daughter quite often hangs a blanket across the front of the bed to make a playhouse/fort. She suggested I create something cute to make it look like a house. While visiting, I took careful measurements before I came home.

Last week I was busy creating her playhouse bed covering. I used a new twin size bed sheet for the wall of the playhouse and scraps of fabric for the door frame, mailbox, window, and roof.

Playhouse Tent for Loft BedIt’s hard to take a picture of it when it has to lay on the floor! It won’t look so wrinkled once it is attached to the bed. The fabric strips on the side near the door will tie to the ladder frame. The strips at the top fold over the top of the bed frame and tie onto the slats of the bed. So when it is attached, it will look something like this– without the wrinkles. I photoshopped the playhouse tent to the bed picture. Someday I will update with a picture of it actually on the bed.loft bed tentTo give stability and weight to the bottom of the wall, I used folding tent poles with elastic. My husband cut them to fit the length and I made a buttonhole on one end of the hem. (I kept the hem already in the sheet.) The pole can easily be removed and folded for storage.Tent polesThe doorway has decorative molding.Playtent doorframe decorationThe mailbox has a nameplate for the current residents complete with a button keyhole. My husband had a broken key he filed smooth that fits the button “keyhole” perfectly.MailboxFor the window I sewed a piece of clear vinyl to the sheet wall using bias tape for the frame. Then I cut away the sheet on the back side so Songbird can see out her window. Melinda crocheted flowers for the window box, and I added the buttons, which I attached to painted popsicle sticks. Songbird can arrange the flowers however she wants.crochet flowersWindow Flowerbox PlaytentI sewed a hem on all sides and gathered the top of two pieces of sheer fabric for curtains and sewed them across the top of the back side of the window. The tiebacks are ribbons attached to the sides of the window so she can close the curtains when she wants. This is the back side of the window.Inside of Playtent window

I can’t wait to see the playhouse tent on the bed (sure hope I measured right!) You could adapt this idea to fit on a bunk bed or any other kind of loft bed frame. Use your creativity and then let the kids use their imaginations for hours of creative play.

The Creative Life Photographer

My son, Dan Johnson, came home for a few days visit. It’s always too short for this mom, but I am grateful for the time we can spend together. You may think I am biased, but he is an extremely creative and talented young man. So rather than listen to me telling you how awesome he is, you can read this wonderful post he was featured in this week on fiftycoffees.com.

Dan Johnson Photography

Photo by Dan Johnson of his dad scuba diving

Using a Thrift Store Dress as Pattern

Several weeks ago, I found a cute little dress for Miss Tickles at the thrift store for a whopping $.75. She looks adorable in it, and it is super easy to put on a two year old because it just has buttons on the top with the rest of the skirt open and ties. No pulling over the head or having to step into it! Pair it with some cute little leggings or bloomers, and it’s great!

Original Toddler Dress

Since the dress works so perfectly on her, I decided to try and make her another one for her Easter dress. Using the original dress as a pattern, I made some pattern pieces to make more dresses just like it. I just drew an outline 1/4 in larger than each part of the dress to account for seams.

Making Pattern from Thrift Store DressThere were six pieces for the bodice, two ties, and four panels for the skirt. I needed about 1 1/2 yards of fabric to make a 2t-4t size dress.

I don’t have a lot of experience with making dresses like this without any instructions, so I will admit I was trying to figure it out myself and had to do about an hour of extra work with ripping seams and redoing before I finally found this tutorial for the bodice. That made my life a whole lot easier!

Sewing Dress Bodice

After sewing the bodice together, the skirt part was easy to do. (I didn’t have enough of the blue fabric, so I added the pink with the blue border. There are so many options to make this dress unique).

New Toddler Dress

After adding buttons, the dress was complete!

New Toddler Dress Front and BackShe loves it!

Toddler DressIf you have an outfit for yourself or your kids that you really like, try using it as a pattern to make another one!


Documented Life Project- Week 20

The challenge for week 20 in the Documented Life Project was to “Use a rubber stamp in a new way.”

Since I have very few rubber stamps (about 6) I was not sure what I would do with this challenge. Melinda and I have made our own stamps out of several different materials this past year. You can read posts about some of the stamps we have made:
Make Your Own Stamps
Print Your Own Fabric Part 1 (Craft Foam)
Print Your Own Fabric Part 2 (Moldable Stamps)
Space Pillow (Lego Stamps)

My Mom (Great Grandma) and I took the kids to see the amazing production of Jonah at the Sight and Sound Theater in Branson, MO. We loved the underwater scene with all of the jellyfish and fish “swimming” around us in the auditorium. Seeing the jellyfish brought back memories of visiting an aquarium in Hawaii. I was fascinated with a tank filled with jellyfish that glowed in the dark tank.Jellyfish in AquariumJellyfish became the inspiration for my challenge this week. I wanted to do something with the gelli plate and decided to make some jellyfish “stamps” to use on the plate. I drew various jellyfish shapes on a piece of parchment paper with hot glue and let them harden.Making Stamps and Stencils with Hot Glue I then played around with various gelli prints, laying the jellyfish shapes into the paint on the gelli plate to “stamp” the shape into the paint. (When you put any kind of stamp, stencil, shape tool, and so forth on top of the paint on the gelli plate, it removes part of the paint leaving an impression which will transfer to the paper.) Here’s a picture of the Jellyfish stamps (after getting paint on them.)Jellyfish Stamp StencilsI finally got a print I liked.Jellyfish Gelli Print

To complete the challenge, I decided to use part of a doily and some scrap lace to make a textile jellyfish.Lace for JellyfishThe center of the doily became the body of my jellyfish and I cut the scrap lace into strips for the tentacles.Lace JellyfishDLP-Week-20-J-Jellyfish

Melinda will be sharing her challenge for this week at a later time. Her challenge these days is getting through the last days of pregnancy and preparing for my new grandson.

To make your own gelli plate, go here to find out how I made mine.

Documented Life Project- Week 19

This week’s challenge for The Documented Life Project was to “Document a Random Act of Kindness from you.”

Jan:
The definition of kindness is “the quality of being friendly, generous, and considerate.” Kindness should be a quality exemplified in our lives in everything we do. The definition of random is “made, done, happening, or chosen without method or conscious decision.” So I think that kindness should be so much a part of our character that we do acts of kindness without having to consciously make a decision to do so. It should just flow out of us.

One of the ways that kindness can flow out of us is by looking at people and smiling. It is a way to acknowledge someone’s existence and give them value. It may seem like too simple a thing to do but with so many hurting people in our world today, just looking them in the eyes, genuinely smiling and maybe speaking a kind word could be just the thing that lifts their spirits and helps them keep going through their day. Start smiling at people and see if you can make ’em smile by your kindness.

DLP-Week-19-JI choose to use collaged pictures from magazines for my challenge this week, adding in some doodles and colored pencil.


Melinda:

I had a couple instances where a random act of kindness came across my path this week. I was thinking about how all it takes is keeping your eyes open and you will see someone who could use some kindness. That is what inspired my page. I have been trying to work on my font drawing skills more so that is the style I stuck with.DLP-Week-19-M

Rolled Hems for Quick Projects

I knew my serger was supposed to be able to sew rolled hems. I just had never taken the time to pull out the instructions to find out how to do it. When Melinda and I were making decorations for our table for the Spring Tea, we wanted to use some colorful spring cloth napkins. I figured out how to set up my serger for doing a rolled hem and very quickly made eight napkins with rolled hem edges from some fabric scraps. Serged Cloth NapkinsI was excited to see how easy it was and decided to use the rolled hem stitch on some summer clothes for the granddaughters. Remember the dresses I made for My Princess and Miss Tickles using T-shirts for the top of the dresses? You can find those posts here and here. I took the left over pieces of t-shirts I had cut off and finished off the raw edges of each piece with a serged rolled hem. I stretched the fabric as I sewed to make it ruffle. Then I sewed the pieces to the bottom of another t-shirt top to make a new dress for Miss Tickles, leaving the rolled hem showing to make a ruffle on the top edges.T-Shirt DressI was on a “roll” and did not want to stop. Melinda had some new pairs of shorts for Miss Tickles that she wanted skirts added to. Using the tutorial for the circle skirt, I cut a circle from fabric and sewed a rolled hem stitch on the bottom and inside of the circle. I pinned the circle to the shorts and straight stitched (on my regular sewing machine) the circle to the bottom of the short’s waistband. Serged Circle Skirt over ShortsA while back I had pinned on Pinterest a skirt made with squares of fabric and decided to incorporate the circle skirt and the squares together for two more skirts over shorts.Green Circle Square Skirt over ShortsCircle Square Skirt over ShortsIf you have a serger and have only used it for regular serging, pull out your instruction manual and learn to sew rolled hems. You can also watch this video from Craftsy. Hmm…So what else can my serger do?

Documented Life Project- Week 18

The challenge for this week in The Documented Life Project was to “Add an inspiring quote to guide your week.” If you are new to reading our posts, The Documented Life Project gives a challenge each week to add art to a planner/journal with a specific theme. How you interpret that challenge is totally up to your own creativity. Melinda and I are doing the challenges as art projects on individual pieces of paper and not doing planners or journals this time. We wanted to commit ourselves to something every week that would help us to stretch our creative skills in new ways. If you like using weekly planners and journals or just want to add a little more creativity to your life, check out the project. There are so many creative ideas and processes shared each week by many of the over seven thousand people participating from around the globe. (When we first signed up the number of participants was about fifteen hundred!)

Jan:
When I came across this quote by Jon Acuff, I put it on a sticky note on my computer. It can be applied to so many areas of life, but seemed especially applicable to creative endeavors. Some of the comments posted on The Documented Life Project Facebook page are from people who are just starting out on their creative journey. They see the beautiful work done by people who are further down the road on their creative journeys and feel intimidated. It really doesn’t matter how much you have progressed in your creative skills, you will always be able to find someone who can do “it” so much better than you. But that doesn’t mean that what you are doing is bad– you are just nearer the beginning and they are nearer to the middle. Accept that and rather than be intimidated by comparing your work to theirs, be inspired with new ideas and techniques. Get excited about taking the next step in your creative journey. When you get nearer the middle, your work will look different than it did near the beginning.

Since chalkboard lettering art is a big trend right now, I decided to give it a try with my quote. I thought about using one of my white pens so the lines would be more crisp on the black paper and still have a chalk look, but that defeats the purpose of trying to use chalk! By the way, chalk doesn’t erase very well on paper.  (Confession: I did use a white pen for the name at the bottom because it was so tiny. AND this paper was the third one I did trying to get my letters to turn out the way I wanted. And that’s OK. I got more confident each time.) So here is my quote in chalk.DLP-Week-18-JMelinda:

There’s been a lot going on in my life lately, and when that happens, I enjoy listening to the song Oceans by Hillsong. The line that kept resonating with me this week was “keep my eyes above the waves.” I decided that would be the quote I would use for my page. I started by drawing the eye from a picture on pinterest. I like the handwritten quotes using different fonts and thought I would give it a try. Letters can be quite the challenge! After I had my words finished, I decided to add some waves at the bottom. I have enjoyed working on my drawing skills the last few pages!DLP-Week-18-M


Spring Tea

Yesterday we shared with you how we made some whimsical paper and fabric flowers for decorations for a spring tea. Since that post was already full of pictures, we want to share with you today pictures from the event. Each table was beautifully decorated by a different host. We’ll show you some of the creative ideas we saw on the tables as well as decorations for the room. Be inspired!Spring-Tea-Decor-3Spring-Tea-Decor-2

Spring Tea Decor Name Tags

Name Tags

Spring-Tea-Decor-1Spring-Tea-Decor-4Spring-Tea-DecorSpring Tea Table Decor Spring Tea Table DecorReady for a tea party

My Princess

My Princess was so excited for the tea party!

Miss Tickles Tea Party

Miss Tickles was excited to have a tea cup just her size.

Tea-Table-Decor-1

Tea-Table-Decor-2

Tea-Table-Decor-3Tea-Table-Decor-4Tea-Table-Decor-5Tea-Table-Decor-6