First Day Gelli Printing {Part 2}

Gelli Prints

Have you made a gelli plate yet? I am hoping by the time I finish showing some of what I made the first day I tried gelli printing, you will want to do it too. In case you missed it, read {Part 1} so you know what I am talking about.

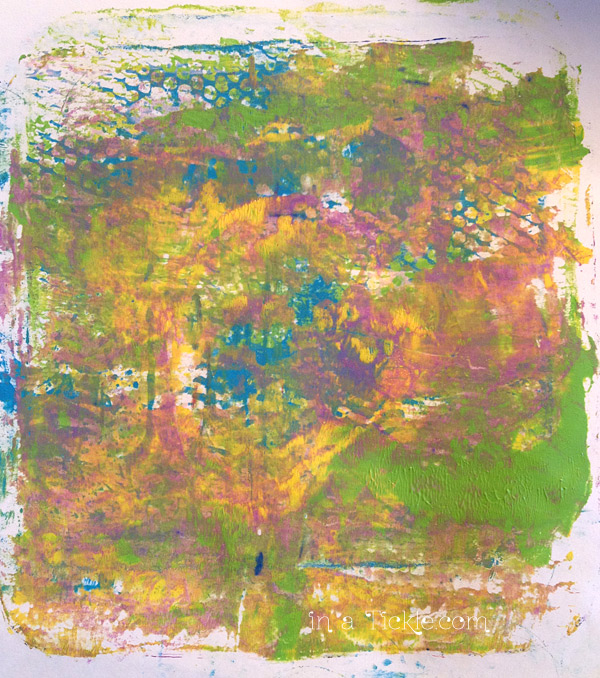
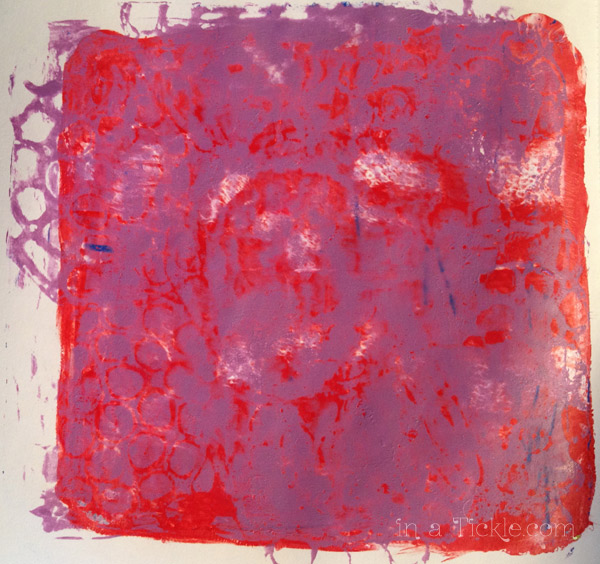
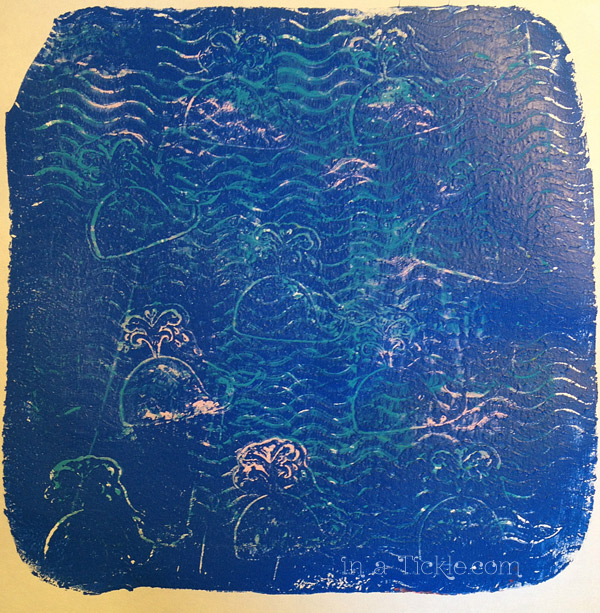
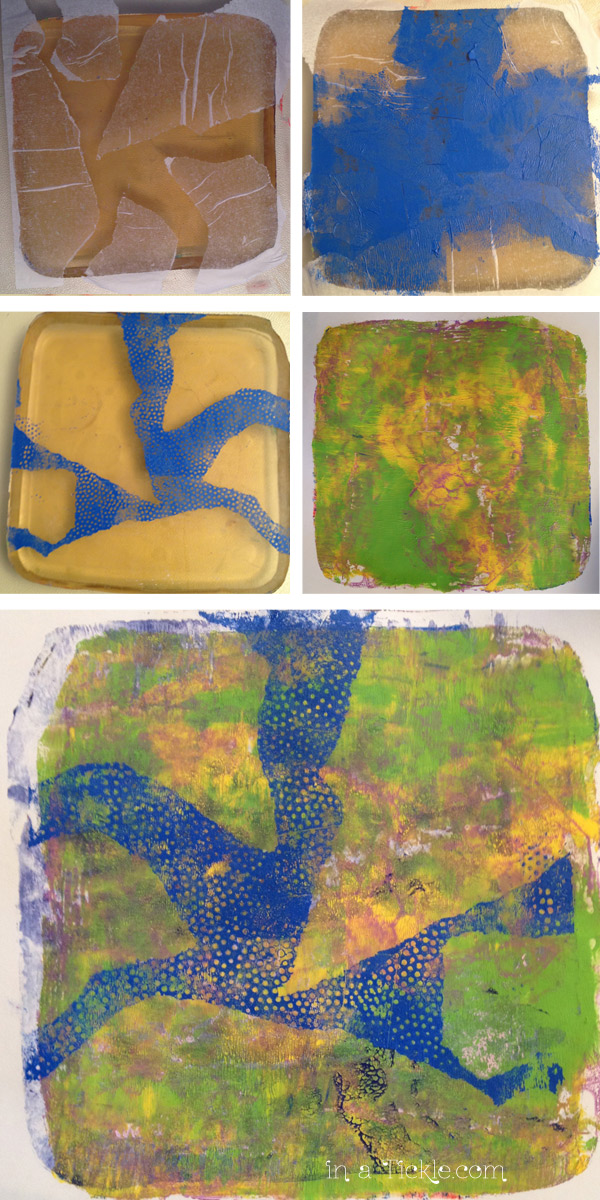
For the following print I tore strips of tissue paper and laid them on the gelli plate. Then I rolled blue paint into the areas between the tissue strips. I peeled the tissue up from the gelli plate leaving very distinct lines of paint. It seemed too solid, so I laid the small dot textured craft foam on top to create spots in the blue paint. I picked a print that looks like I started with a purple ghost print of the kitchen mashing utensil texture I showed you in {Part 1} with an added green and yellow layer over it. I pulled a print of the blue on top of it.

Tissue Gelli Print

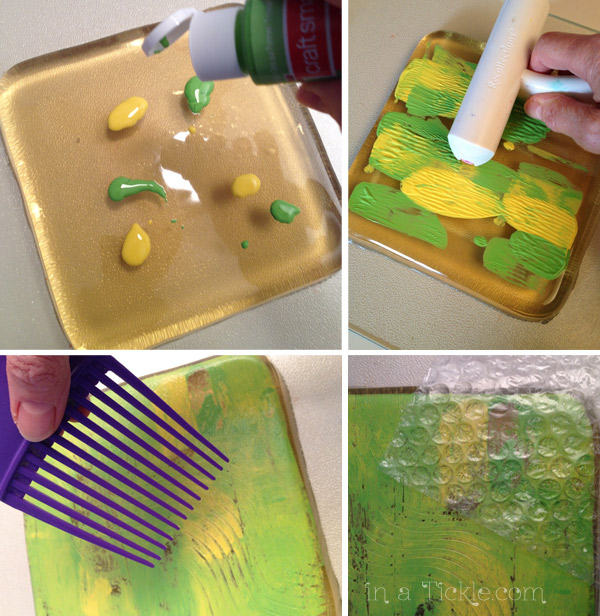
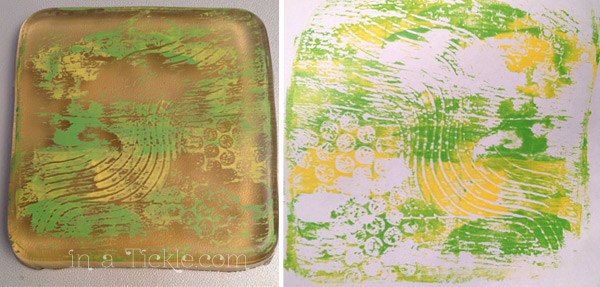
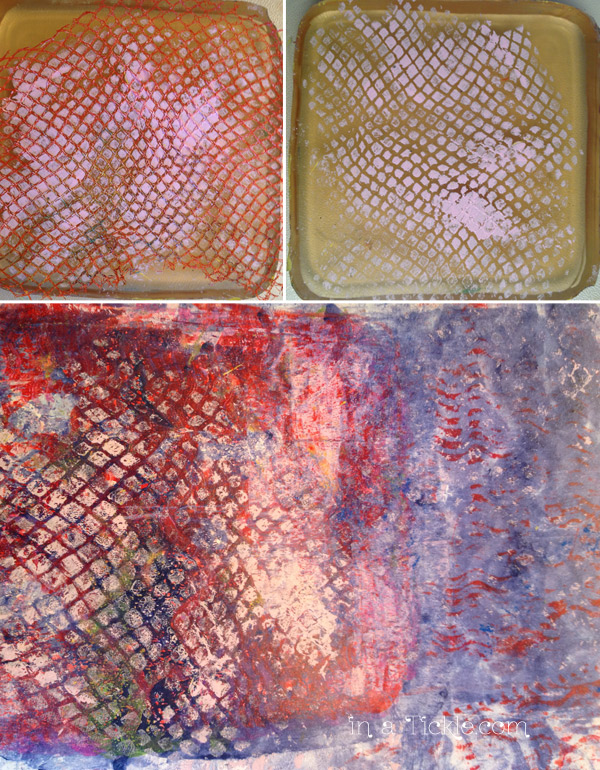
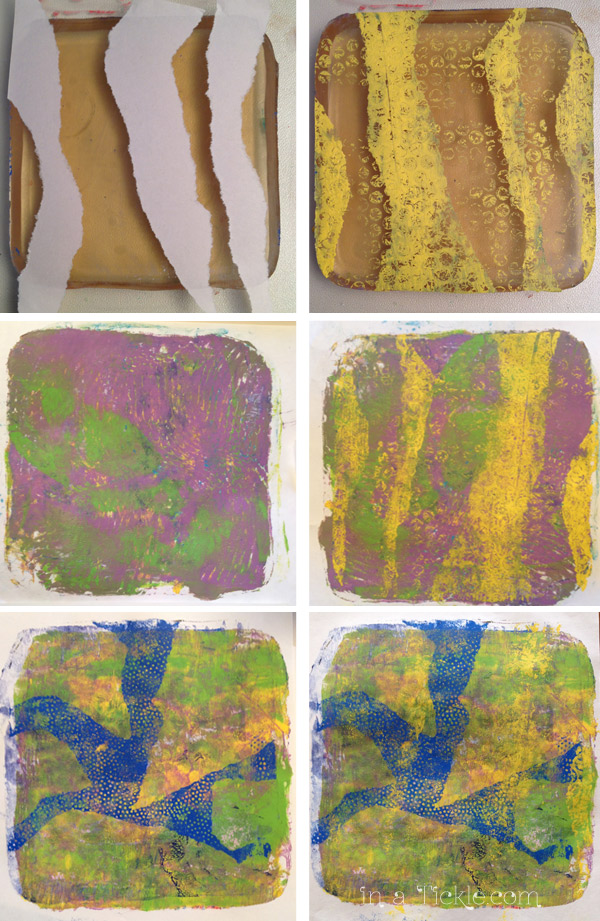
The tissue worked but was a little flimsy when rolling the paint over it, so I next tried strips of torn newsprint. I rolled yellow paint over the exposed gelli plate areas and peeled the paper strips off. Then I took small bubble wrap and laid it on top of the yellow paint. As I moved it around some of the paint from the bubble wrap stuck to the unpainted areas of the gelli plate. I rubbed a previously made print of green and purple over the gelli plate and ended up with yellow stripes and yellow bubbles on top. There was still a ghost print left on the plate so I added the yellow ghost print to the print I showed you above.

Torn Paper Gelli Print

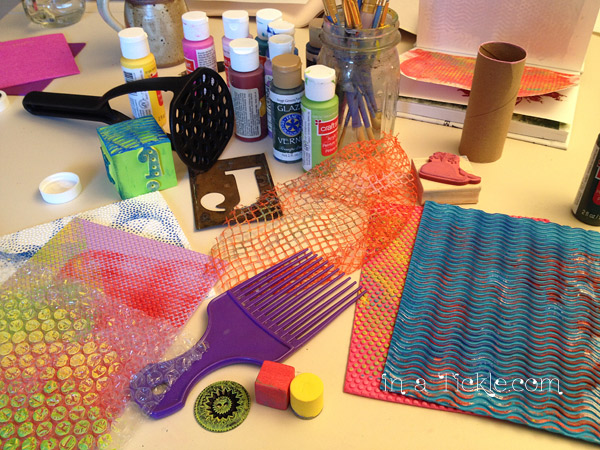
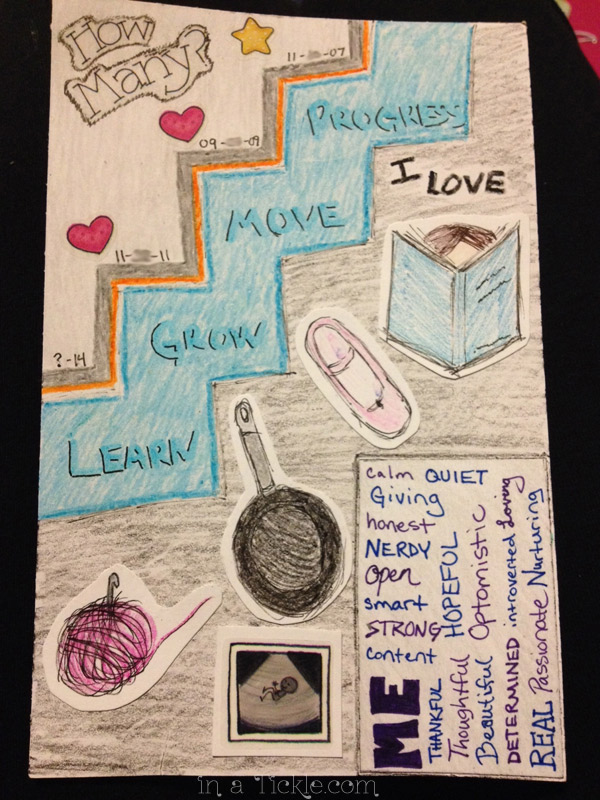
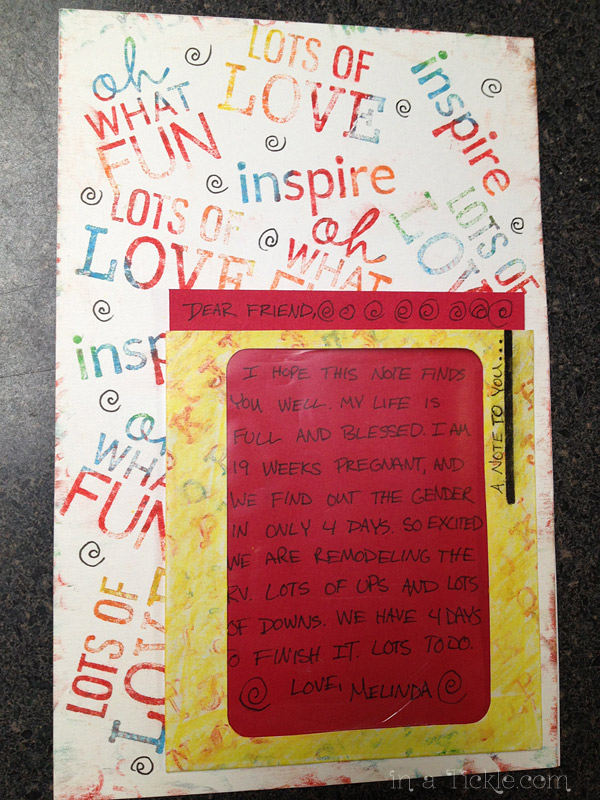
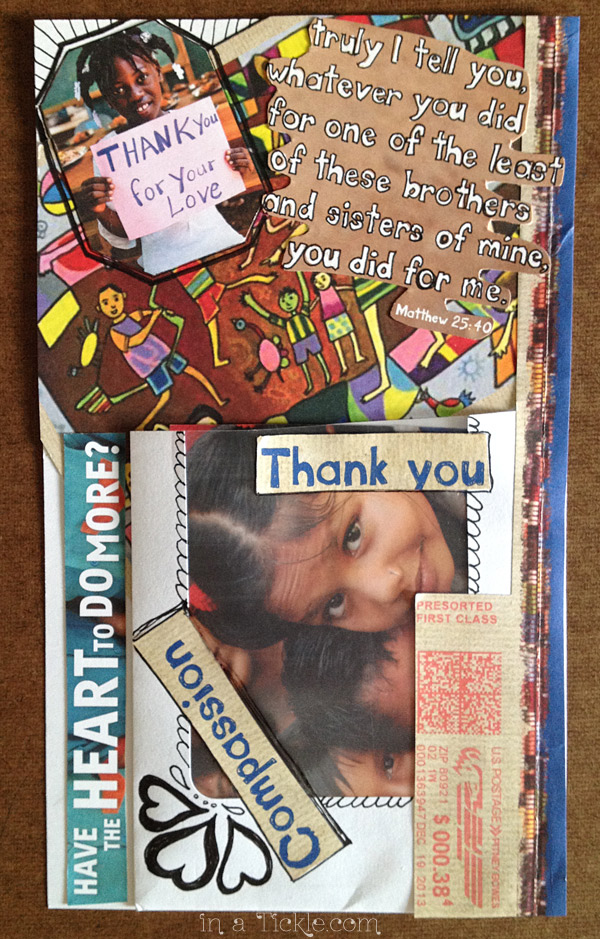
When you are making gelli prints you don’t have to waste paint. Just make a ghost print on another print or by itself on a new piece of paper. You can also run your brayer on another piece of paper or even in a journal to use up the paint. The texture tools you use can also be rubbed onto another paper or journal page to remove the paint. Here are three pages I made in my sketch book just using up paint on my tools.Journal Pages Gelli Print

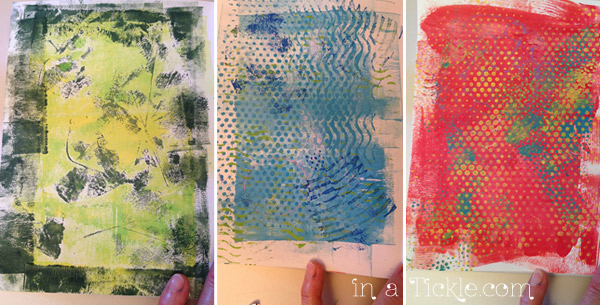
Are you ready to try gelli printing yet? It is so much fun and the creative possibilities are endless…

…to be continued in {Part 3}.

First Day Gelli Printing {Part 1}

Gelli PrintsMy husband read yesterday’s post and teased me for leaving him and the rest of you hanging. He does not like stories, movies, etc. that come to a certain point and then say…”to be continued.” He saw the strange glass pan in the fridge with a note that said “Not food. This is for a craft.” He was not home when I played with making gelli prints and is still wondering what that strange looking slab does.

Today I will show you what gelli printing is. After going through the pictures I took (which was only of a small portion of what I actually did since I tend to get caught up in the fun and forget to take pictures of what I am doing) I decided the first day of gelli printing fun would have to be in several parts.

To start you need a gelli plate which you can purchase or make at home. You also need paint (I used craft paint), a brayer, brush or flat card (credit card) to spread the paint around and some texture tool (pretty much anything around your house will work.) I squirted some paint onto the gelli plate and spread it out over the plate with my brayer. Then I lightly drew some squiggly lines with a comb across the paint (don’t poke the gelli plate) and lightly pressed some bubble wrap into the paint.Gelli Printing Basic Steps 1

I laid a piece of drawing paper over the gelli plate and rubbed across the back of the paper with my hand. Then I peeled the paper off the gelli plate and got my first print. You can see the design from the bubble wrap and some of the comb lines in the print. You also can see there is still paint on the gelli plate.

Gelli Printing Basic Steps 2

The paint left on the plate can be used for another print, called a ghost print.

Gelli Printing Basic Steps 3

Depending how thick the paint was to begin with the rest of the paint comes off the gelli plate with the second print or third print. I did learn that it was not a good idea to put the paint onto the gelli plate in a thick layer. Layering ghost prints on top of each other (dry between layers) can yield some interesting results.Ghost Prints Gelli PrintThese are the tools I played with:Gelli Printing toolsNow I keep looking at everything around me wondering if I could use it to texture the paint. This print was textured using a kitchen utensil used for mashing.Kitchen Utensil Gelli Print

The ghost print from the utensil print printed over a red gelli print:

Utensil Ghost Print Gelli Print

For this print I laid a brass letter stencil backwards on the paint on the gelli plate. You can see the outline of the stencil and the letter J. I also used a textured piece of craft foam in the lower right corner to make the small dots.J Stencil Gelli Print

For this print, I used a piece of craft foam with a wave design and a whale rubber stamp.Whale Stamp Gelli Print

We have been eating clementines like crazy this winter and as soon as I learned about gelli printing, I figured the net bags they came in would come in handy and started saving them. I laid the net on the gelli plate and used the brayer to roll a little bit of paint over the net. Then I pulled a print of the netting on another piece of paper I had been putting multiple ghost layers on. It gives a great effect.

Netting Gelli Print

Start looking around your house for possible texture items. Before you throw something into the trash or recycle bin, ask yourself if it could be used for gelli prints. Once you get started printing with a gelli plate you are going to want to try all kinds of things, so might as well start a basket of items now! I’ll share more of my first experience with gelli plate printing in the next post…to be continued!

Homemade Gelli Plate

Sounds like a new recipe doesn’t it? Well, there is a recipe involved but you won’t want to eat it. But it can become addictive.

On some of the comments on the Documented Life Project Facebook page, I was noticing people talk about using a gelli plate. I had never heard of it and our local craft stores did not have one. So I did what my grandson told me when he was quite young and I was not able to answer his questions- “Just Google it, Grandma!”  I watched a lot of You Tube videos of people using gelli plates to make beautiful paper prints that could be used for all kinds of papercrafting. Even my grandkids were fascinated with the videos and can’t wait to try it.

When I saw the price of ordering a gelli plate, I decided it would have to wait a while. The prices range from about $30 to near $100 depending on the size. I want to make sure it is something I really like first.  However, I did see several ways of making your own homemade plate. Here’s one. Here’s what I did:

Gelli Plate IngredientsI bought glycerin (100% pure vegetable glycerine) from our local natural food store as well as bulk gelatin (you could also buy the Knox packets of gelatin in the grocery store but the bulk was cheaper.)

First step was to put enough water into my pan (an 8X8 inch glass pan) to measure 3/4 inch deep. Then I poured the water into a measuring cup to see how much liquid was needed total. I needed 3 cups total.

I poured 1 1/2 cups of glycerin into my measuring cup. Then added 6 Tbsp of gelatin to the glycerin and carefully stirred until it was mixed in. The ratio of gelatin needed is 2 Tbsp gelatin to 1 cup of liquid.Adding GelatinThe next step was to measure 1 1/2 cups of boiling water, add the gelatin/glycerin mix and stir until the gelatin was completely dissolved. Adding boiling waterWhen the mixture looked like it was dissolved and clear I poured it into my glass pan. There were a few bubbles but they quickly popped when I touched them with a flat knife. Next step was to stick the pan into the refrigerator (uncovered) and let it set. Making gelli plate moldAfter it was set (like VERY thick jello) I used a sharp knife to go around the edge of the pan to loosen the gelli from the walls of the pan. Cutting edge of gelli plateThe plan was to loosen it and then gently pry it out with my fingers from one edge and it would fall onto the glass cutting board I was using for my base. Well, that was the plan, but I tried to do it too quickly and tore the gelli. Torn Gelli PlateNot to worry though. I broke it all up and put the glass pan into the microwave for 2 1/2 minutes and melted it all again. It was back to the fridge to set again. By the way, you can do that as much as you need to in order to fix it after gouging or tearing it. You also can melt it to put into a new size or shape of pan.Microwave gelli plate repairsFinally, after reseting it, I got my gelli plate out of the pan without mishap and started playing today. Gelli PlateI had so much fun experimenting to see what I could do. Here is just a sample of some of my playing today. The creative possibilities are endless. I’ll show you some more details in another post.Sample gelli prints

One Color Challenge

Mom, thankfully, has been keeping things going with the blog lately while my family has been having all kinds of adventures. You can find out all about that at Four Point Families.

Well, things have settled down a little while we hang out with family between speaking engagements. During that time, we have been doing a lot of coloring. And not just my kids. Our adopted daughter, Jessi, has been getting into it, and then my hubby’s cousin, Josh, decided to join the fun.

While we were all sitting at the table with the coloring books and crayons spread around us, Josh issued a challenge to whoever would accept it. He challenged someone to color a whole picture using only one color. I got excited about that and accepted right away.

Josh chose the color black for me to color with so I went hard core and chose the most colorful style of coloring book as a contrast.

One-color-4

Grayscale unicorn coming right up.

One-color-2


One-Color-1It was a great challenge because it made me think more strategically about shading and to give dynamics to the picture even without the color.

I loved this challenge so much, I decided to do another picture. This time I chose a blue color for myself.

One-Color-5


One-color-3

After my success with the challenge, everyone else decided to join the fun.

One-color-7

Here is Jessi’s first attempt (she did a couple more after this):

One-color-8Josh’s first attempt:

One-color-9


This is a fun and easy challenge to get your mind thinking about coloring in a whole new way. Practice your shading techniques and tap into your inner child.

Happy coloring!


Doodle to Your Heart’s Content

This week doodling was given a little press in the news. You can watch the CBS News report here. Though the dictionary may define doodling as “drawing made absentmindedly” according to the news report, Sunni Brown, the author of The Doodle Revolution disagrees.

“It’s totally inaccurate,” said Brown. “It’s not an accurate representation of what’s happening for a doodler.” Brown is convinced that doodling isn’t a mindless activity, but instead engages the mind in a way that helps us think.

Melinda and I give you permission to doodle to your heart’s content. Don’t know what to doodle? We’ve found a website that will give you lots of doodling ideas to practice called TanglePatterns.com. From that site I linked to this tutorial. I started playing around with that design in my sketch book.DoodleI thought that a variation of that design would make a nice border and decided to make a border around a heart shape. I took a cardboard heart pattern I had and drew an even number of dots spaced around the heart. Then I alternated the curves between dots. After enlarging the dots inside each curve (they remind me of old telephone receivers) I added the squiggly curve to connect them. Heart DoodleSince we are nearing Valentine’s Day, I thought it would be fun to see if I could make a stamp out of this design. I pulled out a sheet of self stick craft foam, cut out a heart and using a ball point pen, drew the same design pattern I had drawn in my sketch book. If you are wondering how to make stamps from craft foam, read this post. Craft foam heart stampI attached the stamp to a piece of clear acetate, rubbed an ink stamp all over it and stamped my design. When I pulled it up, I laughed.Backwards StampWhen making words on a homemade stamp, you must remember to print the word backwards on the stamp so it comes out forwards when you print! So I cut the center out of the stamp to make a new stamp.Cut Out HeartIt works. No harm done!Cut Out Heart StampedI started over on a new stamp. This time I tried writing the word “Love” on a piece of tracing paper with pencil, turned it over onto the craft foam and rubbed it with my fingers. Yes, the pencil transfers to the foam. I am not very good with writing backwards yet!tracing words backwardsAnd it turned out right!New Heart StampLove Heart Stamp

Are you ready to try some doodling? Your doodles just might lead to a new design idea.


Documented Life Project- Weeks 2 & 3

In case you missed previous posts, Melinda and I are participating in The Documented Life Project challenges. Feel free to join us!

Week 2 Challenge was to incorporate a selfie in the challenge, by taking a photo and printing it, or sketching or painting a likeness. If you wished, you could just add words to describe yourself without a picture. Also, you could add a word you want to focus on this year.

Melinda actually did this challenge the first week on the back of her door picture without knowing it. Since we did not show you that side of her picture before, here it is:DLP Week 2 MI was in the mood for doing collage and picked out words and images from some magazines to go along with my photo. I cut, pasted, and did a little doodling as well. The main word I want to focus on this year is STRETCH. I included a printout of one of the definitions: “cause (someone) to make maximum use of their talents or abilities.” I want to stretch my talents and abilities this year but I also want to cause others to stretch as well.Week-2-DLP-JWeek 3 Challenge was to add an envelope from your mailbox and be creative with it by journaling on it, writing notes or use it as a pocket.

Melinda made use of some of her stamps for the background and wrote a note to put in the pocket of the envelope.DLP-Week-3-M

I chose a piece of mail from Compassion thanking us for a donation. Still in my collage mood, I cut up parts of the contents of the letter, pasted, and doodled. The envelope was torn so I used the window part of another white envelope as my pocket.

Week-3-DLP-J

The challenges for the Documented Life Project are free. You can use them in any way you like. Sometimes we all just need a little idea prompting to try something creative even if it’s not going to be used for anything other than the joy of creating.  Give it a try and have fun!

Cushion Slip Covers

Talk about a crazy week! This week included making curtains and cushion covers, finishing up an RV makeover, getting a crown replaced on a tooth because the recently installed crown broke in half, dealing with identity theft fraud for a loved one, finding out the gender of Melinda’s baby, Melinda’s family packing up for a ministry trip in newly finished RV, RV breaking down, late night rescue trip with little sleep and new plan of travel put together… and we have not gotten posts written!

When we first planned to make cushion covers for the dinette in the RV, we were going to try to make them as much like the originals as possible. But when we actually got down to work decided that it made more sense to make slip covers that could easily be taken off and thrown into the wash when necessary. So we made long tubes with the bottom and side seam sewn similar to a pillow case with the top turned under for a finished edge. The tubes were cut longer than the length of the cushions. We allowed for seam allowances, and hem and added the width of the cushion end for the tubes. After the bottom edge was sewn, we stitched a box bottom to make the end of the tube a rectangle. You can see a demonstration of that technique hereRV cushion cover

The box bottom end of the cushions is the end that will show on the dinette cushions. Cushion end

Since the other end of the cushions were going to be against the wall, we folded the extra fabric like a present and marked where to attach pieces of velcro. With the velcro sewn in place it is very easy to secure the slip cover in place over the original cushion. Cushion slip cover with velcroThe new cushion slip covers really brighten up the RV dinette.RV DinetteYou can also see a sample of the new curtains we made. We had hoped to get pictures of the dinette and the rest of the curtains in the RV while in use, but that will have to wait. At least the trip started out great!In the RV

You can read more about the new ministry Melinda’s family has launched at Four Point Families.


Your Life as Art

Joshua Becker begins his blog post at Becoming Minimalist today with this quote:

“I challenge you to make your life the masterpiece you want to paint, the novel you want to read, the day you want to wake to.” ―Toni Sorenson

In a post last week we talked about doing something creative everyday in all aspects of our lives. I recently started following a blog by Emily Freeman who encourages people to live their lives as art and approach everything they do with creativity. She wrote a book I want to read called A Million Little Ways.A Million Little Ways

From the product description: A Million Little Ways uncovers the creative, personal imprint of God on every individual. It invites the discouraged parent, the bored Christian, the exhausted executive to look at their lives differently by approaching their critics, their jobs, and the kids around their table the same way an artist approaches the canvas–with wonder, bravery, and hope. In her gentle, compelling style, Emily Freeman encourages readers to turn down the volume on their inner critic and move into the world with the courage to be who they most deeply are. She invites regular people to see the artistic potential in words, gestures, attitudes, and relationships. Readers will discover the art in a quiet word, a hot dinner, a made bed, a grace-filled glance, and a million other ways of showing God to the world through the simple human acts of listening, waiting, creating, and showing up.

I received a little ebook from Emily Freeman. You don’t need to have read her book, A Million Little Ways, in order to get something from this ebook. It just may encourage you in your creative journey, and you will probably want to buy her book. She says at the end that the readers can share it with whomever they want (for free.) So I want to share it with you. Click here to read Seven Little Ways to Live Art.

Documented Life Project Our Way

Last week we shared with you about a project called The Documented Life Project. Most of the people participating in that project are decorating their weekly planners with the challenges. Some are using the challenges as prompts for art journals or scrapbook pages. Melinda and I decided that we would participate in the challenges, but so far are doing the challenges on card stock (not yet attached to any thing!) I may eventually put my art challenges into an art journal, or binder, or maybe just in a box. Just haven’t gotten that far yet. I have not been very good with traditional planners in the past and I know I would not carry around a large book like some of the very creative ones I’ve seen on the facebook page. Since I have been wanting to try art journaling, this project is a way to get me launched.

The challenge last week was to photograph, paint, sketch or incorporate your front door somehow onto your page. It’s been fun seeing all of the creative ideas others have shared. Even though this is the second week (and I am still working on this week’s challenge), it is not too late for you to get started. No matter when you start, the challenges will be archived at Art to the 5Th, so you can really begin any time. And you can use the challenges in any way you wish. There is no right or wrong. Just let your creativity start to flow.

Melinda decided to draw with pencil, crayon, and scrapbook markers a portion of the inside of her door where the peek hole is, and on the other side (not pictured), she decorated it with things all about her. Here is Melinda’s door page:DLP Week 1 Door

I decided to sketch a picture of the inside of my front door since there was too much snow and bitter cold outside to do it from that view. Also the view from the inside was symbolic for me. I am now based at home each day instead of working outside of my home. Here’s my door sketch:DLP Week 1 DoorIf you are looking for ideas for creating just for fun, check out The Documented Life Project. Melinda and I will periodically post pictures of what we have done to give you an update. Now that I’ve told you that, it makes us accountable to keep up with it. (We all need motivation!)

For the past couple of days Melinda and I have been working on a big project involving these two fabrics pictured below. Can’t wait to show you soon what it is…fabrics


Do Something Creative

Step 1. Do something creative today.

Step 2. Do something creative tomorrow.

Step 3. Do something creative the next day.

Step 4. Repeat steps 1-3.

When I was in New York City last fall, I wandered into a store called Paper Source. It looked inviting and the first thing I noticed was this printed on the wall:

Paper Source StoreTurns out that phrase is a registered trademark for their company. The store was filled with wonderful papers, paper crafting supplies and lovely gift items. One part of the store was a classroom for classes and workshops where a group of young girls were having a great time working on a project.

Near the front of the store was a desk where a young woman was demonstrating how to do heat embossing on cards. I had already had opportunity to use that technique before but it was fun to watch her and ask questions. This store had the right idea. My biggest complaint with the big craft stores is that they need to have people demonstrating something all the time to encourage people to try something new and purchase new tools (you know, like the little booths set up in grocery stores to give you a sample taste of a new food.) I love to craft but there are so many items I have looked at on the shelves in craft stores that I have no idea how to use. If someone were demonstrating, I would know what it was and be tempted to give it a try. I’m sure there are many more like me!

Any way, you can check out the Paper Source online or visit one of their stores around the country. They not only have supplies to purchase on their website, but you can also find a multitude of free videos and tutorials to learn something new.

In thinking about their trademark phrase, Do Something Creative Everyday®, I want to encourage you to think in terms of your whole life and not just a particular type of activity like paper crafting, or painting, or sewing, etc. Yes, it is great when you can do a creative artistic/crafty type activity everyday, but I know for many, including myself, that is just not always feasible. But that does not mean you can’t be be creative everyday. Think of your whole life as art in how you care for yourself, your home, your family and the world around you. What can you do today to make your world (your sphere of influence) better?

Here are a handful of suggestions:

Think of a way to bless someone else today and do it.

Rearrange a room, or decorations, or countertop to make it more appealing.

Read a story to your kids and use lots of creative expression to make the story fun for them.

Set the dinner table in a new way tonight.

Find a new recipe to make or change up a recipe you have made before.

Choose a vegetable, or meat, or fruit you don’t know anything about, look up recipes and make something with it.

Do you always wear the same clothing combinations? Look in your closet and put together a new outfit with stuff you already own.

Try fixing your hair in a new way and maybe add some accessory.

At work find something that needs your creativity and do it or offer the idea to your boss.

Write a note to someone who has touched your life, or someone you know needs encouragement and send it to them.

Take five minutes and draw something or doodle something. (Remember doodlers retain more information than non-doodlers. Read the post.)

For some other ideas, read Melinda’s post from last fall about 10 Ways to Be Creative When You Have No Energy.

You can be creative today, tomorrow and everyday after that. Accept the truth in your heart and mind that you are a creative person (after all, you were created in the image of the Creator) and find ways each day to express creativity. No matter how big or small that creative expression may seem to you, the world around you will be a little bit better because of it.

What creative thing are you going to do today?