A Shadow With a Story

The wonderful historic city of Savannah, GA is a place my mom,sisters, and I will always remember with fondness. One of many stories we heard about on our visit a few years ago was of “The Waving Girl”. A young lady by the name of Florence Martus spent much of her adult life making sure each boat that came by the island where she lived was greeted with a handkerchief wave during the day and a lantern at night. It is said she probably greeted the seamen and passengers of about 100,000 ships with her wave. The SS Florence Martus, a Liberty ship built in Savannah in 1943, was named in her honor. Rumors abound that the reason she waved at each passing ship was because she was waiting for a lost lover to come home. Read this article for more of her fascinating story.

After hearing about this girl we visited the beach. While wading in the water and watching some ships pass by, I noticed my shadow and it reminded me of the waving girl. So I decided to be the waving girl in shadow and snapped a picture.

Waving girl-beach-shadow

One of the art challenges in September for the Documented Life Project was using silhouettes with the theme of journaling with photos. The journal prompt was: “There is no shadow without the light.” I decided to do a watercolor painting of this photo combining all three parts of the challenge- a shadow that formed a silhouette on the sunny beach recorded (journaled) by a selfie photograph.

Waving-girl beach shadow watercolor

Experimenting With Shibori Dyeing

Last fall I purchased a beautiful silk scarf from a crafter. As we visited, she told me she dyed the scarf using the shibori method. Well, that was a new word for me and after explaining quickly how she wraps the fabric around a pole before dyeing it, I asked her to spell “shibori” for me so I wouldn’t forget. When I returned home, I looked it up online and became fascinated with the history and many techniques of shibori dyeing, determined to some day give it a try.

Shibori is an ancient Japanese art form of making designs on fabric. Some might call it tie-dye, but when I think of tie-dye, I see in my head bright neon colored t-shirts with some sort of circular pattern of colors. Shibori actually has as many as 15 different techniques to achieve unique beautiful patterns depending on how the fabric is folded, tied, stitched, bound, compressed, or wrapped. Each technique forms a resist for the dye which forms the patterns. Traditionally, the fabrics were dyed in indigo, a natural blue dye from plants, but today a variety of dye colors are used.

For a quick history of this beautiful form of art and craftmanship, read this post, and this post.

Experimenting-With-Shibori-Dyeing

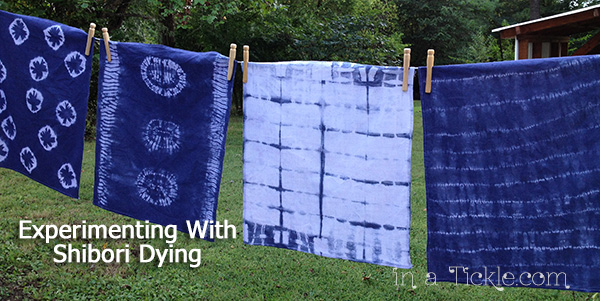
For my first adventure in shibori dyeing, I decided to use the rest of the cotton flour sack dish towels I had from my grandparents. (I shared how I used some of them for embroidery a while back.) I folded, tied, stitched, bound, compressed, and wrapped them first and then dyed them all together. Since I did not have indigo dye available, I used Rit navy blue dye. Sorry, I was in experiment mode and not tutorial mode, so I did not take pictures of the steps I took along the way. I will show you each piece before dyeing and then how it turned out. You can find many videos about shibori dyeing on YouTube.

The simplest technique was an accordion fold. I folded the fabric back and forth accordion style and then folded that long strip in an accordion fold. In the first experiment, I placed matching hard plastic lids on both sides of the folded piece and secured the lids with several rubber bands. As you can see in the photo of the dyed towel, the areas compressed by the lids did not absorb the dye. This technique is called Itajime Shibori, or “fold and clamp” shibori in which a resist is formed by shaped objects compressing the fabric.

Shibori-with-round-lids

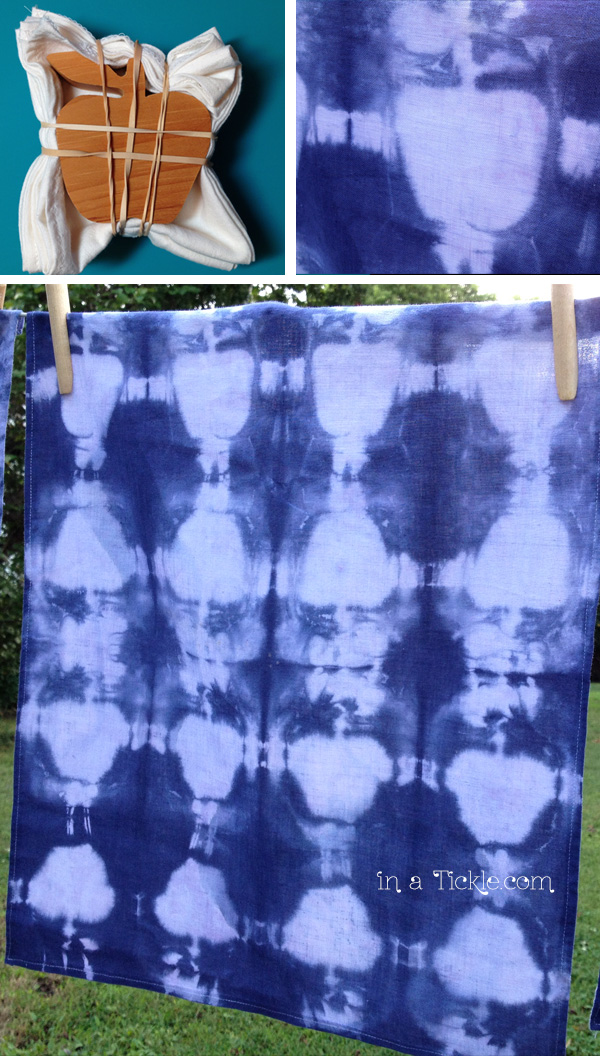
I folded this towel in the same way as above, and used wooden apple shapes on each side of the folded piece. Since this was a smaller towel, with less folds, the apple shapes showed up fairly well on the finished piece.

Shibori-with-wooden-apple

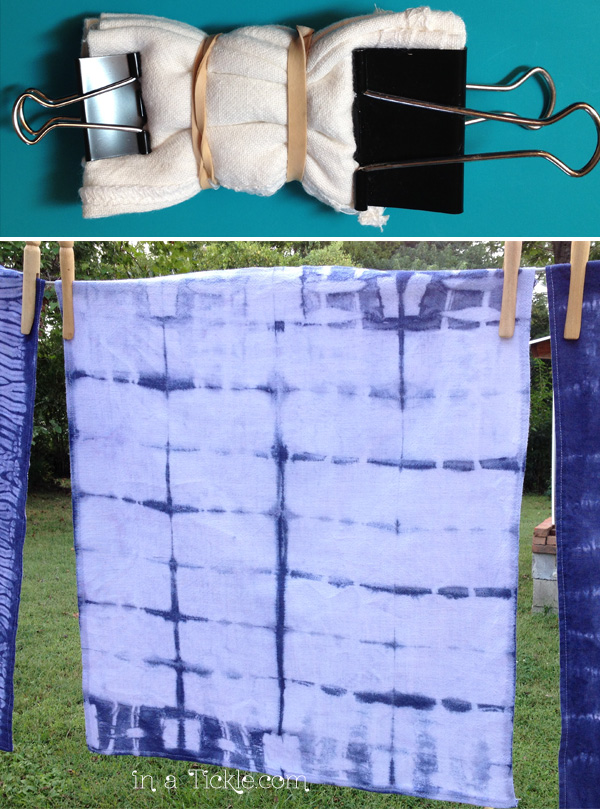
The next towel was also folded accordion style both directions and then secured on each end with binder clips. I also put two rubber bands around the middle. The shape of the clips only show up well on the outer edges.

Shibori-Accordion-Fold

This time I folded the towel accordion style starting at one corner in a fan shape and then folded that strip accordion style as well. I clipped both ends with binder clips. (I forgot to take a pre-dye picture of this one!)

Shibori-Fan

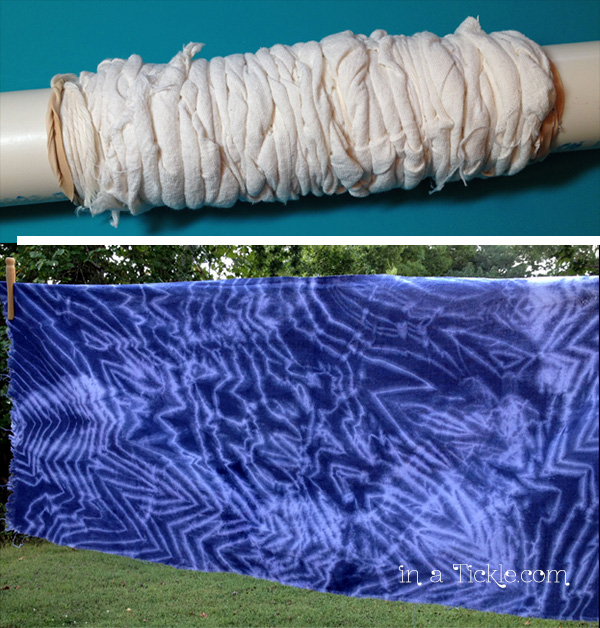
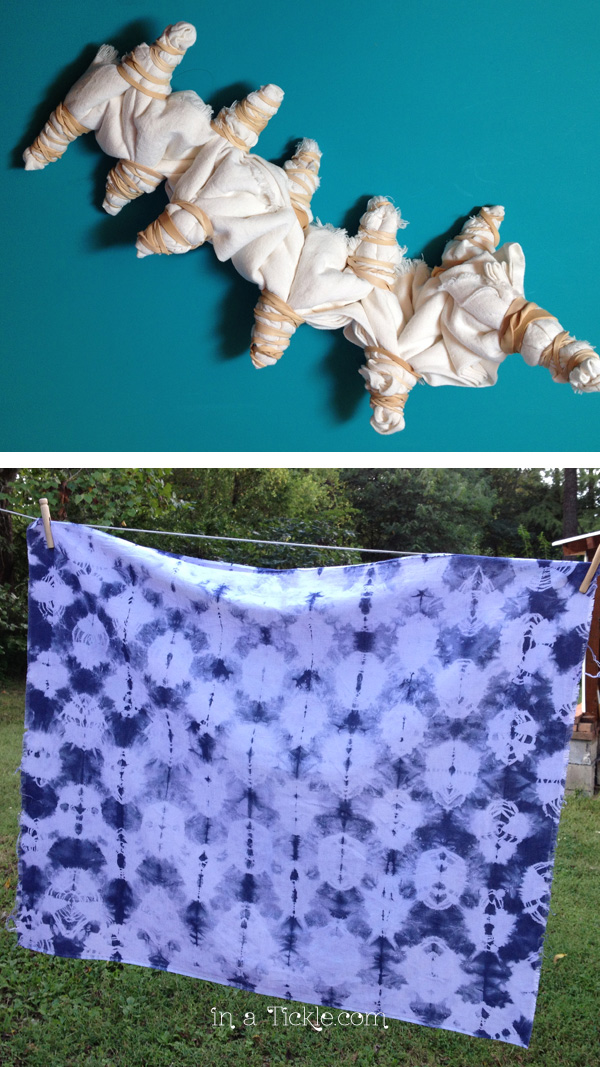
This next technique is called Arashi Shibori, or “storm” shibori (which makes sense when you see the finished product!) Starting with a short piece of PVC pipe I wrapped the flour sack towel around the pipe, winding string around the fabric and scrunching the fabric down every few inches. I put rubber bands on the ends to make sure my string stayed in place as I was pushing the fabric down. I really like the crazy lines this technique left on the dyed fabric.

Shibori-with-PVC-pipe

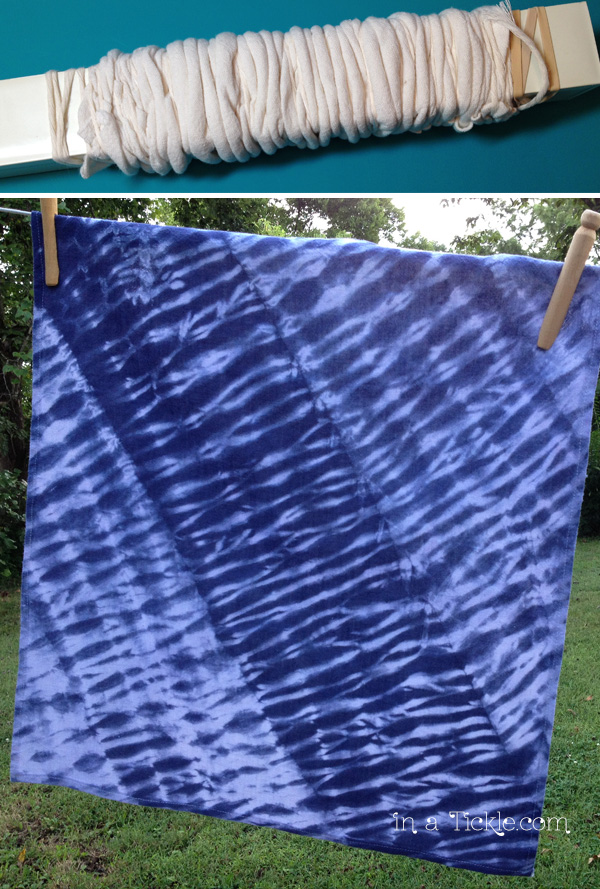
In the next one I used a broken square plastic leg from a shelf and wrapped the towel around it in the same way as the PVC pipe (I thought!) I am not really sure what I did different from the previous one, but there was less fabric and I probably put it on without twisting as I wrapped. I also don’t know how I got the variation of shading, but I do like it. The square plastic also left a unique design. This is why I call it experimenting because I don’t know enough yet to end up with something similar a second time!

Shibori-with-square-plastic-leg

The next technique I tried is called Kumo Shibori, or “spider web” shibori where the fabric is bound around a small pebble or marble. I used wooden beads and randomly placed them on the towel and secured each in place with a rubber band.

Shibori-with-wooden-beads

Another technique I tried was Nui Shibori, or “stitched” shibori. Many different designs can be made with stitches. On this one I stitched straight lines by hand across the fabric and pulled the threads tight to gather the fabric. As you can tell by the finished product, my “straight” lines are a little curvy. That’s what happens when you freehand.

Shibori-with-straight-stitch-lines

I folded the next towel in half and stitched three half circles on the fold with three lines of stitching each. On the unfolded edge, I stitched several rows of straight lines through both layers of fabric. All of the threads were pulled tight to gather.

Shibori-Stitches-Circles

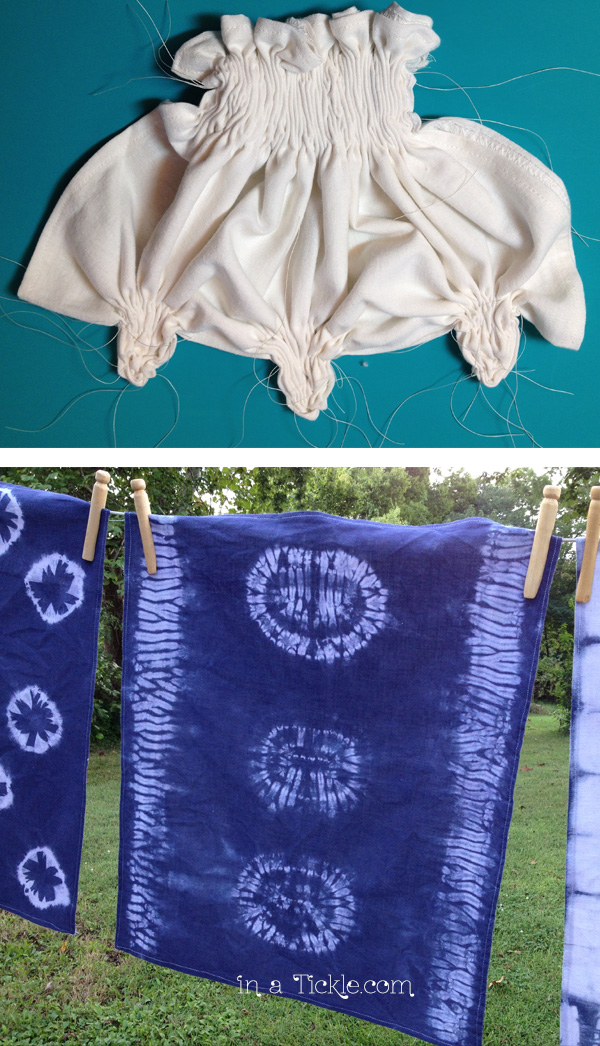
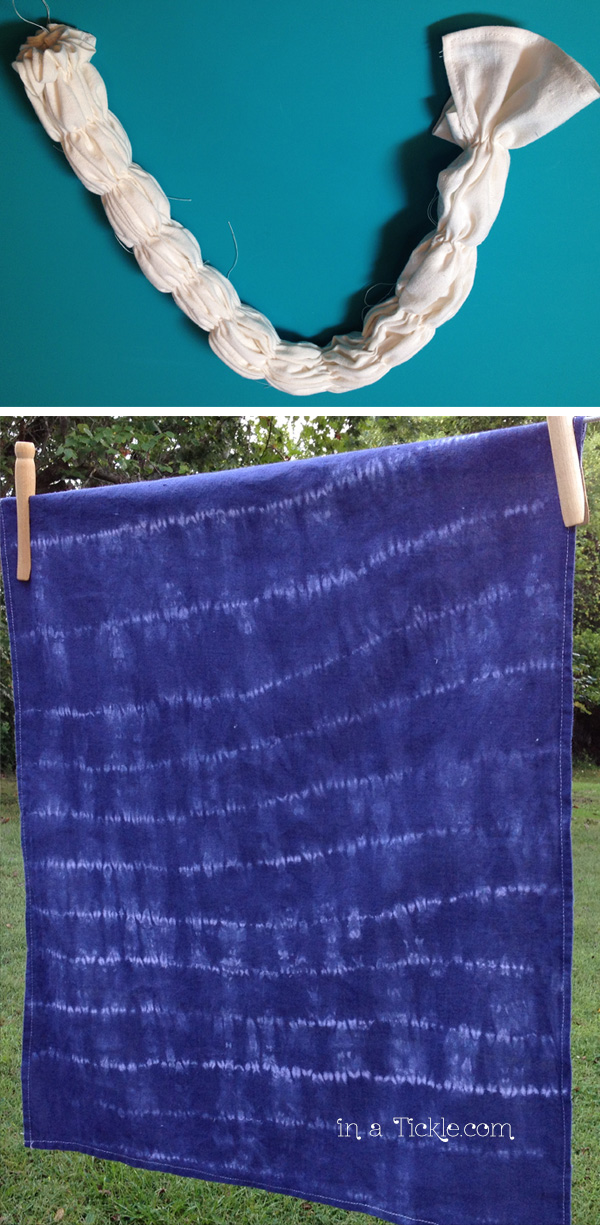
This next technique is called Kanoko Shibori. In this method portions of fabric are plucked up by hand and bound tightly with thread. You can see in the photos the thread lines on the dyed fabric.

Shibori-with-tied-horns

On the following towel, I used both the stitching technique and Kanoko. I sewed the straight stitches first and then gathered the threads after I made the horns.

Shibor-Horns-and-Straight-Stitchesi

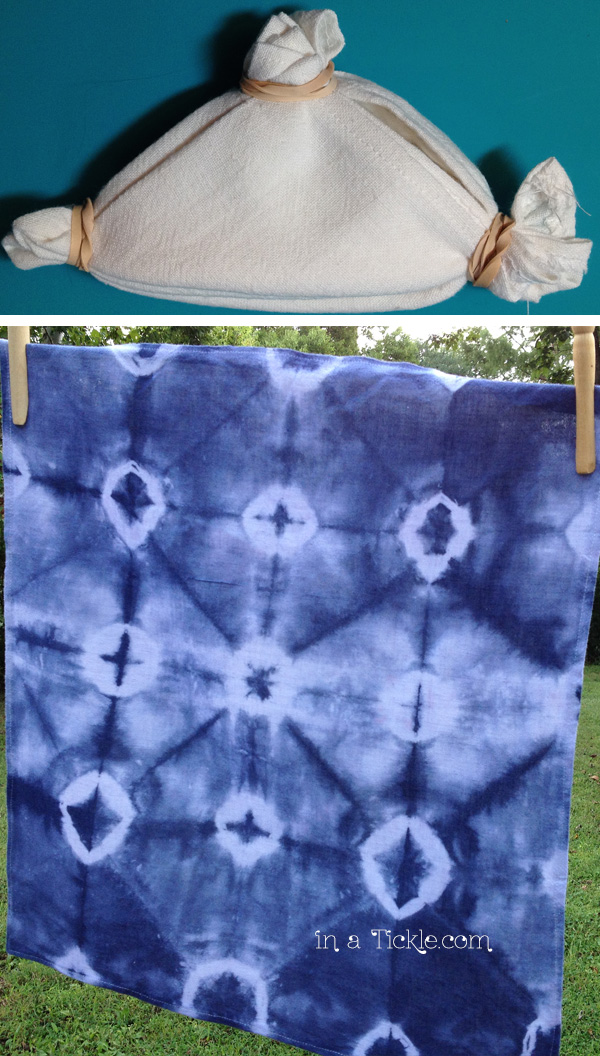
On this towel I did a straight accordion fold for the first fold and then a triangle accordion fold for the second fold. Then I fastened each point of the triangle with rubber bands.

Shibori-Triangle

For this towel I made the first accordion fold and then pulled up a portion of the fold on each side in a zig-zag fashion securing each pulled section with rubber bands.

Shibori-Dying

For some more ideas on folding, check out this shibori folding tutorial video I found.

Are you ready to give it a try?

I am hooked. I can’t wait to try more shibori dyeing and maybe figure out how to use more than one dye color.


Nautical Baby Gifts

A long time ago I purchased several desktop magnet boards on a clearance sale. I scraped off the designs printed on them and remade several of them for gifts. (You can see what I made in this post.) Recently we needed gifts for another baby shower. Since the bigger sister of this new baby was the recipient of one of my previous magnet boards (and her mom loved using it) it was an easy decision to remake another magnet board. The theme of the new baby’s room is nautical with a red, white, and blue color scheme.

Nautical-Magnet-Board

I painted a cloth background in shades of blue and glued it to the metal. Then I cut out wavy strips of navy blue fabric and attached them with gel medium. I colored some white buttons with alcohol ink and glued heavy duty magnets to the back.

The whale was made by sewing two pieces of fabric and a layer of batting together, leaving an opening to turn right side out (after clipping the seam allowance at the curves). I glued a googly eye and used a permanent marker to draw the mouth. For the back side of the whale, I cut a piece of stiff plastic (from a food container lid) just smaller than the body of the whale and glued it to the fabric. The magnets were glued to the plastic.

I did not make the anchors. I purchased charms from Michael’s Craft store and glued magnets to the back. The back and bottom sides of the magnets board were covered in felt.

Melinda used four small canvases and covered them with coordinating paint, paper, and buttons for wall decor for baby’s room.

Mixed-Media-Canvas-Nautical

Interview with Stoneybrooke (Inspiration)

I am happy to share with you several posts about a great friend of mine, Linda Lee. I first met Linda when her son came to our Junior High class when we were youth pastors at church several years ago. She started helping out and began bringing crafts for the girls to do before service started. The girls (and some of the boys) loved it! She is a beautiful, giving person who LOVES being creative. I have loved seeing her share her different mediums of art and creativity, and I hope you enjoy taking a little peek into her life too.

This is the final of a series of posts featuring Linda Lee, AKA, Stoneybrooke.

lindandjon

Jon and Linda

Linda has so much creativity that I couldn’t contain it all in just a few posts, but here is the rest of the interview with her words of inspiration and encouragement.

fawninspiration

Inspiration from nature

What kinds of things inspire you to be creative?

I would say nature inspires me. If you can’t get out and about, the internet allows you to be an armchair traveler to all sorts of inspiring natural destinations.

I’m also inspired by music. Allison Kraus just gets me in the mood to make things.

And scent. Warm vanilla and cinnamon scents help set a creative mood for me. For that matter, any yummy dessert baking does it for me too.

Color is also a huge inspiration. I love an autumn pallet and red, in most muted shades, is a color that gets me creating.

Stretchy pants feel inspiring to me, but maybe that’s going too far?

heartjournal

Altered composition book to use as a journal

If you were stranded on a desert island what 5 things would you want to have with you?

Can I say an airplane and crew to get me home?  lol

But if you mean what creative tools would I want? My spinning wheel and knitting needles, colored pencils, my journal and Bible.

What are your favorite ways to be creative?

Knitting and spinning yarn are big favorites, of course. They are a core creative outlet for me.

However, this year a new interest has been added to my creative life. (Never fear fiber is not being replaced). I have fully embraced art journaling. I do that in a special journaling Bible and a composition book I created for that purpose. It is amazing to see what happens when you get out some markers and glue, or a kids watercolor set and try to illustrate a truth from the Bible, a key thought in your mind, or something beautiful you see.

I feel like a kid again. I’m discovering new ways to use color and trying my hand at putting images on paper. It has added a new dimension to my time of studying the Word for sure and I am looking at the world God created with fresh new eyes. Study the face of your child long enough to draw it and you will see that you develop a new appreciation for that child and for the Creator.

bibleartjournaling

Page from Linda’s Bible

What encouragement can you give to someone who is just discovering their creativity?

For those who are pre-wired for creativity, the mere suggestion of an idea is all you will need to begin. To you I say embrace creativity and run with it. See where it leads. And find fellow creative enthusiasts that you can share with, and get inspiration from.

For others, you might worry that you aren’t talented enough. Negative thinking not only doesn’t feel good, and isn’t productive, but it literally makes your brain and body not work as well. Creativity is about flexible thinking and imagination. It’s also about adding joy and beauty to your life. Those are all great things. So decide ahead of time that negative thinking will not be allowed in your creative space. Any effort should be rewarded with massive praise, and a few “Yay Me’s” thrown in for good measure. If that’s too hard to do, imagine you are talking to your young child. If they showed you their best scribbles, would you not be delighted with them? Just do your best, have fun, and enjoy the process.

If you just can’t see the value of creativity, let me say this. Creativity is good for your brain and good for your spirit. When you think and do creative new things you are building new neural pathways to a healthier brain. You are improving your powers of observation and your ability to really see things in new and more detailed ways. You are adding to your dexterity and coordination. You can also improve your retention of new material to learn, when you reinterpret the information artistically. When you create something you like, it is a real boost to your spirit. It makes you happy. So don’t discount it until you try it.

I recently shared my love for art journaling with a good friend. She felt art wasn’t her thing. But she was brave and tried it. Today she went to Joann’s and bought markers to expand her tools for journaling. She is loving it and finding it very calming and good for mental clarity and focus. And her art is improving!

If you don’t know where to start, look outdoors for one thing that makes you happy. Or search the Internet for inspiration by typing a word and browsing images. Try drawing that one thing. I prefer working on smaller pieces of paper. They don’t feel as daunting. Just get something down on paper. No judgement. No worries about perfection. Or watch some YouTube videos and try your hand at painting, or scrapbooking or knitting or crochet. Whatever it is…I encourage you to just TRY It!

That should be my official motto for this time in my life.  “Just try it”. Don’t let your creative dreams stay forever a dream. Take one step toward that dream. One step at a time and you just may get there.

rughooking

Rug hooking

Anything else you want to add about creativity or what you do?

I believe that everyone should discover what makes their heart sing, and I have discovered that creating beautiful things does that for me. I believe creativity is a healthy part of a well rounded life. If knitting and painting aren’t your thing, maybe you could be a creative cook, or gardener, or find creative ways to enrich the lives of co-workers. Being creative is about expanding your world and adding joy to life. That’s something everyone can benefit from.

And I believe we should exhaust ourselves in this life, chasing the dreams God has put in our hearts. We all should be in the business of discovering every bit of who God made us to be. You are uniquely and wonderfully made. You look just like your Daddy in Heaven and He is creative and so are YOU! He wants you to fill a special role on this earth that only you can fill. He wants your heart to fly and soar. So don’t emulate anyone but the Creator and who He made YOU to be. His life for you will always be the best life possible!

artjournaling

A page from Linda’s art journal inspired by a verse in Isaiah

Thank you so much Stoneybrooke for sharing yourself and your creativity with us! You are amazing.

You can follow Linda and her daughter, Brianne, through their blog at www.knitworthypodcast.com and through their Knitworthy Ravelry group. Check them out on itunes and Youtube.

Read the first three posts about Linda and Stoneybrooke:
Interview With Stoneybrooke (Introduction)
Interview With Stoneybrooke (Podcast)
Interview With Stoneybrooke (Generosity)

Interview with Stoneybrooke (Generosity)

I am happy to share with you several posts about a great friend of mine, Linda Lee. I first met Linda when her son came to our Junior High class when we were youth pastors at church several years ago. She started helping out and began bringing crafts for the girls to do before service started. The girls (and some of the boys) loved it! She is a beautiful, giving person who LOVES being creative. I have loved seeing her share her different mediums of art and creativity, and I hope you enjoy taking a little peek into her life too.

This is the third of a series of posts featuring Linda Lee, AKA, Stoneybrooke.

LindaMom

Linda has a special relationship with her mom who now has dementia. Linda makes and sends postcards for her each week that share memories that she has of her mom. These are a couple postcards she has made.

postcard

Linda’s mom’s ham and white bean soup always makes her think of Fall.

sheepdrawing

Linda also helps with her mom’s bills and altered this composition book to help keep track of everything. That is a picture of her beautiful momma on it.

bookofmom

What a special way to stay connected to a family member.

Linda has a giving heart and has used her creativity in ways to bless others in her life and even people she doesn’t know.

Tell us a little about how you are using your creativity to help others.

Knitters are known for being generous people. Thousands of hats and scarves are donated each year to worthy causes who collect for those in need. This year our podcast did a charity drive in which participants were encouraged to choose a charity to craft for.  

In my search for a cause that touched my heart, I came across the need for sleeping mats for people who are living rough outdoors. Across the country, crocheters and weavers are turning discarded grocery sacks into plastic yarn “plarn” and turning that yarn into a mat that will put a layer between the recipient and the cold ground. It takes more than 700 grocery sacks to make one mat! It helps someone in need and it gets those bags out of the landfill.  It took me about 2.5 months to finish one mat and I will begin another one next week.

I have also knit about 30 hats for preemies and newborns this year. Many hospitals love to have handmade hats for their babies so that families feel cared for when they are in the hospital. Sick kids are a cause that is close to my heart. Brianne’s son, Owen who is 11, was diagnosed with cancer when he was 8, and has gone through 2.5 years of chemo. We know what it is like to be in a hospital with a very sick kid. Any kindness means so very much when your kids are sick.

sleepingmat

Isaac holding up an in progress mat for the homeless

We will have on more post about Linda coming up, so get ready!

Interview with Stoneybrooke (Podcast)

I am happy to share with you several posts about a great friend of mine, Linda Lee. I first met Linda when her son came to our Junior High class when we were youth pastors at church several years ago. She started helping out and began bringing crafts for the girls to do before service started. The girls (and some of the boys) loved it! She is a beautiful, giving person who LOVES being creative. I have loved seeing her share her different mediums of art and creativity, and I hope you enjoy taking a little peek into her life too.

This is the second of a series of posts featuring Linda Lee, AKA, Stoneybrooke.

lindaandbrianne

Tell us about your podcast with your daughter and how it got started?

Podcasting was on my bucket list.  Brianne introduced me to podcasts a few years ago and I was hooked. They are the modern day equivalent to a “sewing bee” where you gather to do handwork and get to know one another.  They appeal to me because I am an introvert. Probably hard to tell from this interview, but I am. I am not likely to join a guild or attend a weekly group because it’s hard work for me and because I often have to cancel things because of migraines. It makes it hard to develop friendships when you are hard to count on. But podcasts are viewed at times that are convenient and you can interact when you feel ready. It has opened up a whole world of new social opportunities for me that never existed before.

Our podcast is called the Knitworthy Podcast. “Knitworthy” is a term of endearment in the fiber world. It means you are worth knitting for, because you will value the gift, and treasure the heart it was given with. You can be sure that if someone considers you “Knitworthy”, worthy of spending countless hours, weeks and sometimes months of their free time laboring over a complex pattern and tiny needles to create something for you, then you are truly LOVED my friend. A piece of that crafter’s heart has been wrapped into each stitch. And that is the name Brianne and I decided to take when we started video podcasting over a year ago, because the podcast is our gift of love to the knitting community.

You can find us on Ravelry, YouTube and ITunes. We also have a blog at www.knitworthypodcast.com

Linda has some FREE tag pdf’s for you to download on their website:

journaling
So every few weeks, we put out a new video podcast and invite subscribers to join us for an hour or so. You grab your knitting and turn on the podcast and you are immediately part of a group. We laugh. We cry. We talk about what we are working on. We talk about great products we find and whatever else is on our heart. We are by no means a slick operation. Think homespun and real. Luckily, we hear that’s what our podcast friends like.

And the interaction goes both ways. People comment and interact after watching an episode. That part of the interaction happens in our Knitworthy group on ravelry.com. We also host knit alongs and craft alongs there and draw prizes just for participating.

And it’s fun because Brianne and I do it together! It’s fun sharing common interests. And we are making new friends at the same time. Gotta love that.

A recent podcast episode took us to FiberU in Lebanon, Mo for a day  of classes and shopping for yarn and fiber. Then on the way home, Hurts Donuts. Yum!

donuts
lindadonuts

How did you cultivate creativity in your kids while they grew up? 

I’m curious as to how my kids might respond to this?

But I would say I exposed them to play dough, crayons, scissors, markers, paint and journaling which are obvious exercises in creativity. But even more than that, I didn’t take responsibility for filling or planning their free time. I grew up hearing that “I’m bored” is the best way to get more chores assigned to you. So I taught my kids to learn to be creative and use the smart brain God gave them to imagine fun things to do. I might suggest one or two things but I wanted them to learn the art of how to imagine fun things to do on their own. I know it worked for me because I am NEVER bored.

grandkids

Washi tape mustaches with the grandkids

With the grandkids, when I am lucky enough to have a play date with them, I always try to choose a new type of craft or art activity for us to try together. I have lots of craft supplies I’ve gathered over the years, so it is my joy to share my love for art with them.

Cousins

Linda son, Isaac, with his cousins

podcastselfie

Linda and Brianne

We will share more about Linda in the next post. You can read our first post about Linda here.

Interview with Stoneybrooke (Introduction)

I am happy to share with you several posts about a great friend of mine, Linda Lee. I first met Linda when her son came to our Junior High class when we were youth pastors at church several years ago. She started helping out and began bringing crafts for the girls to do before service started. The girls (and some of the boys) loved it! She is a beautiful, giving person who LOVES being creative. I have loved seeing her share her different mediums of art and creativity, and I hope you enjoy taking a little peek into her life too.

This is the first of a series of posts featuring Linda Lee, AKA, Stoneybrooke.

lindandjon

Linda Lee with her Husband, Jon

Who are you?  Describe yourself as a person and as a creative.

Hello! I’m Linda, a reformed perfectionist who is discovering her inner dreamer. I am a Purple Hat Society member in principle, but I’m not into joining clubs. I am the forever loved daughter of my Daddy in Heaven. I’m a lucky wife, who is still madly in love with my high school sweetheart. I am blessed beyond measure to be the mother of four amazing people, that I admire. I am also a spoiled grandma to four sweet grandchildren that keep me a kid at heart.

lindadaughters

Linda with her daughters, Brianne and Heather


boys

Linda’s sons, Jared and Isaac

At 57 years of age, I still think of myself as a student. I would say I am a naturally curious person. I LOVE learning new things, which is handy when the computer crashes or when I’m taking on a new interest in watercolor painting. However, my son in law would agree there is a dangerous down side to my natural curiosity. He remembers our first meeting so much differently than I do. I remember that I was simply delightful and charming, but he recalls the event as akin to an inquisition. Rest assured I have since tried to reign in my curiosity in social settings. Lol

But my curiosity is fully engaged when it comes to anything artistic and creative. I’d say I’m happiest when I’m creating. I can’t get enough of it. I pin ideas with reckless abandon. I fill journal books full of creative ideas I want to try. Most loved ones have received handmade gifts from me. My favorite chair looks like a workshop because it’s where I so often try out my ideas. I work on creative projects daily and until late into the evening. You will rarely find me without a creative project in my hands or in my purse. In fact, my hands are rarely idle.

How did you become known as Stoneybrooke?

I have a name that is so common that using my name on the internet wasn’t an option. So creating an online name was like a fresh start. It was a unique new way to describe the creative side of myself. I also dreamed of opening an Etsy store some day, so I wanted my name to be something I’d like to see on my handmade product tags.

After a lot of thought, I came up with the name Stoneybrooke Cottage. It’s an imaginary place, but it evokes the feeling I have when I create. I see it as a cozy English country cottage with a garden, and a comfy crafting chair snuggled up next to a charming fireplace. It has the best well stocked art supply closet ever! And it’s nestled alongside a stoney brook where I can look out the window and and be inspired by panoramic views of mountains, trees and wildlife. Silly perhaps, but it makes me happy and some things in life should exist just because they make us happy.

How did you first get started with fiber arts?

These days I am knee deep in fiber!  Sheep, alpaca, rabbit, silk, bamboo. You name it, I want to dye it, spin it, and knit it. And I blame it all on my oldest daughter, Brianne!

lindaandbrianneI’m sure everyone is familiar with “Comfort Eating.” Well Brianne taught me about “Comfort Crafting.” I was there the day my sweet Brianne heard the hardest words a Mom will ever hear… “There is no heartbeat.” This loss was another in series of losses that broke our heart and challenged our faith. In my determination to walk with her through this, I asked her “what can we do that would feel comforting right now?” She said she wanted to go look around our local yarn shop.

A local yarn shop? I had never been to one. Didn’t know they existed and frankly I couldn’t imagine why yarn would be preferable to Haagen Daas but I went along just to be supportive. When we entered the store, it was awash in an array of gorgeous colors, comfy seating, and friendly people. Everything was soooo soft and they encouraged you to touch. I left that day with beautiful yarn, knitting needles and a passion that hasn’t waned in 9 years.

studiomannequin

Mannequin in Linda’s studio wearing a handknit shawl by Brianne

Knitting and spinning yarn are big favorites, of course.  They are a core creative outlet for me.
handknittedsock

Handknit sock, handspun hard, and needle punched rug coaster

spinner

My Hansen’s espinner. Linda used to have an Ashford traditional spinning wheel, but the pedaling became too difficult for her. So show now uses an electric spinner.

YarnFest

Working Yarn Fest in Colorado this year. A National fiber lovers convention.

alpacafarm

A day trip to local alpaca farm, Whirlwind Ranch in Lebanon Mo

SpinningGreats

Linda with 3 greats in the world of spinning: Abby Franquemont, Maggie Casey, and Peggy Doney

And may I take a moment to stand up for knitters and crocheters everywhere? We aren’t all little old grandmas knitting and rocking on the front porch. Well ok, I AM, but not everybody is like me. Fiber people are young moms who happily spin at the park while the kids play, or teenage girls who love to knit at the movies. They may have purple hair and tattoos and crochet toys, or wear sophisticated New York black and hand dye fabulous yarn. They are scholars and 5 year olds. They are nerds and famous people. They are even men. They are athletes and couch potatoes.  They are healthy and they are dealing with chronic pain. Some are drawn to the fiber arts for its connection to simpler times and centuries of textile traditions. Some appreciate connecting to the process of fully appreciating where our clothing comes from, from sheep to sweater. And some are cutting edge artists turning fiber into contemporary works of art. We are a diverse group for sure. So if you knit or crochet, you can stand tall!

This is only a small glimpse into Linda’s world of creativity. Stay tuned for the next part of our interview with Linda where we talk about her podcast with her daughter, Brianne.

Packing Tape Images

Do you want to try a little magic?

Find an image in a magazine and tear it out.
Place a strip (or strips) of packing tape over the image and rub hard to adhere the packing tape to the magazine page.
Place your taped image into a bowl of warm water and let sit for a few minutes. Then begin rubbing the paper gently off the back side of the tape.
When you have rubbed all the paper off, PRESTO!… you have a transparent image of your original magazine picture!

I know, it doesn’t make sense, but it works. You can also try the same procedure on photocopies and laser printed images, but inkjet prints won’t work (so they say…I have not tried any of those yet!) This video explains the whole process.

The art challenge for the first week of September in the Documented Life Project was to do a photo transfer with the journaling prompt: From here to there.

I found a beautiful waterfall picture in a magazine for my background. I did not make a transfer of this image though. I just used it for the background of my page, adding gesso to soften the edges. I did make packing tape transfers of two other images I found in magazines of ballet dancers.

Tape-Photo-Transfers-Mixed-Media

When Melinda was a young girl, she took ballet classes, but stopped as a young teen. She tells the story of her experience dancing as a child and how she started ballet again as a young mom in this post. She dreamed of being able to dance on pointe and was given the opportunity a few weeks ago and loves it! I am proud of her for her willingness to pursue her creativity in dance and fulfill a dream.

Ballerinas

I used a white pen and a ballerina stencil to add three fairy ballerinas to the top of the waterfall. At the bottom of the page I covered the magazine text with blue paint and wrote ballet dance terms in pencil, then stenciled ballet shoes on top.

Photo-Transfers-Tape

Making Cards With DIY Printed Papers

Our previous post showed you how to make bubble printed paper. Here are some cards I made using some of those prints:

Flower-Card

Butterfly Birthday-card

Thank-you-cardWhale-CardButterfly-card

The butterflies and other doodles were inspired by Sakura’s drawing tutorials. (They offer free downloads for you to practice with.) The whale was stamped and heat embossed.

Start blowing paint bubbles today and make your own unique paper!

Painting With Bubbles

Do you like to blow bubbles? Try this simple creative activity to “print” paper with paint bubbles. Bubble-Painting

Inspired by this post from Alisa Burke, we made several jars of bubble paint using water, acrylic paint, and dish soap. (I use a natural low sudsing dish soap, so added a couple drops of bubble bath to get more bubbles.)
Paint-BubblesMix the paint, water and dish soap together, grab a straw and start blowing bubbles. When there are enough bubbles piled up over the top of the jar, pull out the straw and lay a piece of paper over the bubbles (we used white card stock.) I also saved and dried the paper towels from under the jars for… well, you never know when you might need colorful painted pieces of paper towel for a project!
Bubble-Print-1 Bubble-Print-2 Bubble-Print-3 Bubble-Print-4

The grandkids enjoyed “painting” bubbles though the younger ones (3 and 4 yr olds) wanted me to blow the bubbles for them. I think they were concerned they might suck the paint instead of blowing it. When the kids were finished I made a pile of bubble prints for myself. I will admit, it was fun! What will I do with the papers I printed? Perhaps make some cards? Or use pieces in a mixed media collage? Hmmm…

I wonder what kind of prints you could make with chocolate milk?